
A Different Sort of Slow Summer
Folks are always saying that they want a slow and simple life. I think it’s one of the reasons why tiny house + camper living have held the attention of the public in such a tight and tantalizing grip in recent years— the promise of a pared-down life filled with fewer avoidable stresses. The appeal of more time and less noise.
But, as one of Small Space Living’s most enthusiastic cheerleaders, I must say: right now, there is no such thing as slow (at least in the relaxation sense of the word) or simple, no matter the size of your home.
Those who are looking out for one another are either sheltering in their homes for their fifth month, or working in essential positions at their own great risk in order to keep our communities healthy and fed. And while being home is an immense privilege, it’s also an enormous challenge. Even with just one child, the days are exhausting for parents. And as a small business owner, a wave of overwhelm floods every minute of every workday.

This is why our garden-to-kitchen-to-garden habits throughout the summer have been so valuable to me. (Related post: Small Space Gardening to Reduce Anxiety.)

Above: Straw & jar lid from Simply Straws. Jar by Ball.
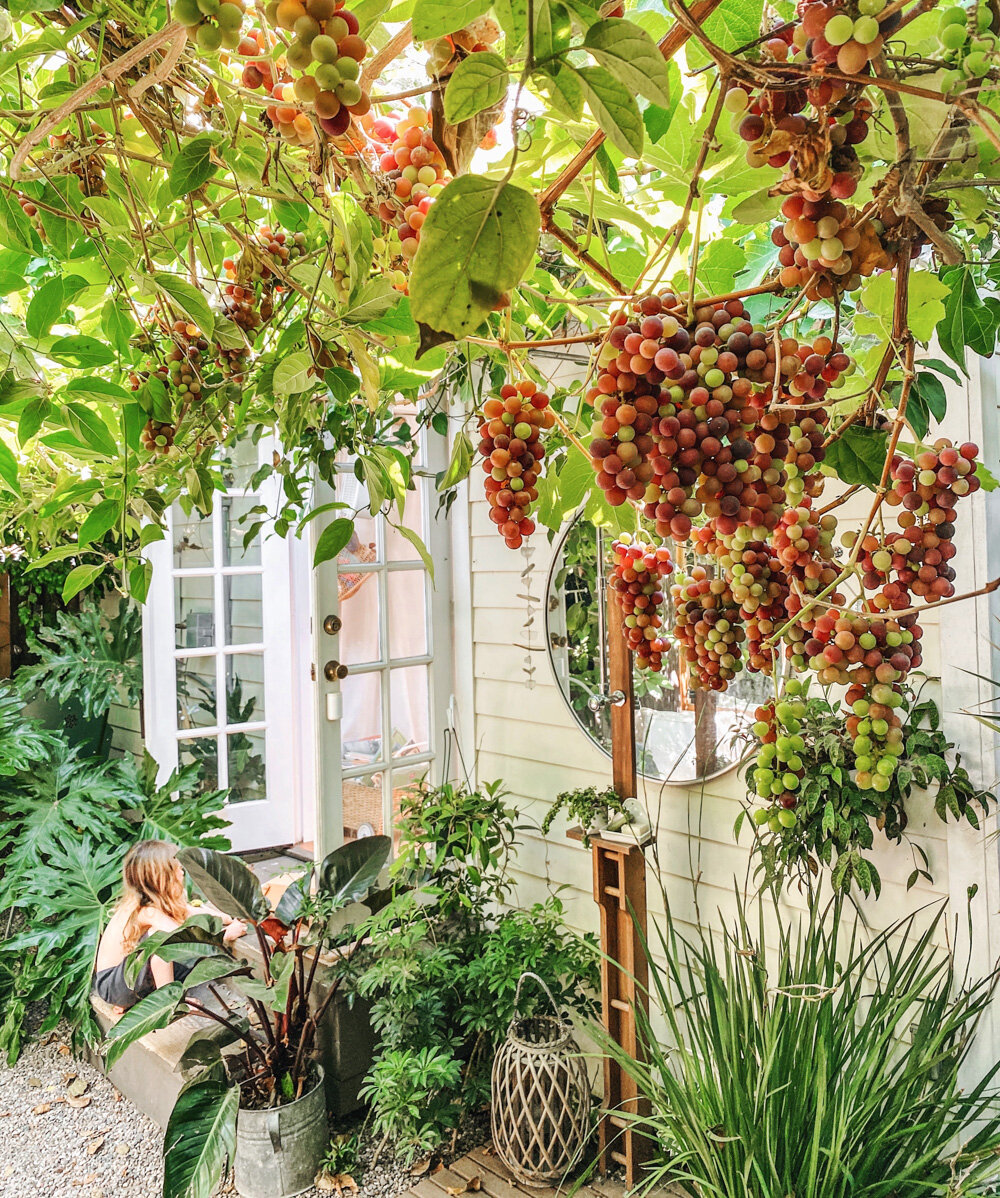
When we need a momentary a break (from running the business, from parenting around the clock, or from the daunting realities we’re facing as a country), we find ourselves shuffling between the small kitchen and tiny wrap-around garden here a the cottage.

The garden and kitchen have begun to blend together as we clip fruits, vegetables and herbs, tote them inside, prep them in one form or another, then return outdoors to enjoy whatever we’ve made as we escape the heat while beneath the vine canopy. (Related post: Our 2020 Grape Harvest.)

Our neighbors have been making sweet grape juice (which we add to our sparkling water) from this year’s Concord harvest.

Above: Vegan Khala & Co food wrap (to replace single-use cling) drying on the rack.
Meanwhile, Adam has started making jam to accompany his weekly batches of sourdough bread.

Above: Adam’s freshly baked bread.
They’re little indulgences that offer impactful satisfaction. They help us— for a moment— regain that feeling of slow and simple. (The good kind of slow.)

Above: Cherries from our weekly CSA box, piled into a handmade ceramic tumbler by Daniel George of Flying Uke Designs.

Bright(er) Lil' Kitchen
This post was sponsored by The Home Depot. All opinions and images are my own. All photos including our son and/or the pups were taken as they happily interacted in their own, natural ways.
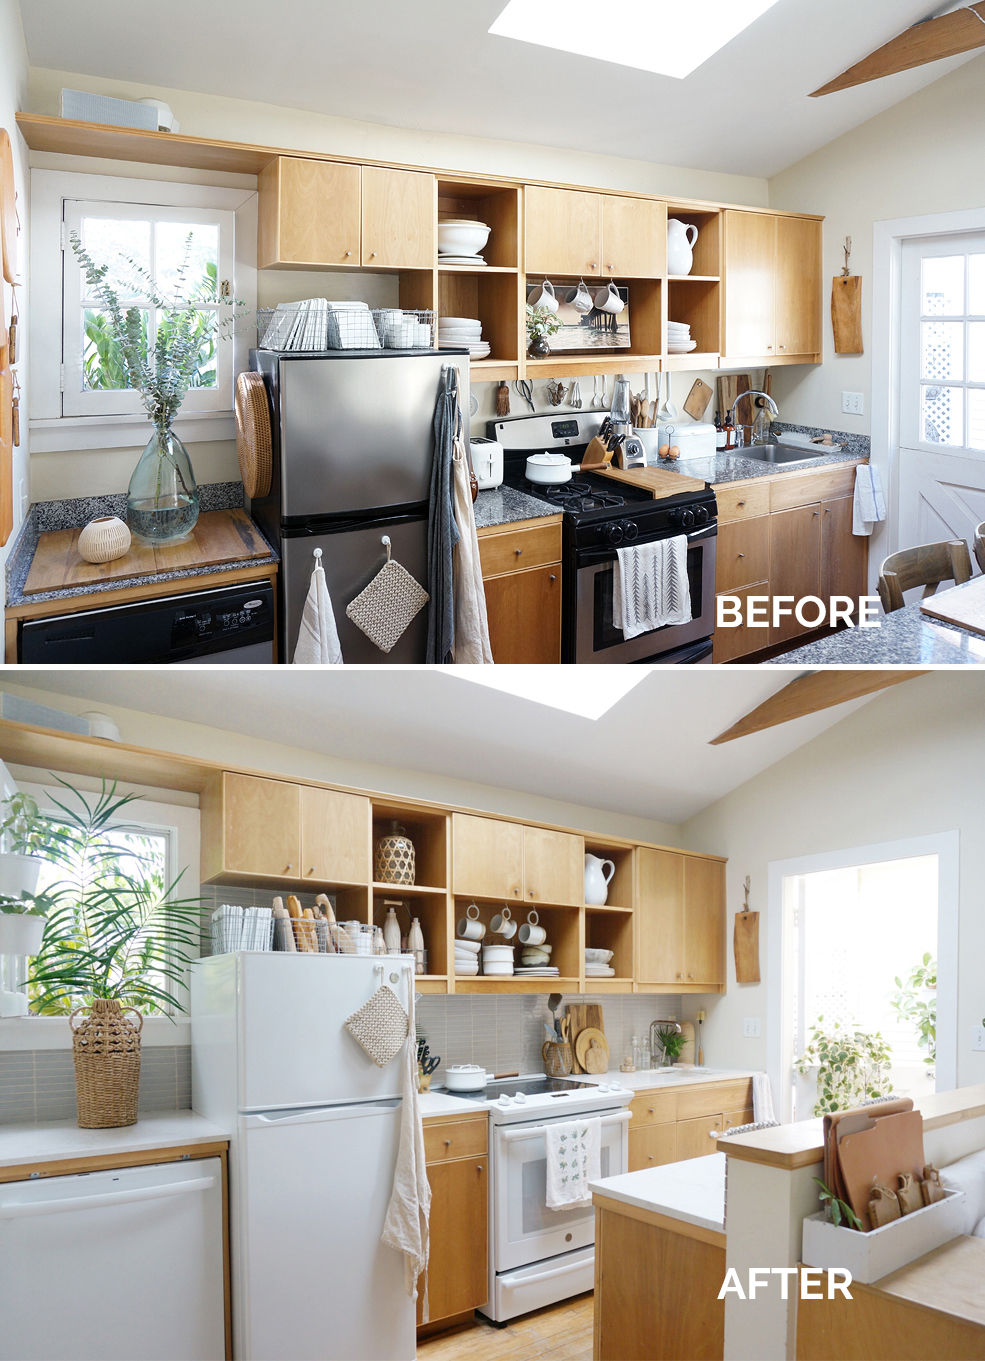
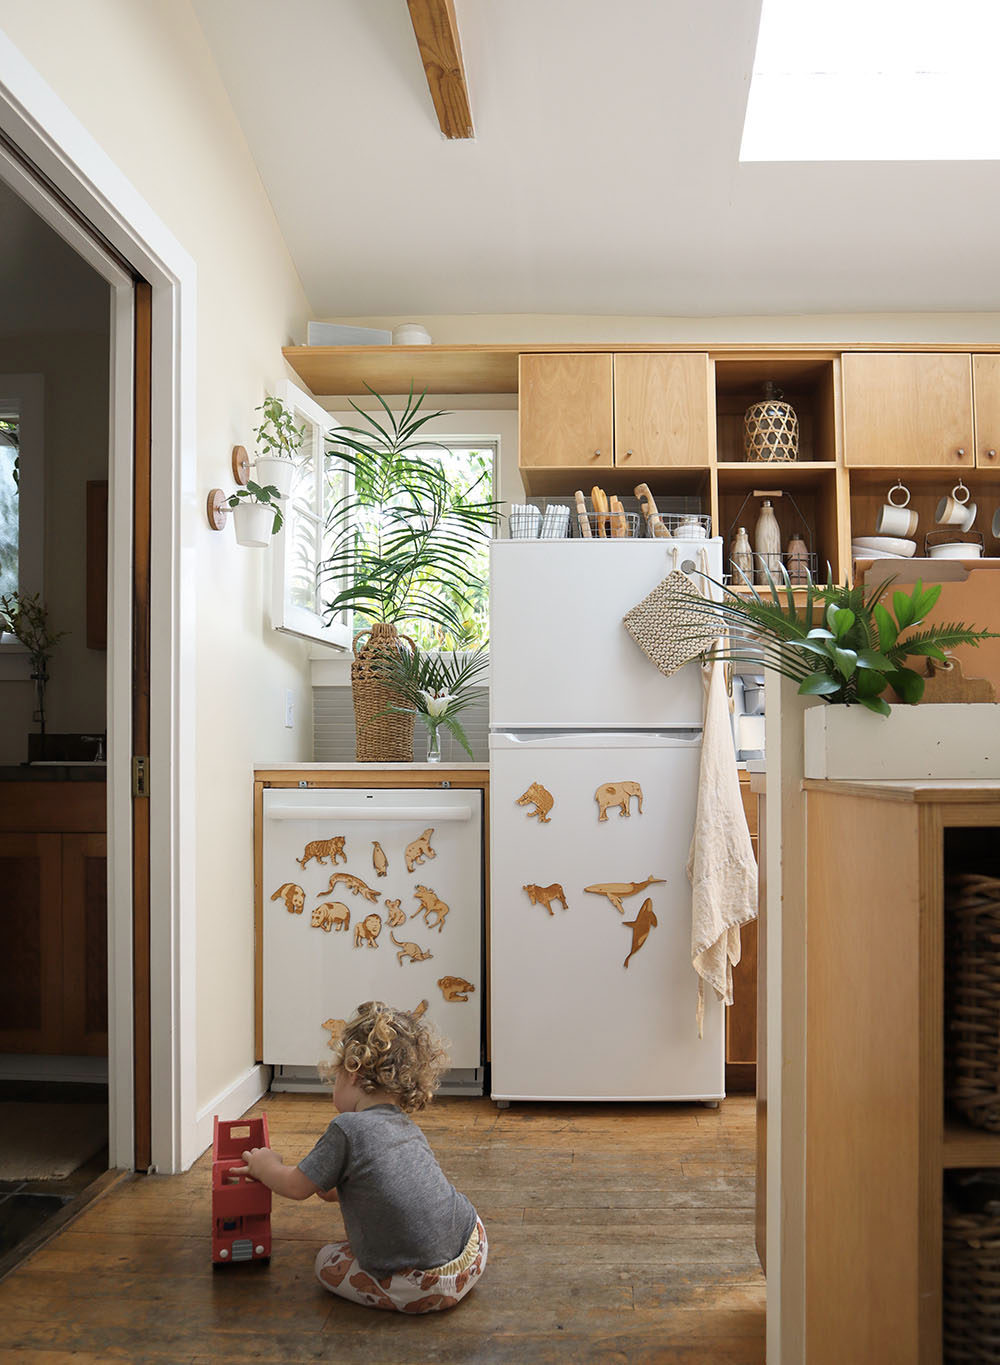
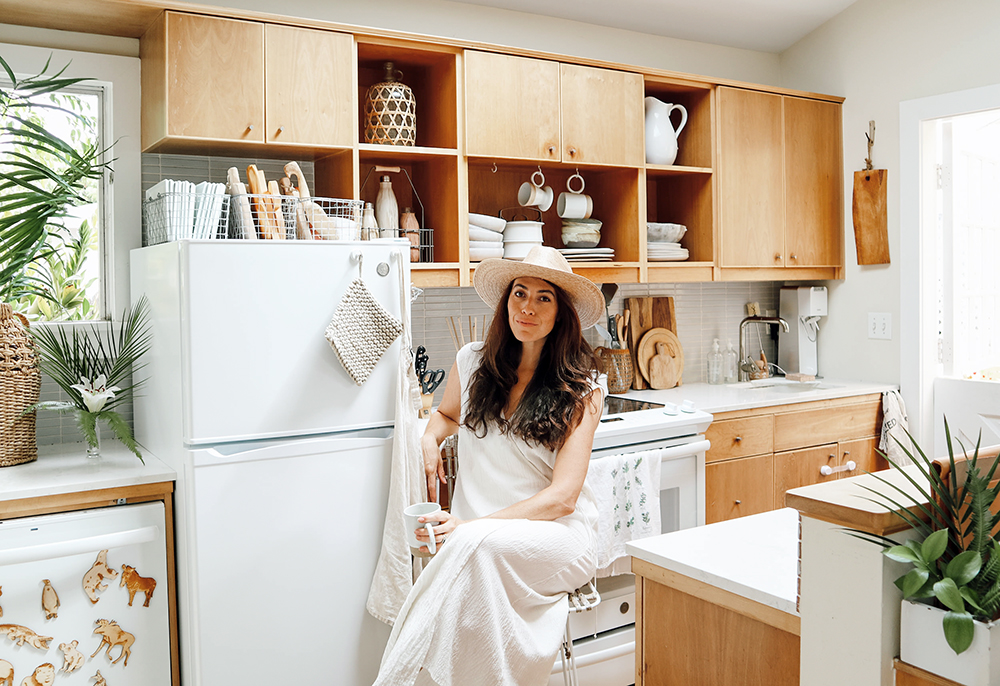
Clearly I love our tiny home. Very rarely do I long for material items or major changes— I’m usually extremely content with what we have, and aim for our belongings to last us a lifetime. One glaring exception to this has, for YEARS, been our major kitchen appliances.
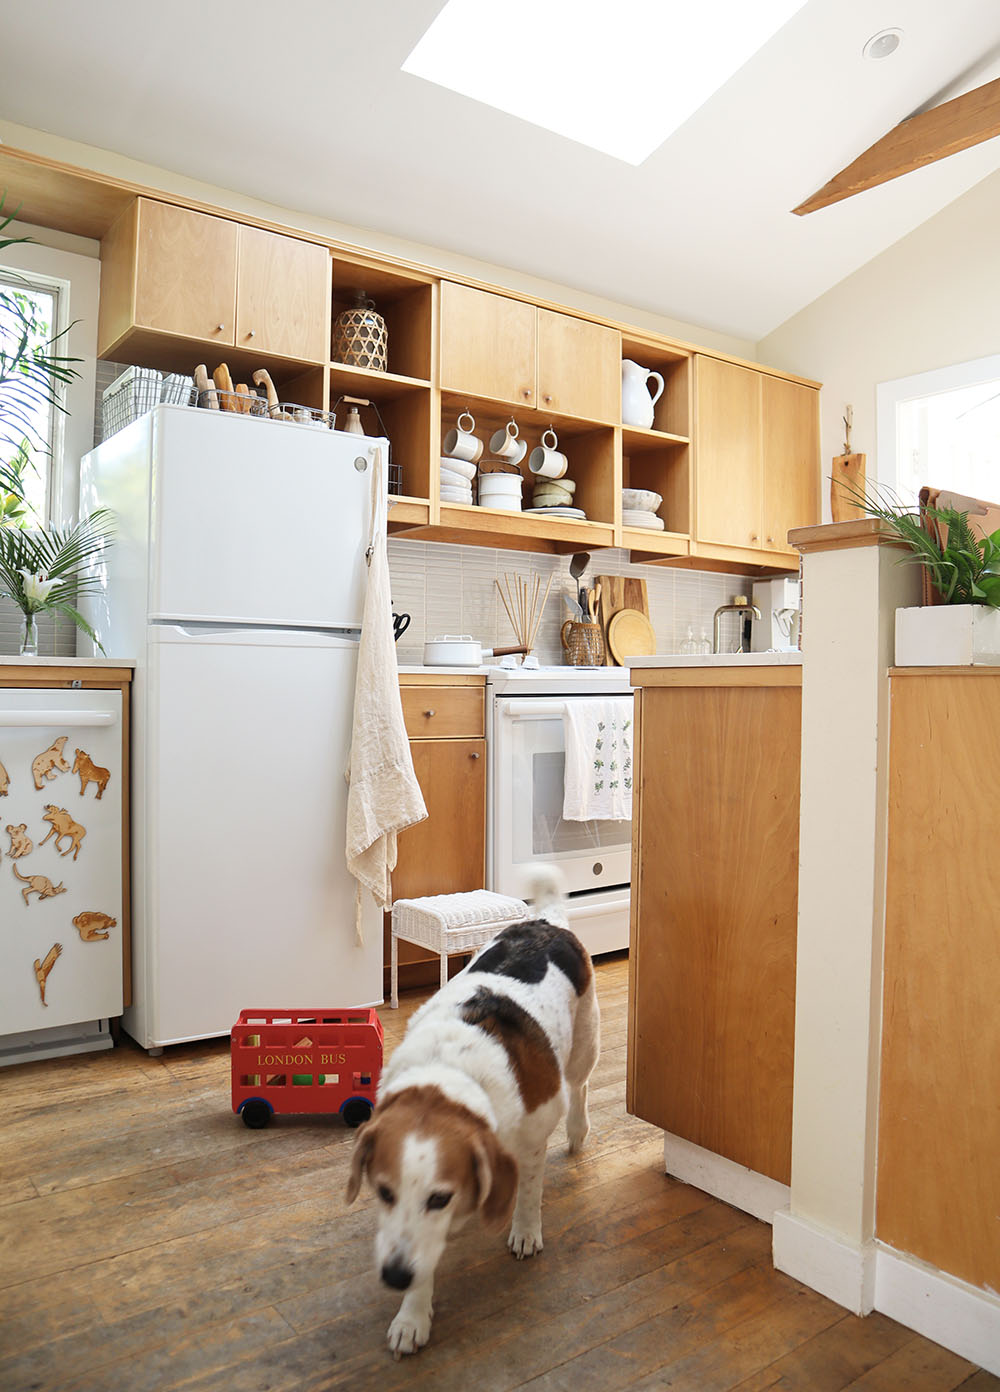
Our refrigerator, range and dishwasher fit our space quite well, but they weren’t the right fit for our style and needs. The fridge had a massive back-coil that consumed several inches of its counter-depth design, rendering the interior smaller than one would expect by looking at it from the outside. And the exterior was black on both sides, which stood in stark contrast to the rest of our airy lil’ home.
Immediately next to the fridge is the dishwasher, which sits about 6’ or so from my desk, and it was so loud that I never wanted to run it. Plus I disliked that the stainless steel cover and large front-panel of buttons were the first details I noticed every time I entered through our front doors.
But the stove was the straw that broke the camel’s back. The electric panel kept dropping out of its frame, and the design wasn’t particularly safe for West. Of course young children should always be supervised in the kitchen, but the compact nature of our space means that our 22 month-old West is constantly passing by the stove. We added safety knob covers on the dials, but our son’s proximity to the flames was an issue— particularly with his unruly curls brushing up against everything. Plus we don’t have a vent in our kitchen. Our ample windows and doors move the air constantly, but our burners were always covered in spatter and stray dog hairs.
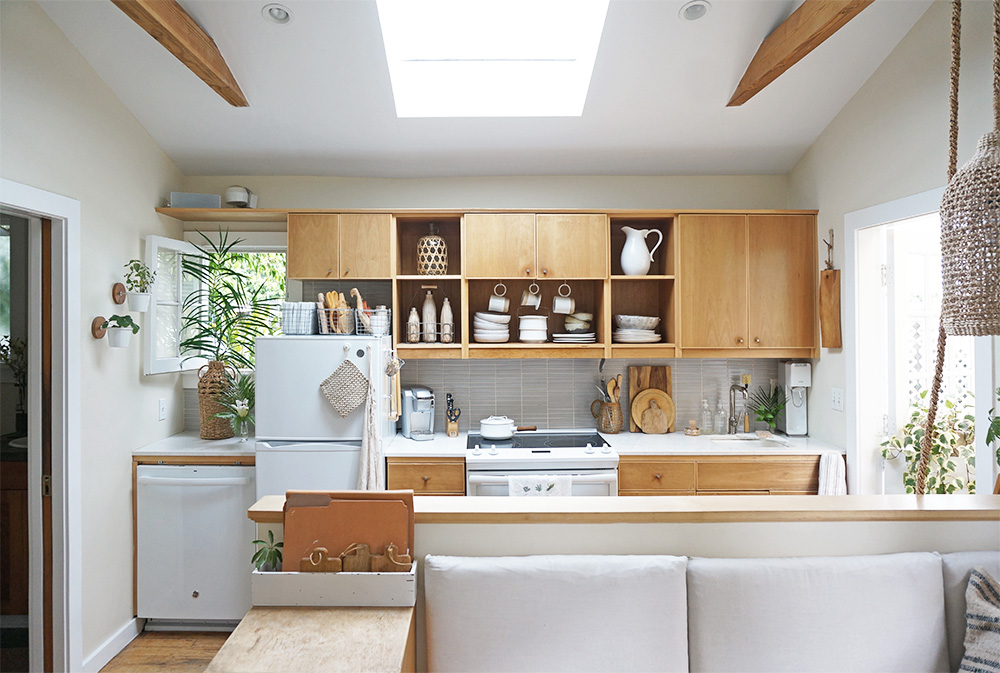
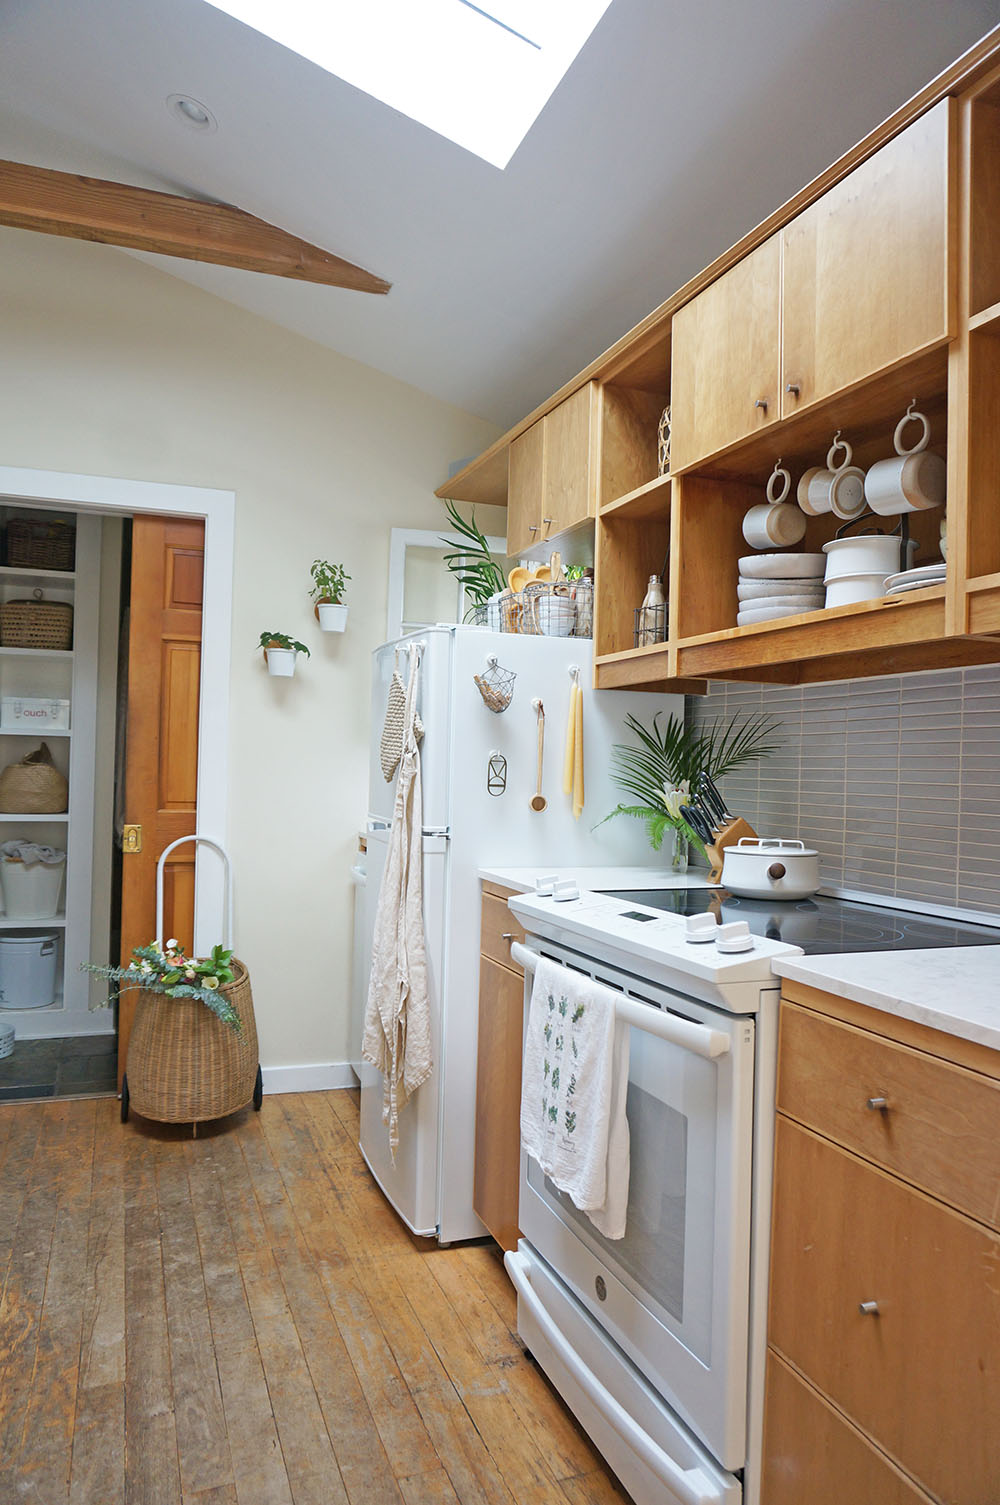
So, in our 7th summer here, we finally swapped out all three appliances. (Hallelujah!) Usually it takes me a while to get used to notable changes in our home— at least a week or so. But I was instantaneously overjoyed with our newest residents: a white GE top control dishwasher, a GE slide-in electric range and self-cleaning convection oven, and a ever-so-slightly deeper but enormously more spacious white GE refrigerator, all from The Home Depot.

The Home Depot delivered and installed the new appliances, and removed the old ones. The entire swap took about an hour, as they had to adjust a few external elements within the kitchen to accommodate the product changes.

The GE refrigerator has the most impact on the space. To have an all-white front and sides changes the look and feel of our entire home, since you can basically see the fridge from almost every point in our miniature home. It’s technically not counter depth, so it sticks out about an inch further than our previous model. But It has far more usable space within it, thanks to the fact that there’s no coil in the back eating up precious inches.
It’s still very compact, allowing us to store dishes in wire mesh baskets up top. (And, thankfully, the baskets no longer rattle, as they did with our old fridge. They sit tight thanks to the steady and quiet nature of this ENERGY STAR appliance.)
The GE top control dishwasher is by far superior to our old one. When I first turned it on, I thought it was broken because it was so quiet. I prefer everything about this machine— from it’s cleanly designed exterior to it’s three user-friendly racks inside. Plus it has wash zones, so we can now wash just a half-load when needed.

Due to the positioning of the dishwasher, it’s visible immediately when you walk in the house, and the white really brightens up (and thus visually enlarges) our space— even at night.
Lastly, the range. We are thrilled with it. I know people get really intense about the gas vs electric debate, and I get it. But our new slide-in electric range and self-cleaning convection oven is designed in such a way that it is significantly safer for West to pass by it in our tiny cottage. (Sophee is another matter—she somehow manages to get onto e-v-e-r-y-t-h-i-n-g.)
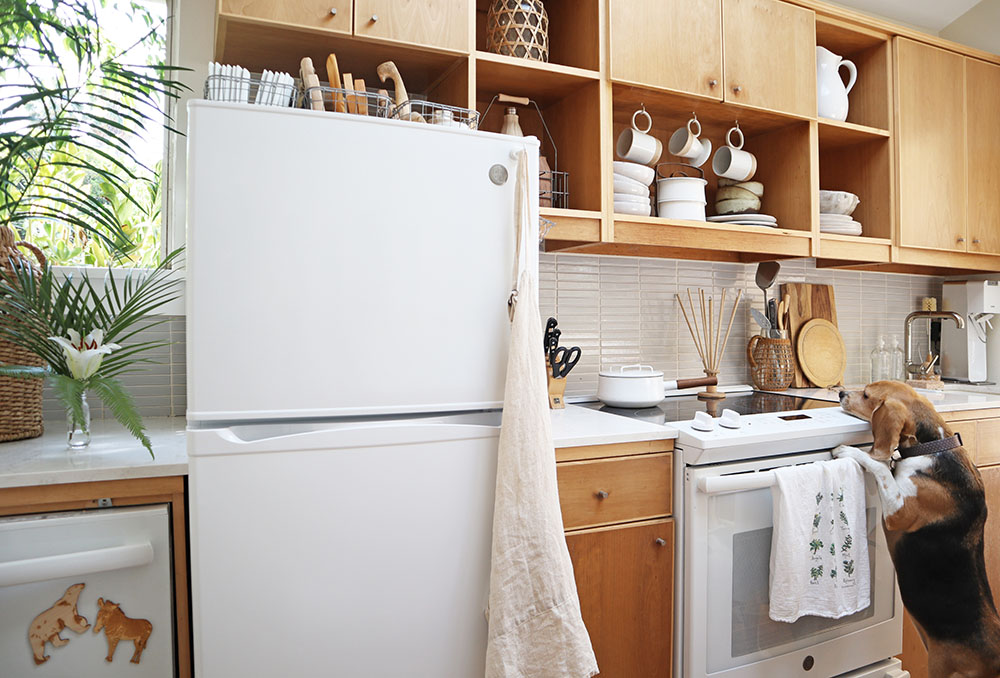
It is SO MUCH EASIER to clean, and there’s no clunky back panel. Folks can continue to grumble over the gas vs electric issue— meanwhile, we’ll be here making eggs on (and clinking glasses by) our cleaner, safer, lighter, and happier lil’ kitchen!

Reusable Bags
Reusable shopping bags are everywhere these days. You're given polypropylene totes in checkout lines, you receive canvas slings for swag at events, and many makers and retailers use drawstring sacks when wrapping their online orders. While it's wonderful that we're no longer requiring and disposing of endless plastic bags, it can be a bit tricky for those of us living in a small space to find a practical place to keep the bulkier, reusable totes. Since these items come into play nearly every day, I thought the topic warranted a post. Here's how I deal with reusable bags and food wraps at the Cottage. Below, I've provided information on the styles I love, were I store them, and how I go about giving some away.

I have three groupings of reusable bags at the cottage, and I organize each category differently, based on their sizes and how I use them:

Market Baskets - I use these for the bulky or heavier duty items-- laundry detergent, beverage cans, oversized branches, beach towels, weekender bags, etc. These stay on display via a coatrack, either inside or on the stoop, depending on the weather. I also hang them on the walls as functional decor from time to time.

Canvas / String Shopping Bags - I have these in multiple sizes, and I use them for everyday groceries and errands. Canvas Shopping Bags - I keep these folded up in a wire, wall-mounted bin. Another bundle of bags stays in the car, and we keep a few in the base West's stroller.

Reusable Bee's Wrap + Sacks - I use these as often as possible in lieu of plastic wrap. They're ideal for sandwiches, baguettes, loaves of bread, and for preserving the freshness of almost anything other than meats. I roll these up when they're not in use and place them in a wire mesh vertical file/folder basket mounted magnetically to the side of the fridge. (Such baskets work well affixed to the inside of kitchen cabinet doors, too.)

EXISTING PLASTIC BAGS - Organizing existing plastic bags in easy-to-reach spots requires minimal time and cost if you simply repurpose select household items. For example, you can always recycle a used tissue box or canning jar to keep shopping or pet bags at the ready:

When (and How) to Give Reusable Bags Away - First off, I love the 4 or 6-compartment wine bags from the grocery store. As my mom pointed out, they're a handy way to safely store (and tote) sandals and flats. For this reason, they are usually the only "freebie" bags that I keep.

The SWAG and retail totes never stay in the Cottage for long. The minute they're empty, I challenge myself to load them up with donations, or I use them as gift wrap for outgoing presents. This can be an effortless way to keep track of how much you're bringing into your home, vs how much you're clearing out.

Compact Drying Solutions
To anyone in a standard size home, the topic of compact drying solutions might seem absurd. But small-space dwellers will know what I mean when I say that finding room to dry dishes, plastic bags, linens, etc. in tight quarters can be a struggle. How do you do it without making your home look like it's in a constant state of soggy chaos?
Between the baby bottles, reusable diapers, reusable cleaning rags, etc., the gross wet stuff piles up quickly here at the Cottage. For a while, Adam and I tried hanging loose items around the house. But since our space is so small, this meant that basically everywhere I looked I was reminded of housework-- plus it was an ugly sight. So I decided to find some quick and simple solutions to the problem.
IN THE KITCHEN
Drying Bottles, Plastic Bags, etc.
After having baby West, we realized why so many people use those Boon Grass drying racks. We don't have enough counter space for a traditional square version, but there are narrow options on the market as well. However, since there's so little spare space by the sink, we were always knocking into items and sending them tumbling over, where they'd get dirty once more. It took a month or so, but we finally found a mix of solutions that work well for us, and help us dry West's bottles and accessories, my pumping supplies, reusable plastic bags, glassware, towels, etc. We have a combination of the following:
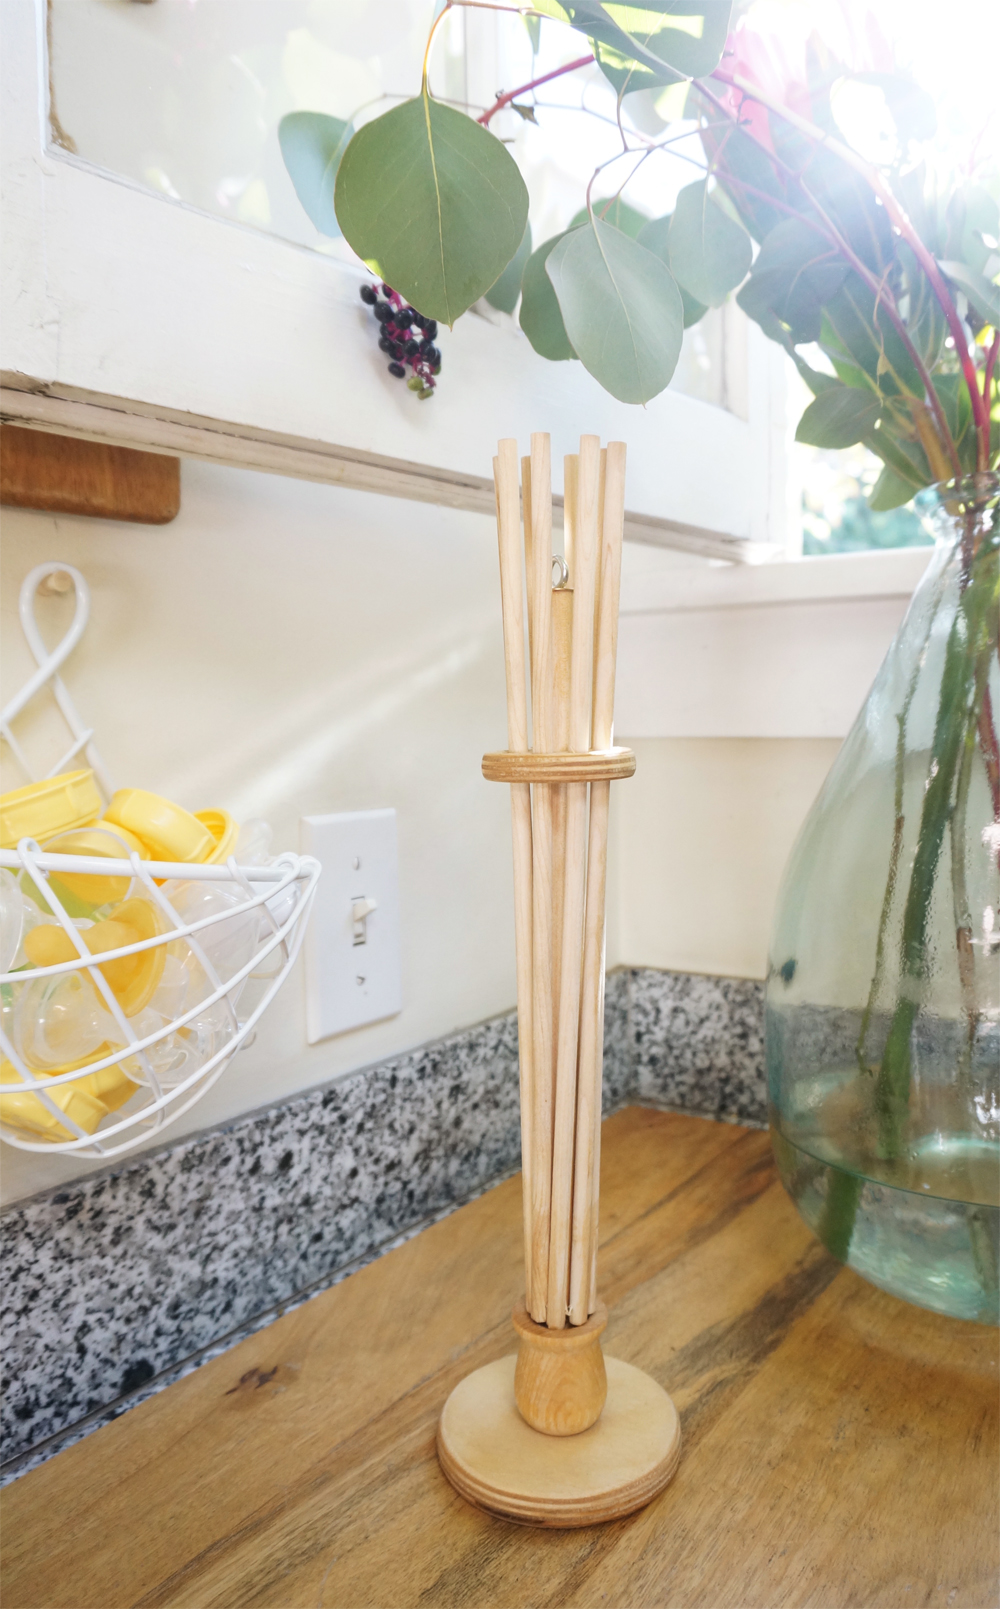
Retractable Wooden Drying Rack (for clean bottles, etc.)
Narrow Glass Drainer / Tray (for the dirty bottles, etc.)
Paper Towel Holder Magnet (for the dish towels we use specifically on baby stuff)
Retractable Over-the-Sink Drying Rack (for food processor parts & larger clean items)
Wall Mounted Baskets (for the miscellaneous little, clean items, such as bottle caps)
Driftwood Accessories Hanger (to help keep baby / vase / cookware (etc) brushes organized and clean)
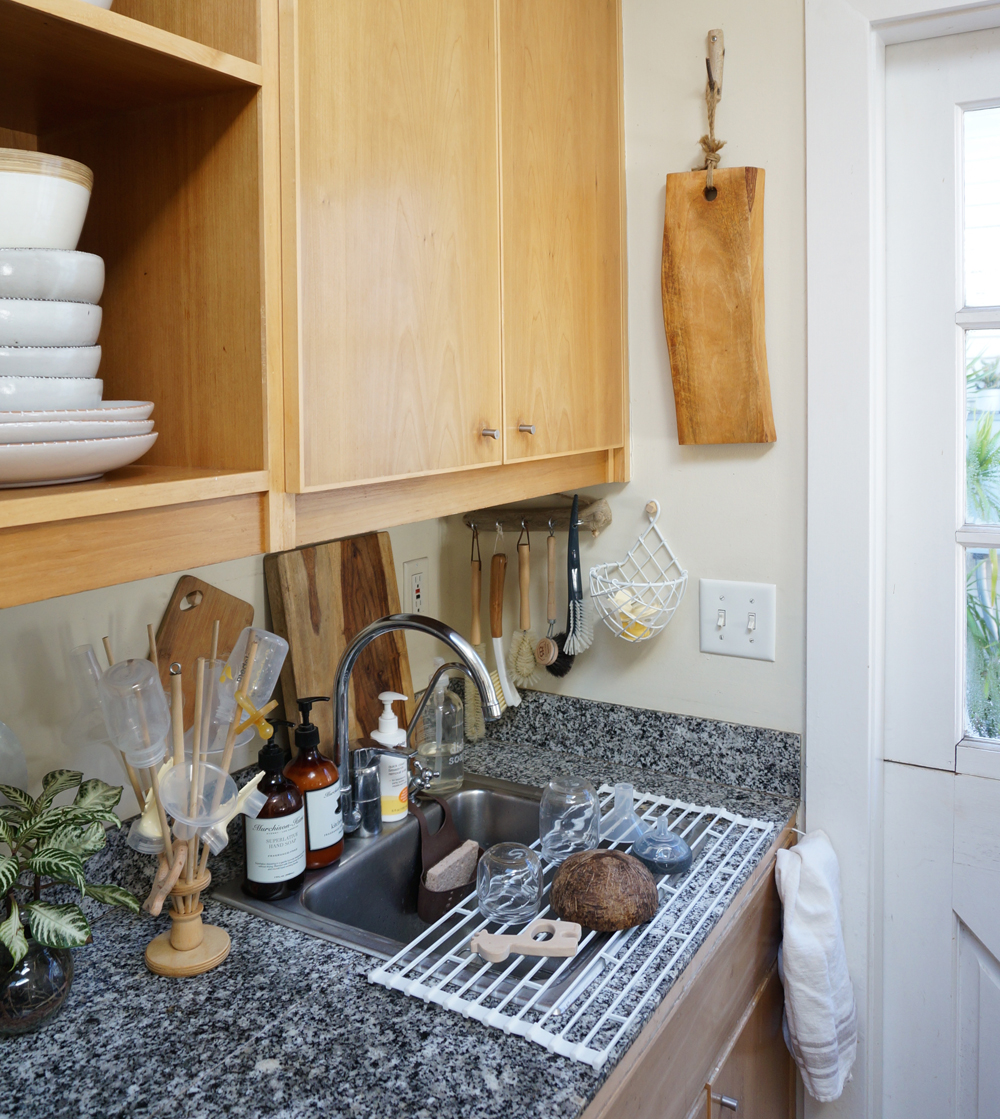
(I cannot wait to replace those countertops.)
This might seem like a lot, but we use each of these items multiple times per day here in our little home/office. The great thing is, the racks fold or roll up and easily when not in use, and can be stowed out of sight.

More small space storage tools. Strong magnets help our wooden coasters air out on the side of the refrigerator.
IN THE NURSERY
Drying Burp Cloths, Used Onesies, etc.
Our entire house looked like a clothing line during the weeks after West's birth. His garments, our clothes, and all of the other linens that got wet and needed a place to dry before being thrown into the hamper for the next round of laundry were draped over every surface possible.
To tame this mess, I simply attached a mesh multi-pocket caddy to the side of the baby's combination changer/bathtub table, and the problem was solved. Now the fabrics can stay in the open air until heading to the washer, without cluttering up our house.

IN THE BATHROOM
Drying Reusable Diapers & Cleaning Rags
We were warned by numerous people that there was no way we could make reusable diapers work in such a small space. But we've had no problem with it! We have a wonderful reusable diapering system by Grovia here at the Cottage. But here was the challenge: in such a small space, where would we place the dirty diapers while we were still actively changing the baby? And then where could we put the diapers after we'd rinsed them off, but before they got properly cleaned?
According to the Grovia website, "the surest way to ruin a diaper is to leave it soiled in a closed, dark, warm pail for several days before washing it. This environment is prime breeding ground for fungi and bacteria. Treat your diapers as you would your own clothing. Soiled diapers should be washed every 2 or 3 days according to manufacturer’s instructions."
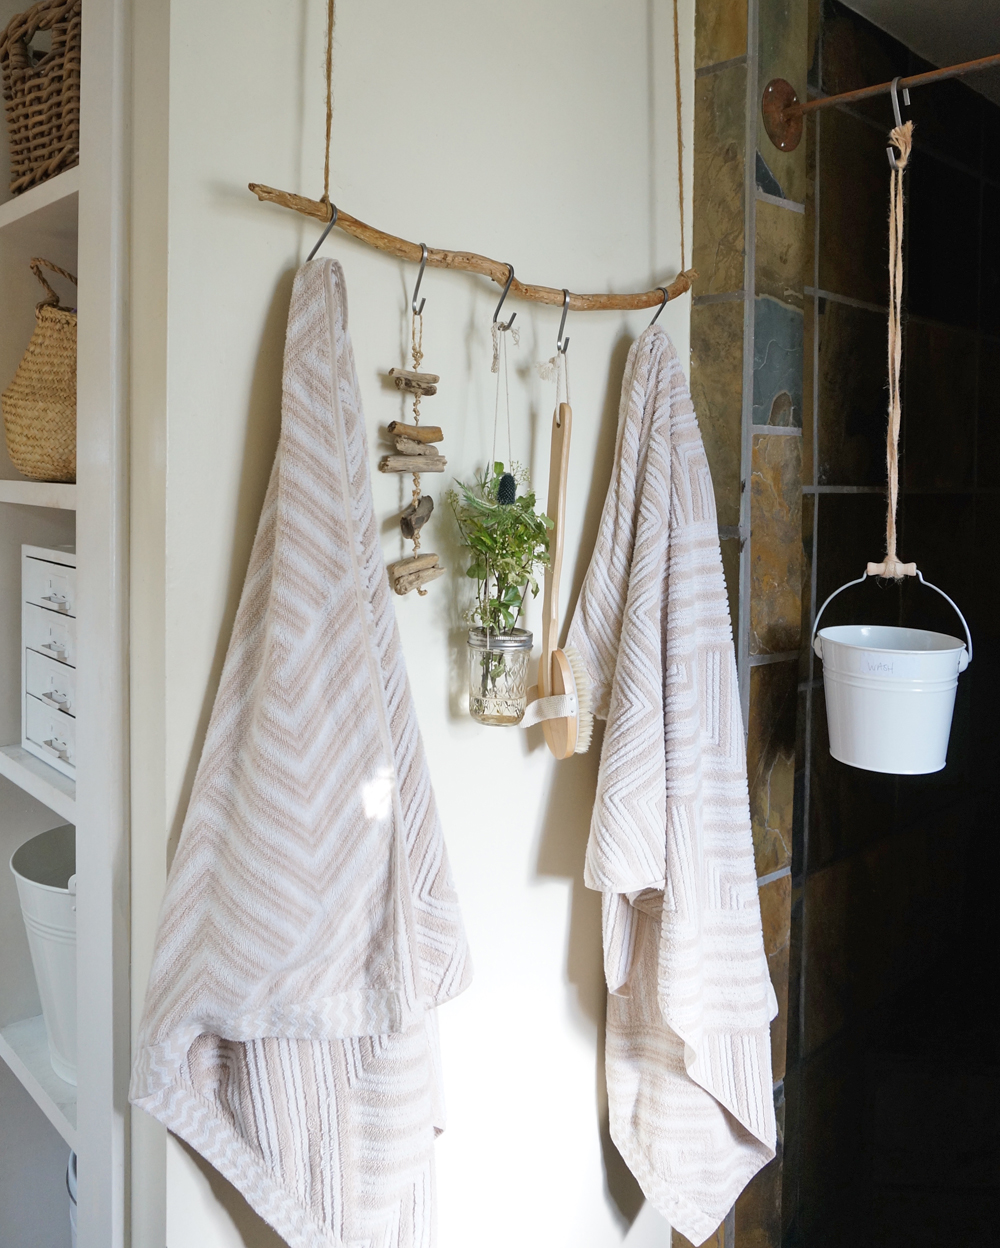
The system that we came up is certainly not glamorous, but it's effective, keeps our surfaces clear, allows the fabrics to breathe while awaiting a full cleaning, and doesn't take up any valuable space. First we use an S-hook to attach a pail to the changing table (see the above photo). That pail holds the dirty diapers while we tend to West. After the baby's diaper is changed and he is safely relocated, we take the bucket to the bathroom and wash the soaker pad off. The rinsed, wet diaper then goes in a second bucket that is suspended from our narrow shower rod (see photo below), and from there it gets fully cleaned.
So that's how we make it work. I know it's not the most pin-worthy topic, but it's these sort of day-to-day hacks that make small-space living doable with a family!