Staying Rightsized (Part 4)
A reminder that we usually don’t need a bigger space— we simply need less stuff, and more creativity.
Staying Rightsized is a weekly photo roundup featuring some of the many space-saving considerations around our cottage. I share this as a reminder that we usually don’t need a bigger space— we simply need less stuff, and more creativity. As minor as some of these moments seem, the little things really do add up, providing more space for navigating daily life within limited or awkward square footage.

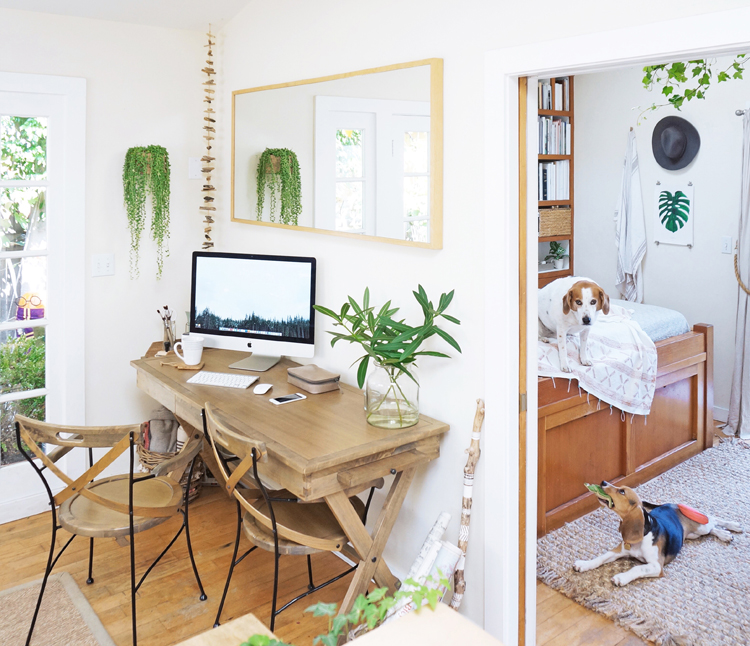
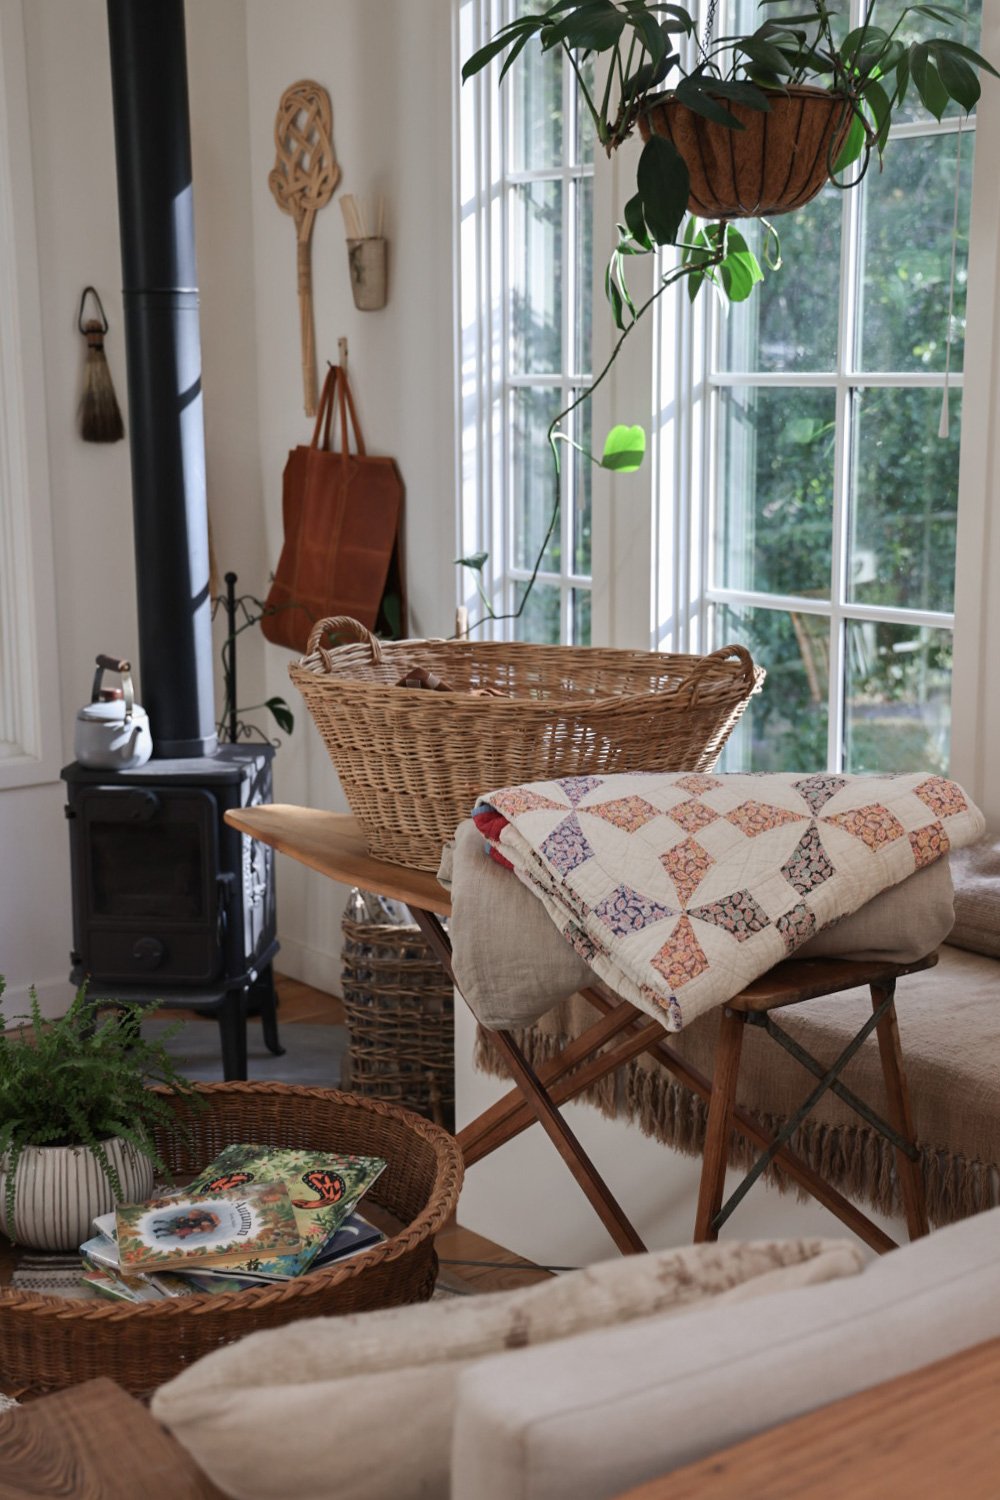
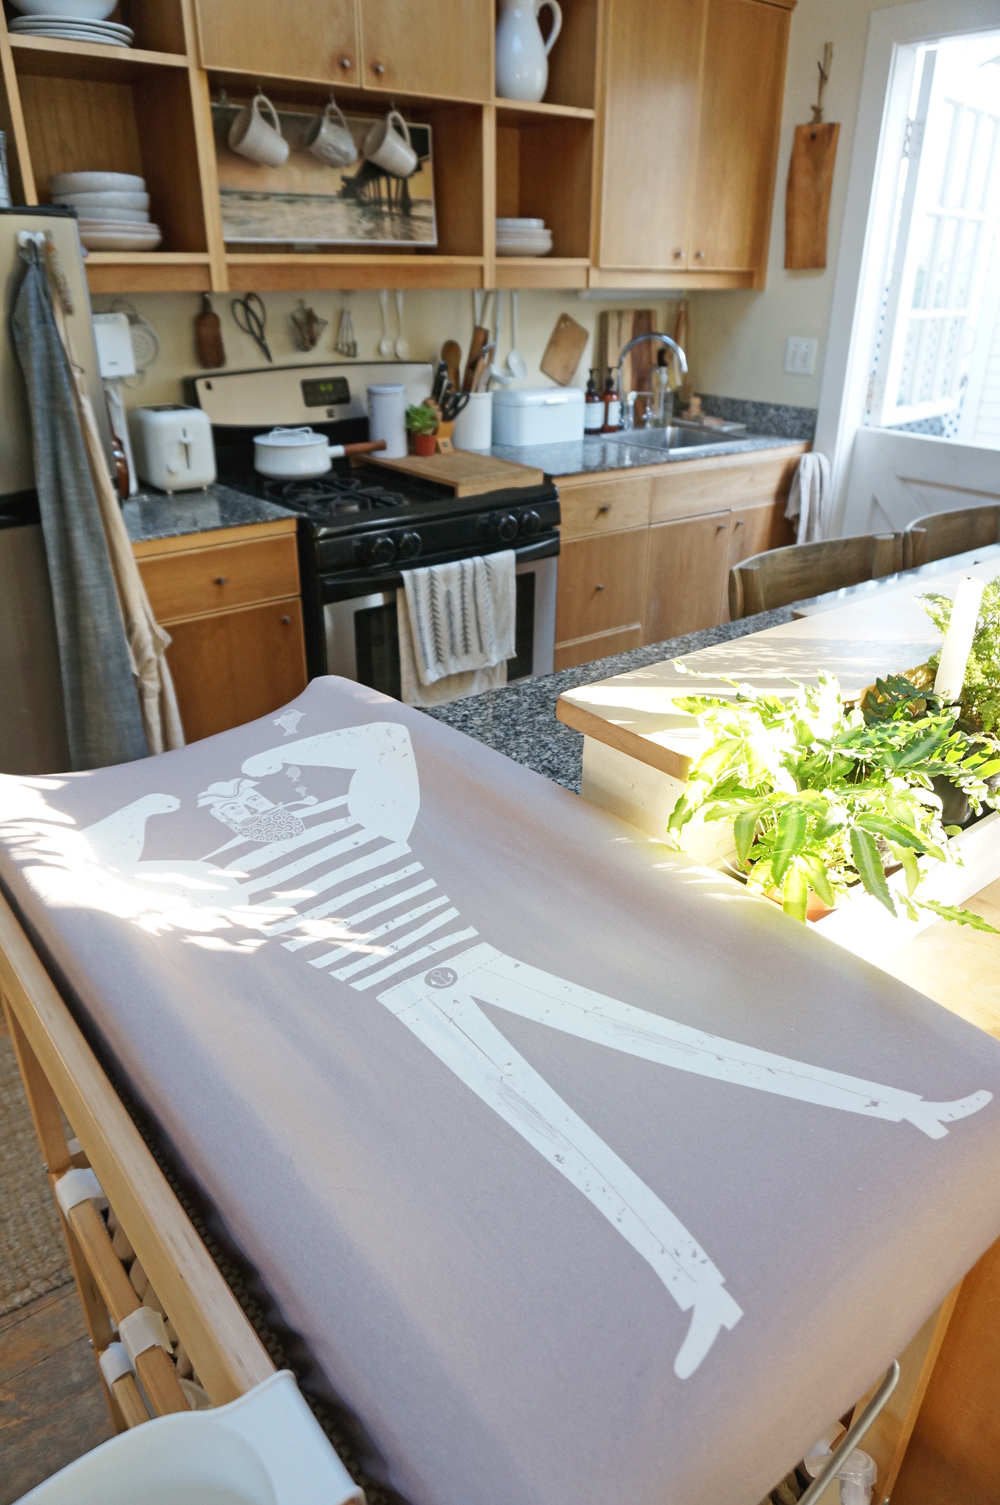
Above: A vintage, folding ironing board provides us with a collapsible, dog hair-free surface for sorting never-ending laundry. (Lately it’s been functioning as a mobile desk as well.)

Above: A swivel-arm, wall-mounted rack holds accessories / functional decor for our 7 year-old, while a lower wall basket keeps art supplies (and magic wands) within reach of both kids.

Staying Rightsized (Part 3)
Because we usually don’t need a bigger space. We simply need less stuff and more creativity.
Staying Rightsized is a weekly photo roundup featuring some of the many space-saving considerations around our cottage. I share this as a reminder that we usually don’t need a bigger space— we simply need less stuff, and more creativity. As minor as some of these moments seem, the little things really do add up, providing more space for navigating daily life within limited or awkward square footage.

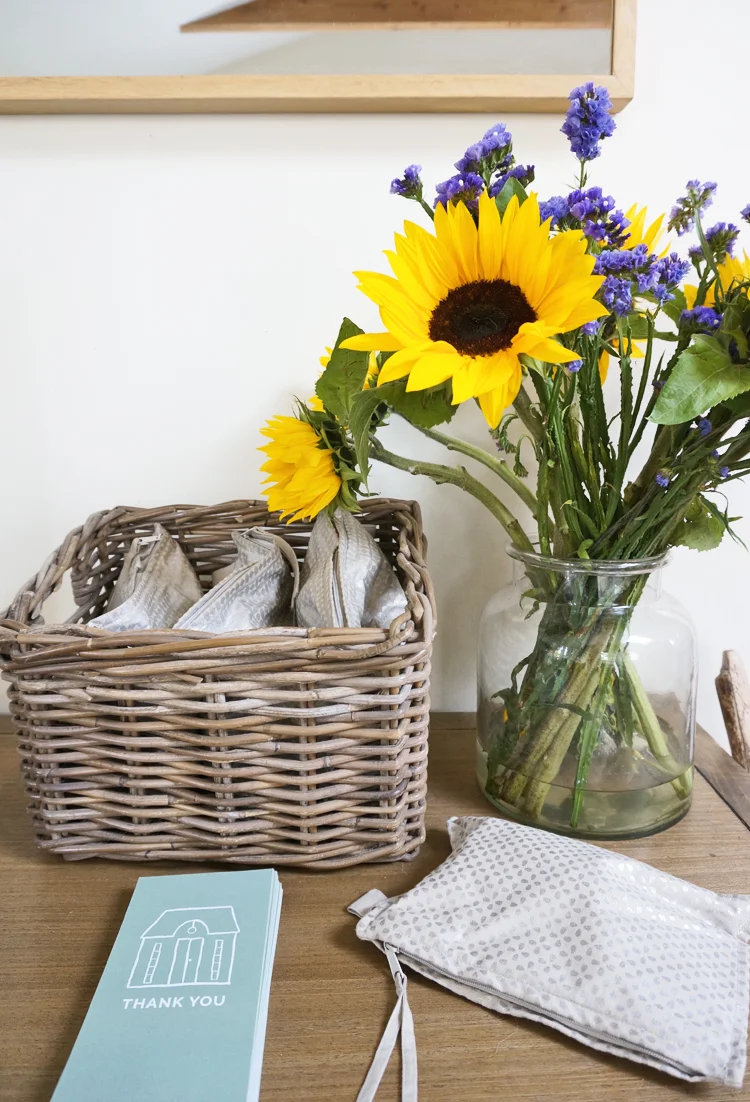
Suspended clips for air drying washable wipes and all manner of small linens.
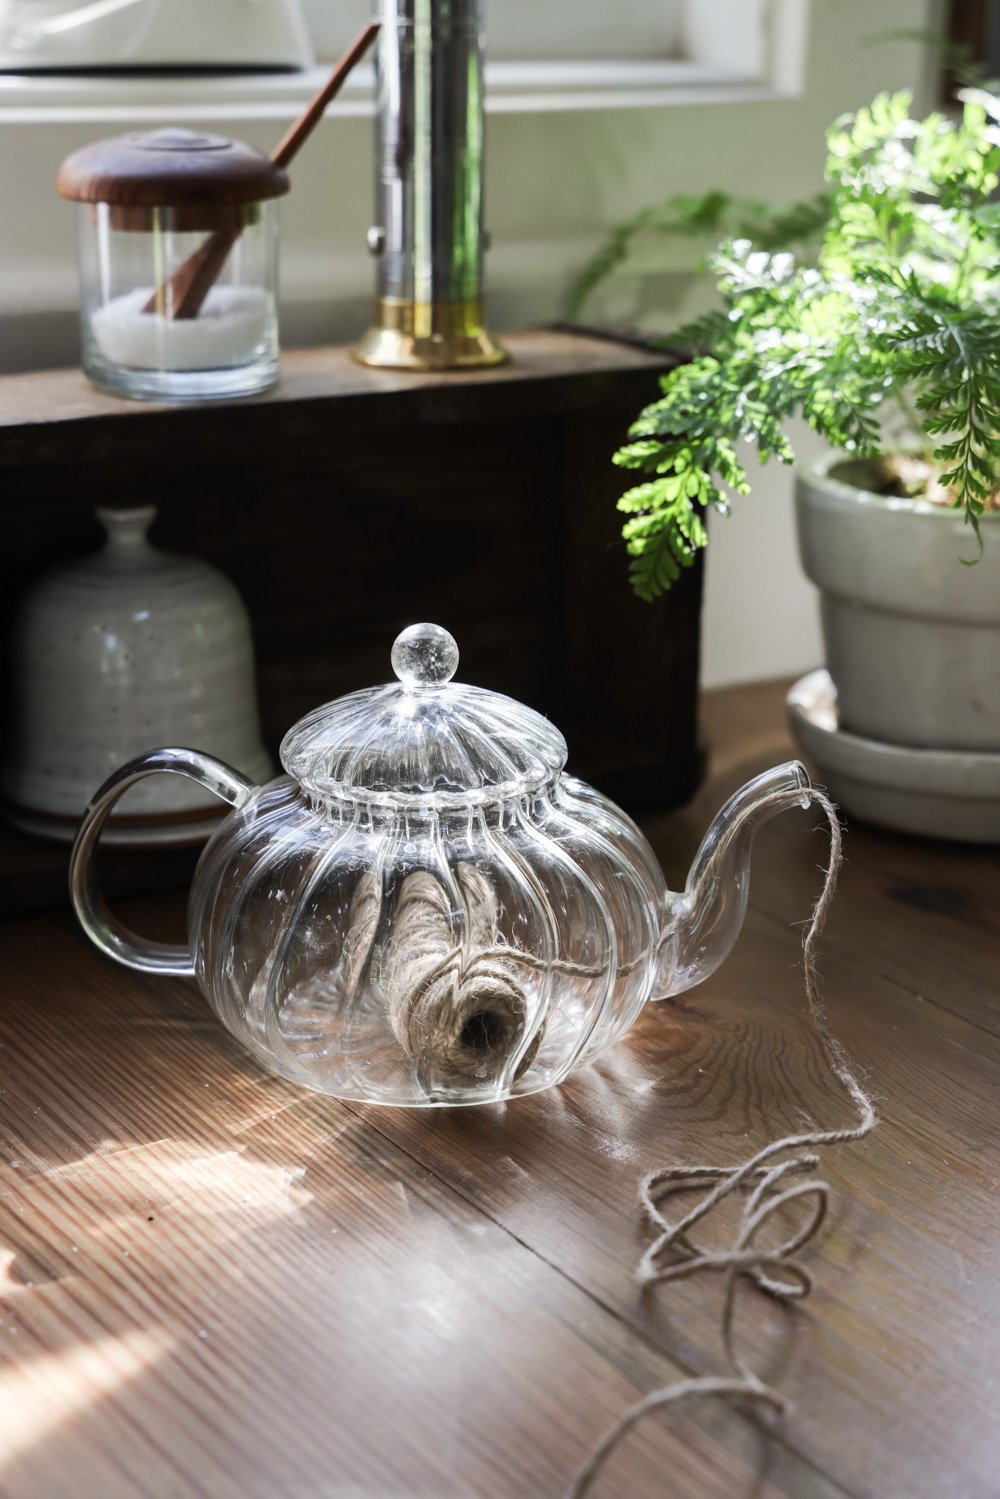
A teapot put to additional use when the weather insists on see-sawing between the 40s and the 90s on a daily basis in November.
Staying Rightsized (Part 2)
Because we usually don’t need a bigger space. We simply need less stuff and more creativity.
Staying Rightsized is a weekly photo roundup featuring some of the many space-saving considerations around our cottage. As minor as some of these moments seem, the little things really do add up, providing more space for navigating daily life within limited or awkward square footage.
Because we usually don’t need a bigger space. We simply need less stuff, and more creativity.

Above: Custom cushions top the raised benches / tables on either side of the kids’ wardrobe. With the cushions on, the kids each have a reading nook by a window. With the cushions removed, the kids each have a desk at which to play and work.

Above: 1¼” wide magnetic wooden blocks (squeezed between the trim of two narrow windows) support individual kitchen knives in order to free up drawer and counter inches.

Tiny Toolboxes
When I left for college, I inherited several tools from my parents. I felt sentimental about the pieces that they generously gave me, and I used those hand-me-down supplies to assemble furniture and make minor repairs in nine of the ten places I’ve lived since leaving home at 18. The last major project in which I used the tools was West’s nursery nook.

Over the years, the tool collection evolved and grew. I added more and more little things to it— particularly when I was set styling over recent years. Eventually I found myself with a multi-level, wheeled cart that I dragged around our cottage with me, despite the fact that I usually only used a handful of items within it when at home.
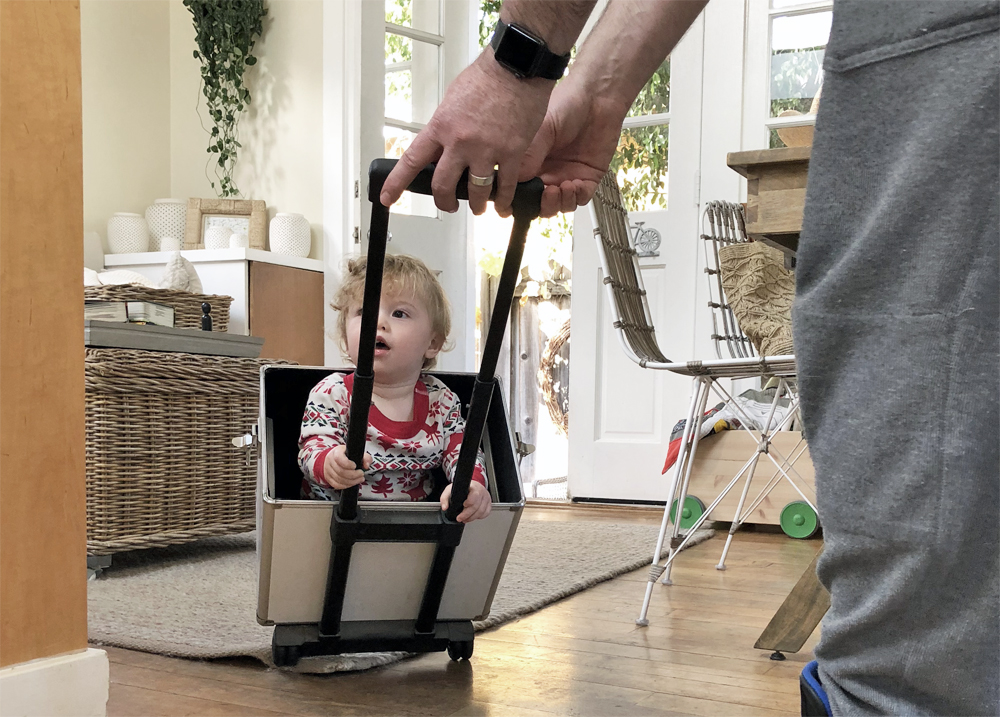
As we began working on the front tiny cottage, I realized— I only need a small, specific grouping of tools and hardware. Everything else is always brought and handled by the professionals with whom we work. So why was I struggling to store a 3’-tall toolbox in our tiny house when I didn’t have to? True small space dwellers know— there is absolutely no room for something like that in a compact home. The poor thing was was a mess inside, and it was routinely left outside for days on end, crammed onto one stoop or the other, and shoved into the back of our 2’ shed. (It was so oversized that West would even climb into the bottom 1/3 of it so we could roll him around the house. It was adorable, but ridiculous.)
I got to thinking about the individual items within my collection. The ones I used regularly could be condensed into a multi-tool, and most of the other products I could do without entirely. (And, surprisingly, I was missing a tool or two that would’ve been extremely helpful to have here on a regular basis.)

I realized that a toolbox makeover was in order. I had to separate the sentiment behind select items and part ways with them. Plus, I needed to come up with out-of-the-ordinary ways to store the necessities. I played around with a few ideas, testing out what ACTUALLY worked (not just for photos), and what was easily accessible, without standing out in our tiny house or consuming space needed for other uses. I combined few methods of storage, and thus far, this mix has been practical and hassle-free:

1. Small Tool Roll (Rather than Box)
A tool roll has proven much easier to store than a box of any size. It’s portable, it can easily be kept out of West’s reach, and it’s neat and organized even when left out in the open. I use these waxed canvas pockets to store the handle of our new Husky 16-in-1 interchangeable screwdriver set from The Home Depot, our new Husky pick + probe set, our hammer, touch-up paintbrushes, and a miscellaneous multi-tool that I use on our bikes. (The Pick & Probe set was one of the items I realized I needed but was missing. Our cottages are from the 1920s and have a lot of imperfections, and West somehow finds them all, and then gets all sorts of stuff trapped in the smallest slivers of space. The picks help Adam and me reach and clear those spots.)
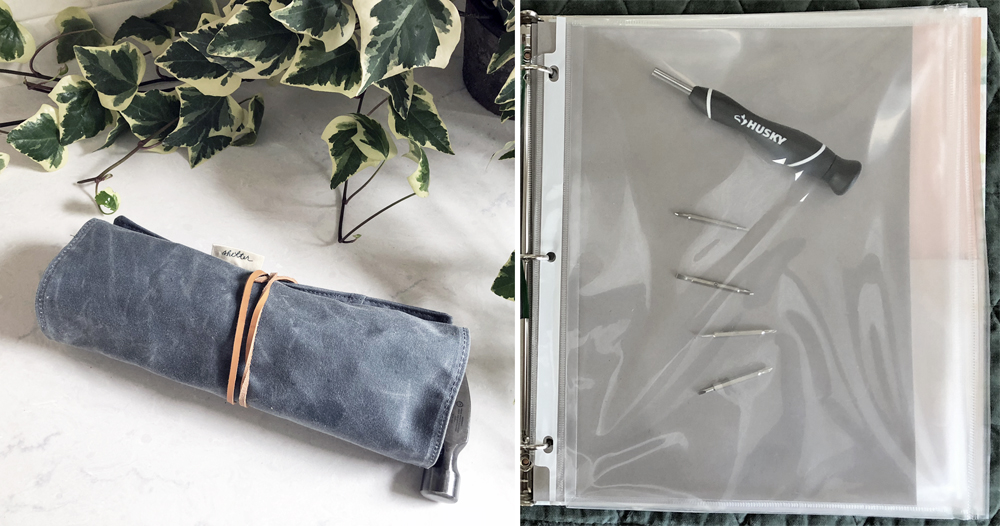
2. Hardware Notebook
It’s easier to make room on our bookshelf than anywhere else in our home, because books can live countless lives by being re-gifted onward to friends and family for their enjoyment. I couldn’t find a hardware organizer that worked well on our built-in bookshelf, so I upcycled a 3-ring binder for the job. I used a combination of basic plastic bags and binder pouches to hold a mix of hardware, along with the various heads for our screwdriver and drill.

3. Large Tool Hanging Bag
After giving away anything I no longer needed, then outfitting the tool roll and notebook, I was left with a few compact yet larger items that were scattered around the house: a 30’ tape measure our Ryobi multi-tool base (which I use to build our suspended shelves and to cut/sand wood), our Hex Key sets, and extra water-resistant gloves. It got obnoxious to have all these items separated, so I gathered them together and dropped them into a washable garden bag that I can hang on the wall. Not only is the bag easy to tote around, but it hangs mere inches away from the notebook, and can also contain the tool roll.

No longer having to track down and lug our nomadic, oversized toolbox has saved time me and frustration. I now have everything organized side-by-side in a way that really works for our funny little space. As we finally wrap up months of repairs to the front cottage this week, I realize that I now have delightful new memories associated with our updated tools.

My advice to anyone in a small space who's looking to get a fresh start on their tool/hardware/craft collection is to carefully select multi-tools, and to think beyond the usual toolbox when it comes to how to store them. Find means of organization that work well for the spaces you have available, keeping size, shape, accessibility, and aesthetic in mind.
Select tools from this post were gifted to me by The Home Depot. All words/opinions are my own.

Reusable Bags
Reusable shopping bags are everywhere these days. You're given polypropylene totes in checkout lines, you receive canvas slings for swag at events, and many makers and retailers use drawstring sacks when wrapping their online orders. While it's wonderful that we're no longer requiring and disposing of endless plastic bags, it can be a bit tricky for those of us living in a small space to find a practical place to keep the bulkier, reusable totes. Since these items come into play nearly every day, I thought the topic warranted a post. Here's how I deal with reusable bags and food wraps at the Cottage. Below, I've provided information on the styles I love, were I store them, and how I go about giving some away.

I have three groupings of reusable bags at the cottage, and I organize each category differently, based on their sizes and how I use them:

Market Baskets - I use these for the bulky or heavier duty items-- laundry detergent, beverage cans, oversized branches, beach towels, weekender bags, etc. These stay on display via a coatrack, either inside or on the stoop, depending on the weather. I also hang them on the walls as functional decor from time to time.

Canvas / String Shopping Bags - I have these in multiple sizes, and I use them for everyday groceries and errands. Canvas Shopping Bags - I keep these folded up in a wire, wall-mounted bin. Another bundle of bags stays in the car, and we keep a few in the base West's stroller.

Reusable Bee's Wrap + Sacks - I use these as often as possible in lieu of plastic wrap. They're ideal for sandwiches, baguettes, loaves of bread, and for preserving the freshness of almost anything other than meats. I roll these up when they're not in use and place them in a wire mesh vertical file/folder basket mounted magnetically to the side of the fridge. (Such baskets work well affixed to the inside of kitchen cabinet doors, too.)

EXISTING PLASTIC BAGS - Organizing existing plastic bags in easy-to-reach spots requires minimal time and cost if you simply repurpose select household items. For example, you can always recycle a used tissue box or canning jar to keep shopping or pet bags at the ready:

When (and How) to Give Reusable Bags Away - First off, I love the 4 or 6-compartment wine bags from the grocery store. As my mom pointed out, they're a handy way to safely store (and tote) sandals and flats. For this reason, they are usually the only "freebie" bags that I keep.

The SWAG and retail totes never stay in the Cottage for long. The minute they're empty, I challenge myself to load them up with donations, or I use them as gift wrap for outgoing presents. This can be an effortless way to keep track of how much you're bringing into your home, vs how much you're clearing out.

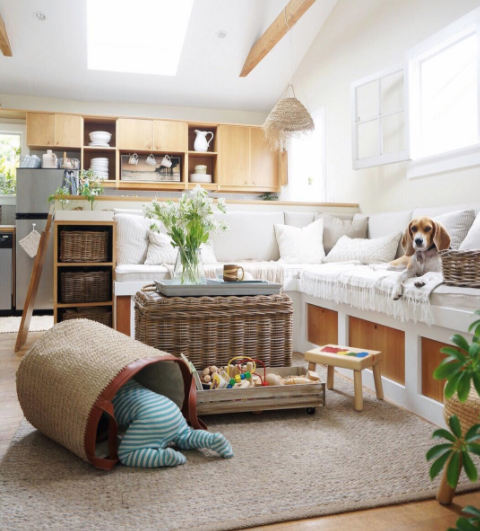
Toys (+ Toy Storage) for Tiny Homes
While we aren't minimalists, our overarching goal at the Cottage is to minimize our possessions without sacrificing comfort, style or experiences. When it comes to our son's book and toy collection, we've stayed in this mindset and only acquired items that he seems to genuinely enjoy, and that we believe to be beneficial to his development-- and, of course, we try to find pieces that we actually enjoy seeing scattered all over the floor, whenever possible.
In our small space, it's been helpful to find the following types of toys and containers:
Collapsible
Travel-Sized
Self-Contained
Scalable (for longevity)
Woven, wood, leather, or hanging baskets/boxes (to suit the style of our home)
As long as everything West enjoys regularly has a dedicated space that's easily accessible (and can be contained in a way that makes our home still feel uncluttered and organized), it works for us. Here are some visual examples of our everyday, ever-evolving storage methods:
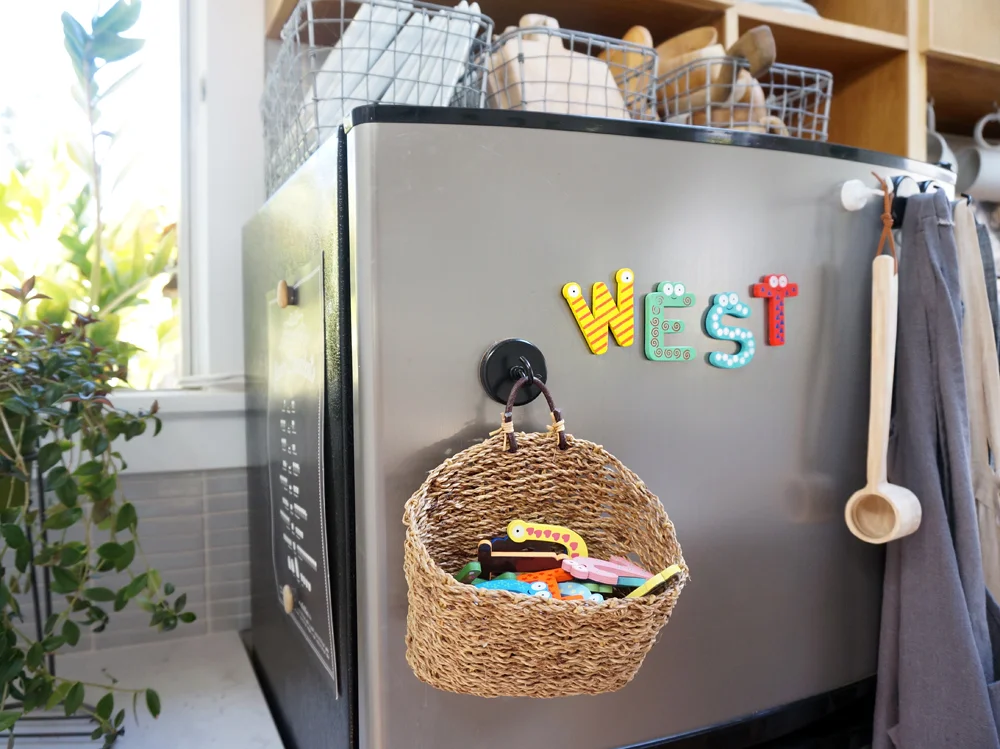
A Handmade hanging basket on A magnetic hook Holds west's magnetic letters and numbers on the fridge or dishwasher
Wire mesh hanging baskets hold small toys high up in the nursery

An oversized Knotted string hamper basket contains miscellaneous toys that west enjoys daily

a mix of Toys contained via similarly-toned boxes and suitcases

the large Built-in trundle storage bin beneath our bed


Here are some of our favorite types of toys at West's current stage, along with the reasons why we love them:

The above sampling of West's toys demonstrates the types of items that work well in our small home. Our son uses all of these regularly, and we can store them easily. The small train breaks down into segments for simple clean up. The leaf puzzle slides onto the bookshelf at night. The wooden book is pocket-sized, and travels everywhere with us. The alphabet books entertain West endlessly, and are self-contained in a small box. The geometric star is pliable and can fit almost anywhere. The handmade magnetic fishing set has small (yet safe) parts that we quickly stash away in a drawstring linen bag.
I want my son to have access to a diverse array of colors, shapes, materials, and activities that make him happy and stimulate his growth. I look forward to seeing how his preferences and styles differ from my own. Having said that, I take joy in analyzing everything we bring into our home, and if we can make select items work for all of us (at this stage), then why not. Everyone wins!

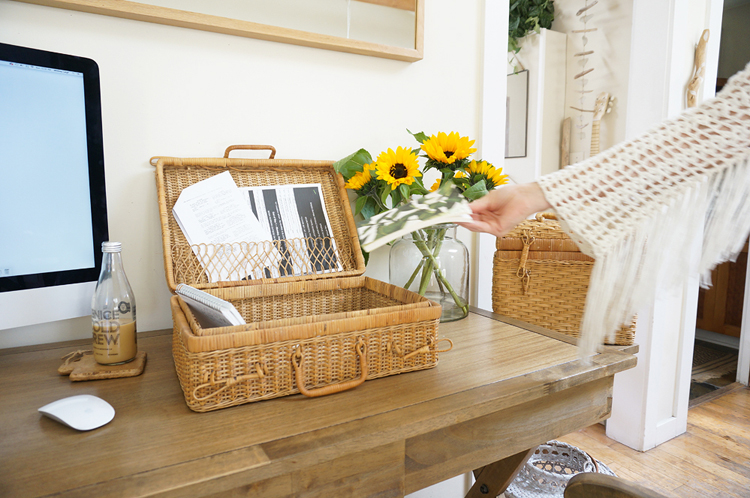
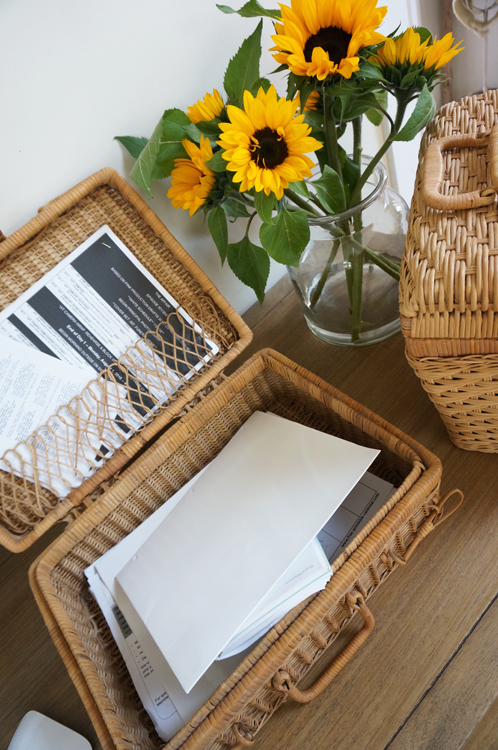
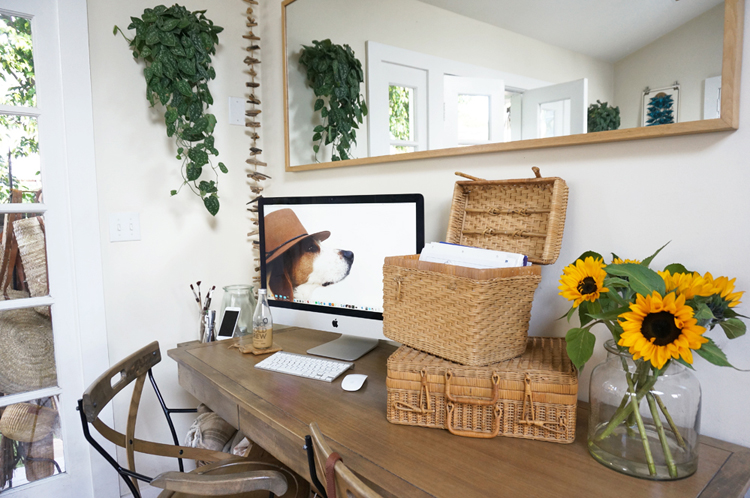
Forget the File Box
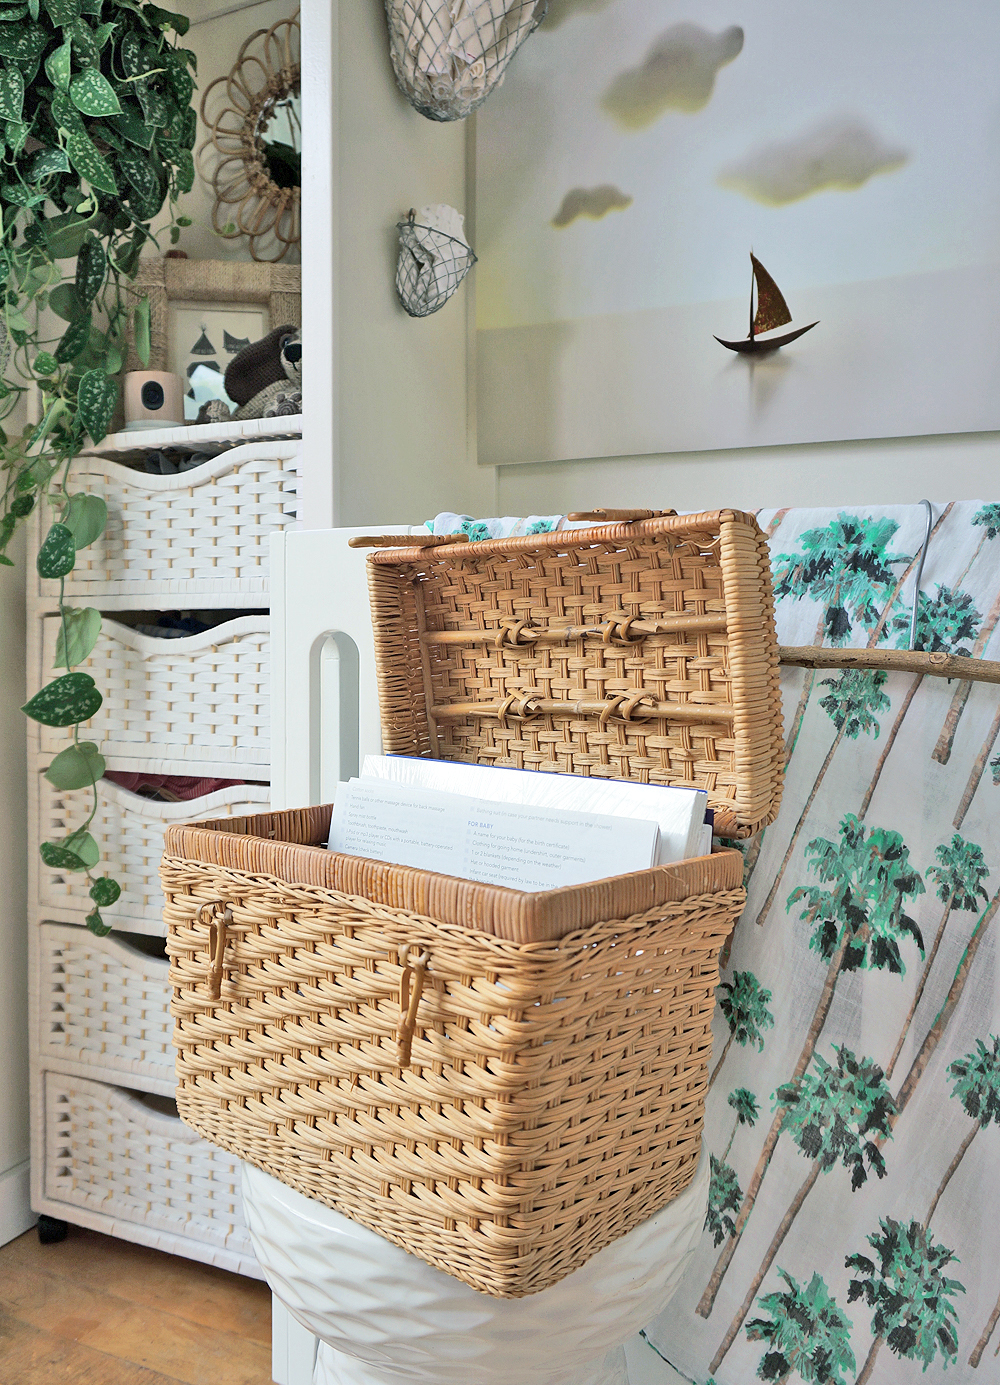
In a recent blog post, I provided tips on how to curb your daily paper clutter by regularly using a mini-scanner and organizing your files digitally. However, I didn't address one key issue: the leftovers. When living in a tiny space, what do you do with the paper files you cannot scan and HAVE TO keep? How do you maintain an uncluttered, beautiful, and yet practical home-office? The solution is simple-- repurposed picnic baskets:

Bottom Basket: This horizontal design holds my current office paperwork.
Top Basket: This vertical format is the perfect filing solution for baby West's medical records & product safety information documents.
There are so many ways to get clever with necessary storage containers. In this case, think beyond the file box. In a small multi-use space where everything is visible, nothing will stab at your eyeballs like a plastic or metal file box that is not only ugly, but also a constant reminder of work. I chose picnic baskets because they're almost always large enough to house A4 paper and US-size folders, and because they're usually a similar color, so they're great to mix and match:
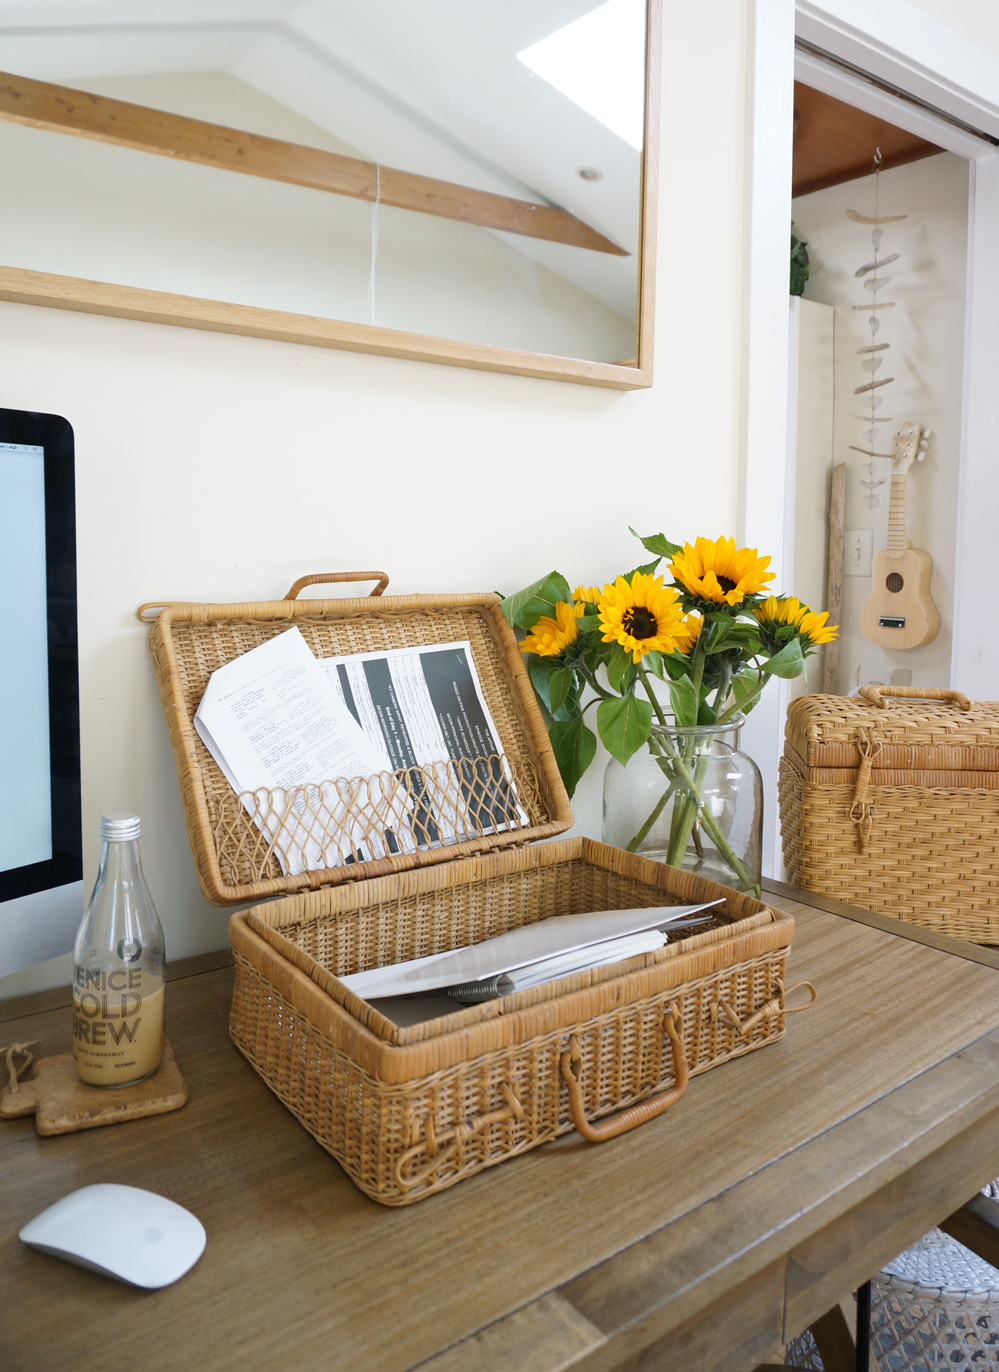
Both of these are vintage. I found the larger basket at The Mart Collective in Venice, and the other at Tower 20 in Santa Monica. Two of my favorite online shopping resources for vintage cases like this are ETSY and Maven Collective.
I love that I can leave these file boxes open and in use for the entire workday without making the house feel like a traditional office. You'll be amazed at what a difference little details like this can make in your little home.
Storing your baskets on the floor? Make sure to select pieces that are stackable. Stowing yours up high in a closet? Pick a format that's slender enough to slide out easily when you need it. There's a never-ending and diverse array of designs out there-- enjoy finding what works for YOUR small space!


Double-Duty Drawers
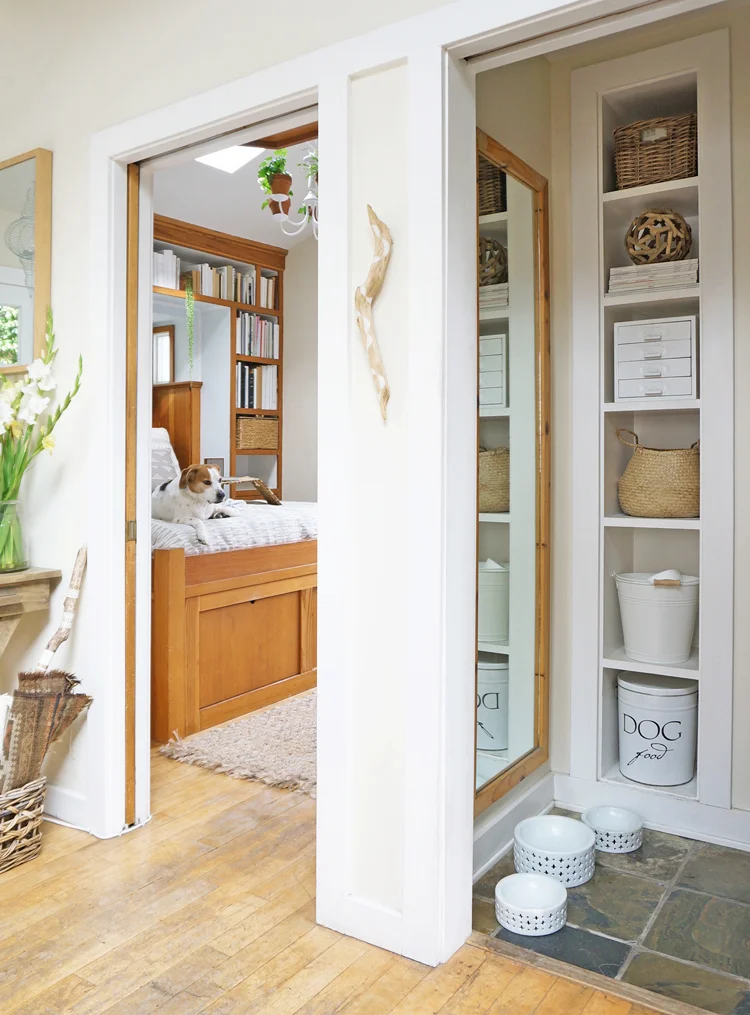
In the past 4 months, Adam and I have given away about 1/3 of our belongings. It feels so wonderful to create more room for our new lifestyle with baby West! Here are a few little modifications that we made that really helped us free up floor space, and eliminate clutter:
1. Built-in Pet Toy Storage
For the past 5+ years, these four drawers on my side of the bed were filled with my socks, underwear and swimsuits. I'd placed an open basket at the foot of the drawers, and that's where we stored the dogs' toys. But the basket got in the way a lot-- mainly when I was trying to access the storage under our bed, or when I'd groggily wake up in the middle of the night to pump. I realized that I could easily get rid of one drawer of accessories, and then keep the puppies' goodies in the bottom bin. Now I can easily tuck the toys and container away:

2. Extendable Nightstand
We have wonderful little built-in nightstands on the sides of our bed. But lately I've been wanting a bit more surface space at night so I can keep West's books and toys at the ready (we're currently co-sleeping). Rather than buying a new piece of mobile furniture to wheel in during the evenings, I opted to make a cover that I can slide over one of the open drawers at night:
Luckily the removable lid to the basket located one cubby up worked PERFECTLY for this project. But had it not, I would've simply had a lightweight piece of plywood custom-cut at the hardware store that I could use in the same manner. During the day, I would've stored it on the shelf alongside the books. In this case, I just replace the basket top during the day. This little extra table-top space is so helpful!

3. Trundle Storage for West's Toys
As West's toy collection grows and evolves, we'll need a big, easy bin in which to put everything. However, there is no room for an additional large catch-all basket or box in our house. So I decided to donate all of the clothes I kept stashed in the trundle-drawer on my side of the bed. (The neighboring bin is for laundry.) Now every bit of clothing I own is stored in our garden wardrobe.

My hope is that this easily accessible, oversized drawer will be a handy tool in the future, when West is able to pick out and play with his toys on his own.

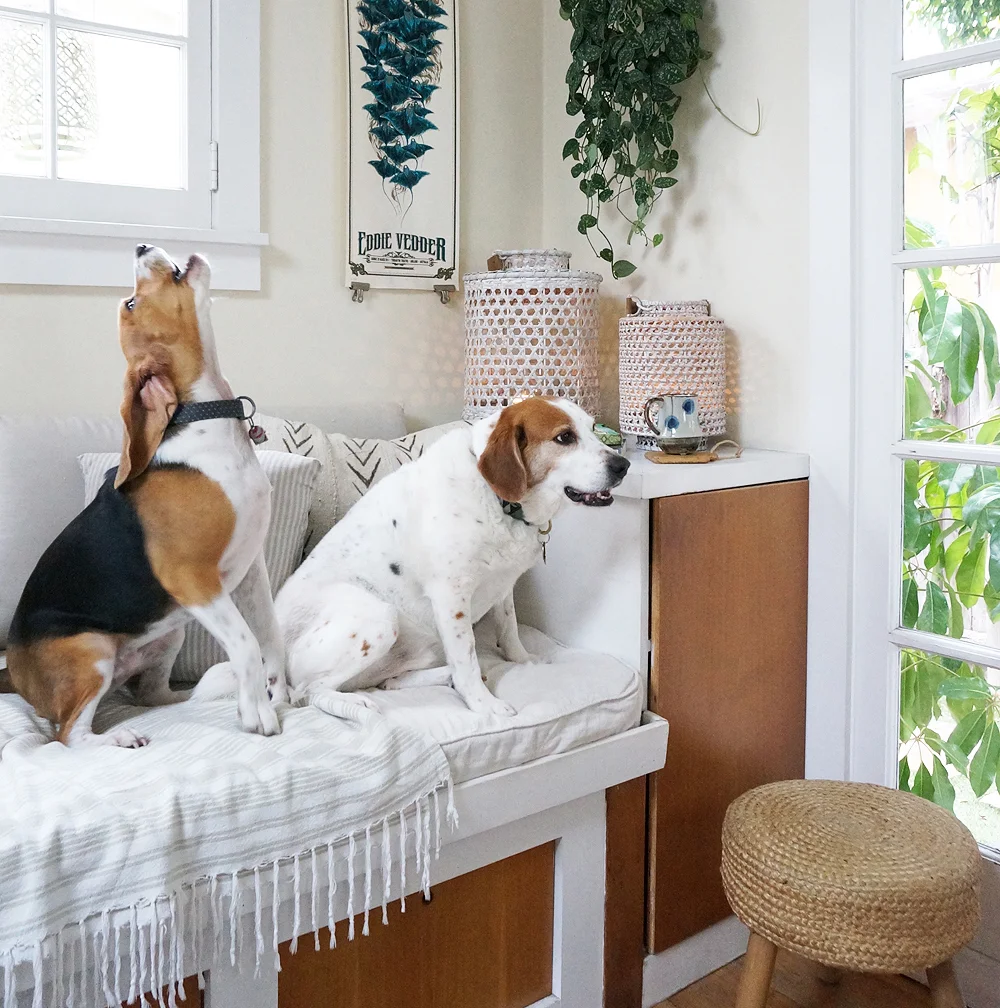
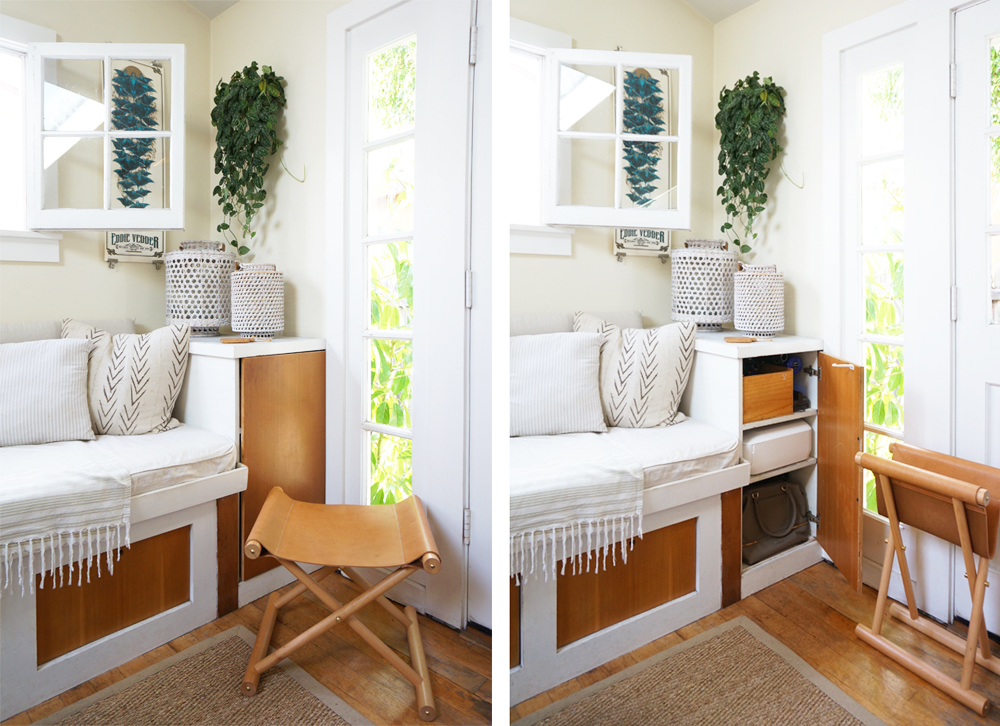
So. Much. Dog. Hair.
You know how my photos are always bright white and a tad bit over-exposed? Well that wasn't an artistic decision at the start-- it was a necessity. I had one dog at the time, Stanlee, and he sheds INSANE amounts of hair. When I first started sharing photos of the Cottage online, I spent hours photoshopping out the numerous, massive tumbleweeds of Stanlee's hair that are constantly gliding across our floor. I should've just left them in there (real life and all), but I didn't want to discourage anyone from adopting a dog. (Stanlee is a rescue, which I talk about often, as I'm big into the Adopt-Don't-Shop concept.) I quickly realized that if I just brightened up my photos a bit-- VOILA!-- the hair would almost completely disappear from the photos.

So many people write to me and ask if my dogs (#StubsandSoph) shed, and if so, how I handle it. For years I used a handheld vacuum. It was the only thing that fit easily into our home, and it's not hard to vacuum an entire tiny house with a mini-vac. That being said, it's definitely a pain to have to plug/unplug the machine in every section of the cottage, and all the hunching over kills your back. And of course I couldn't reach our vaulted ceilings with the handheld, so I would use paper towels on a long stick to reach cobwebs. CLASSY.
Adam kept saying we should get a Dyson cordless machine he'd seen somewhere, but I kept on insisting that there was no way a full-sized vacuum would fit in our house.
Then came baby West. Immediately the dog hair started getting all over West's clothes and toys (which all inevitably end up in his mouth). I finally gave into Adam's suggestion and got Dyson V8 Absolute. I have to say, I am a complete idiot for not getting it sooner. It's amazing. Here's why:
It breaks down into small components so I can stash it away in the living room. (Photos below.)
It's so quiet that West sleeps through it.
It's cordless, which makes it crazy easy to use. I vacuum several times a day now because it's such a breeze.
It can reach the vaulted ceilings, so I no longer have to use my classy Gandalf stick.
It really removes the hair, rather than just dragging it around in the nozzle, or scattering it about the floor via exhaust fans. (My handheld did both of those things, which was annoying.)
I genuinely recommend the V8 to anyone who lives in a small space and/or is battling with the drama of dog hair. (Now I just overexpose my photos so I don't have to clean my windows.😜)
Resources: Folding Leather Stool and Tabletop Lanterns by Serena and Lily. Woven Boots by Frye.


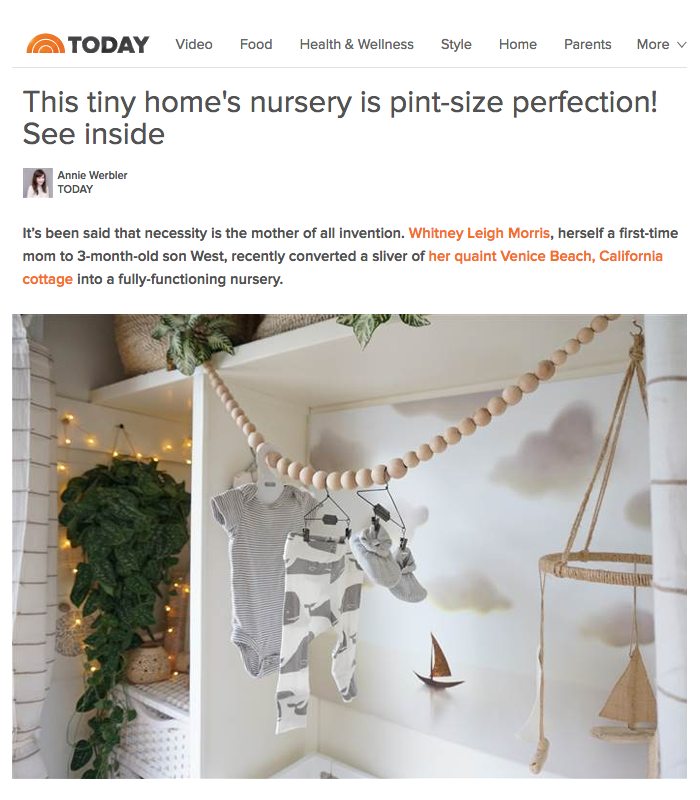
Small-Space Nursery on TODAY.com
We're thrilled to be back on TODAY.com-- this time for West's mini nursery! Check out the full story and all the images here.

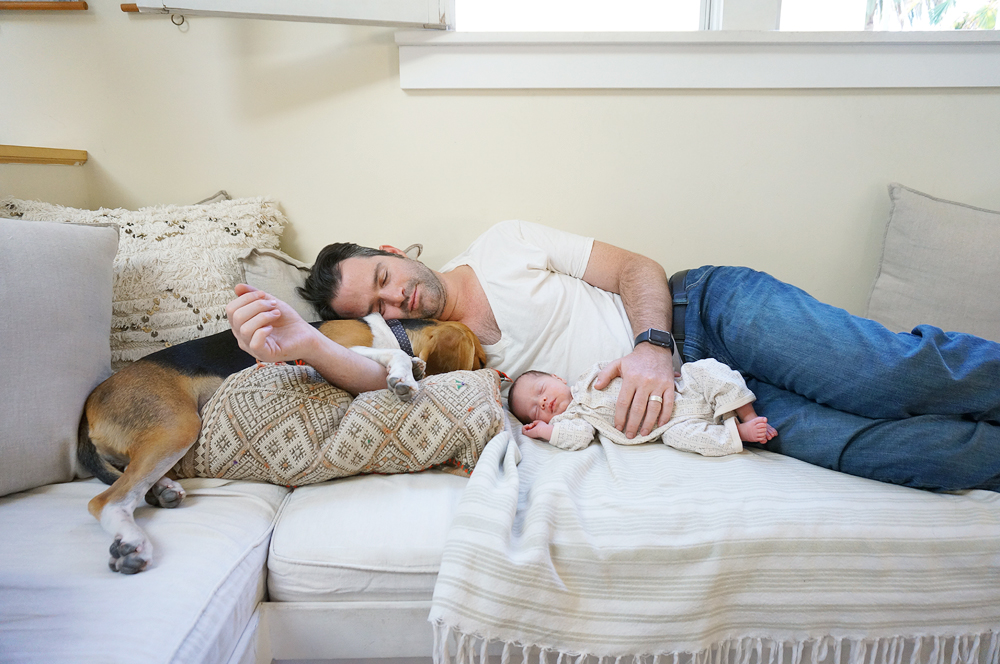
Closet Nursery and Having a Baby in a Small Space
I took some time away from the blog to focus on our first month with Baby West. He is now 6 weeks old, and we've been very pleased with how the nursery has worked for us thus far! (View our nursery tour posts here.) This is a quick round-up of some of the key items we've loved, and the reasons why they're handy for our small-space lifestyle.
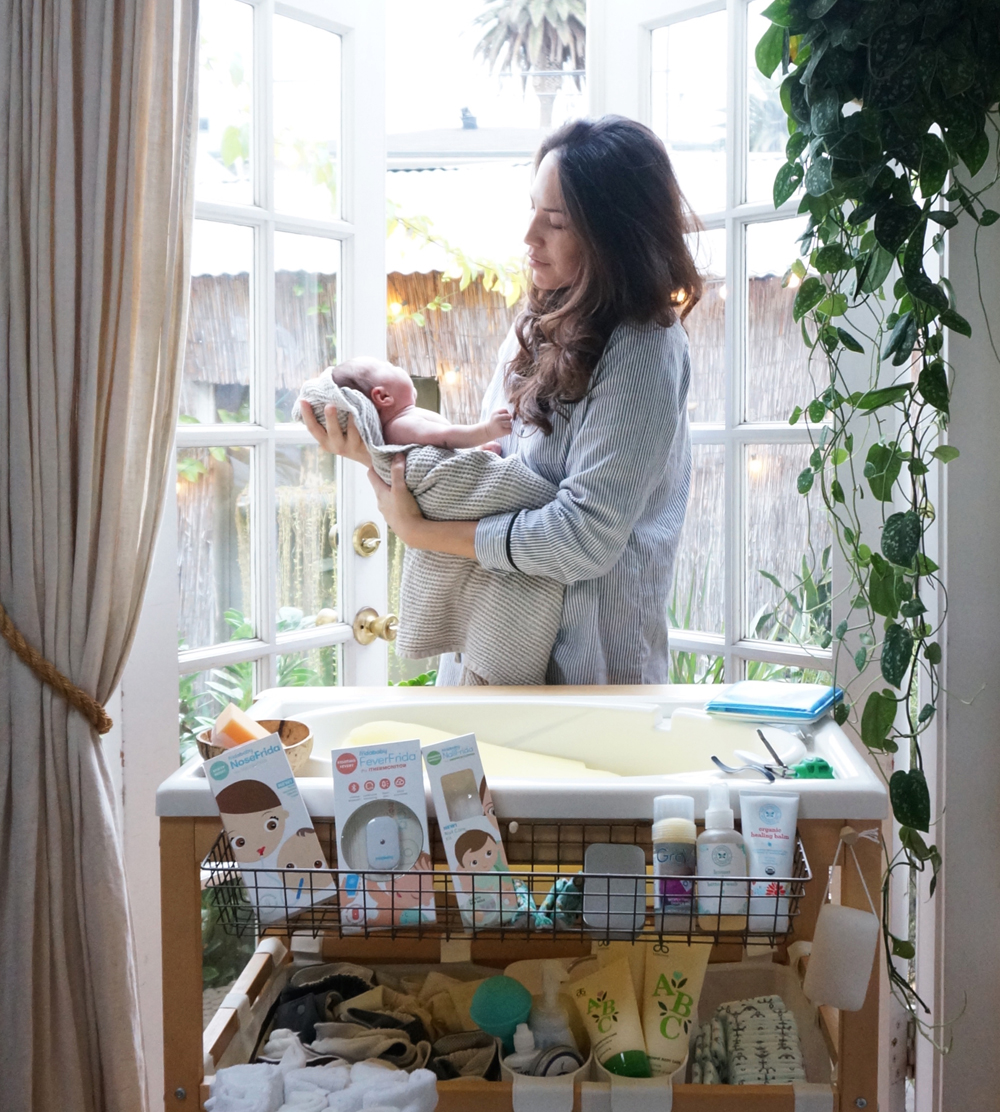
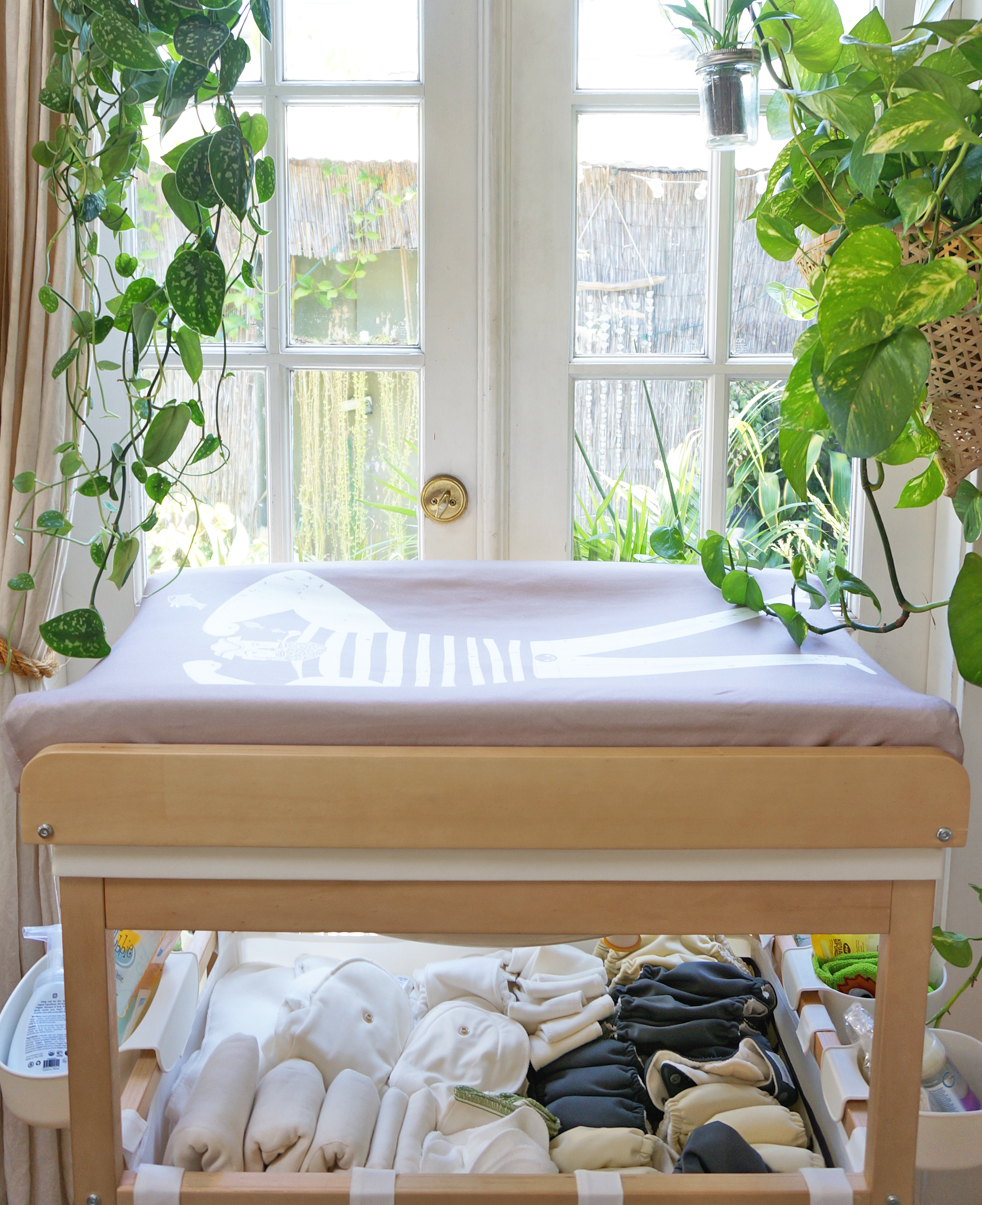
Our most functional, space-saving piece is definitely this bathtub and changing table combo. It rolls all over the house, depending on where we need or want it to be-- from the garden, to the stoop, to the nursery. The removable tub is extremely easy to use and clean, and the entire unit is tall, so we don't end up with aching backs after changing or bathing West. There are also two massive storage baskets built-in, which hold our reusable diapers (from Grovia), disposable diapers + wipes (from The Honest Co.), and bath items (from Amazon and Etsy).
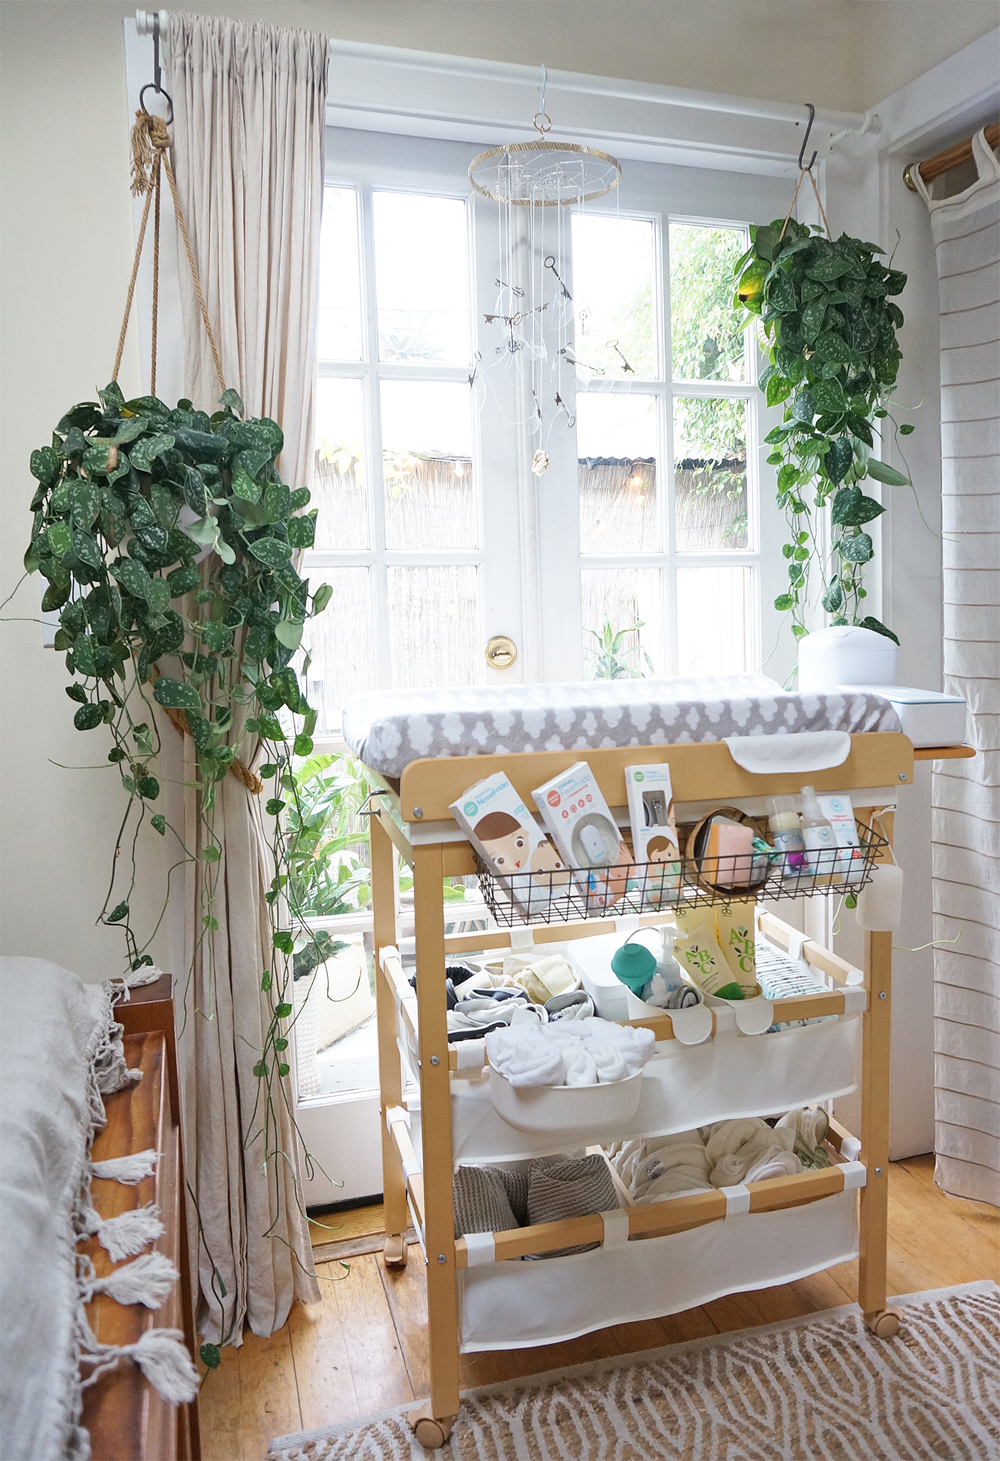
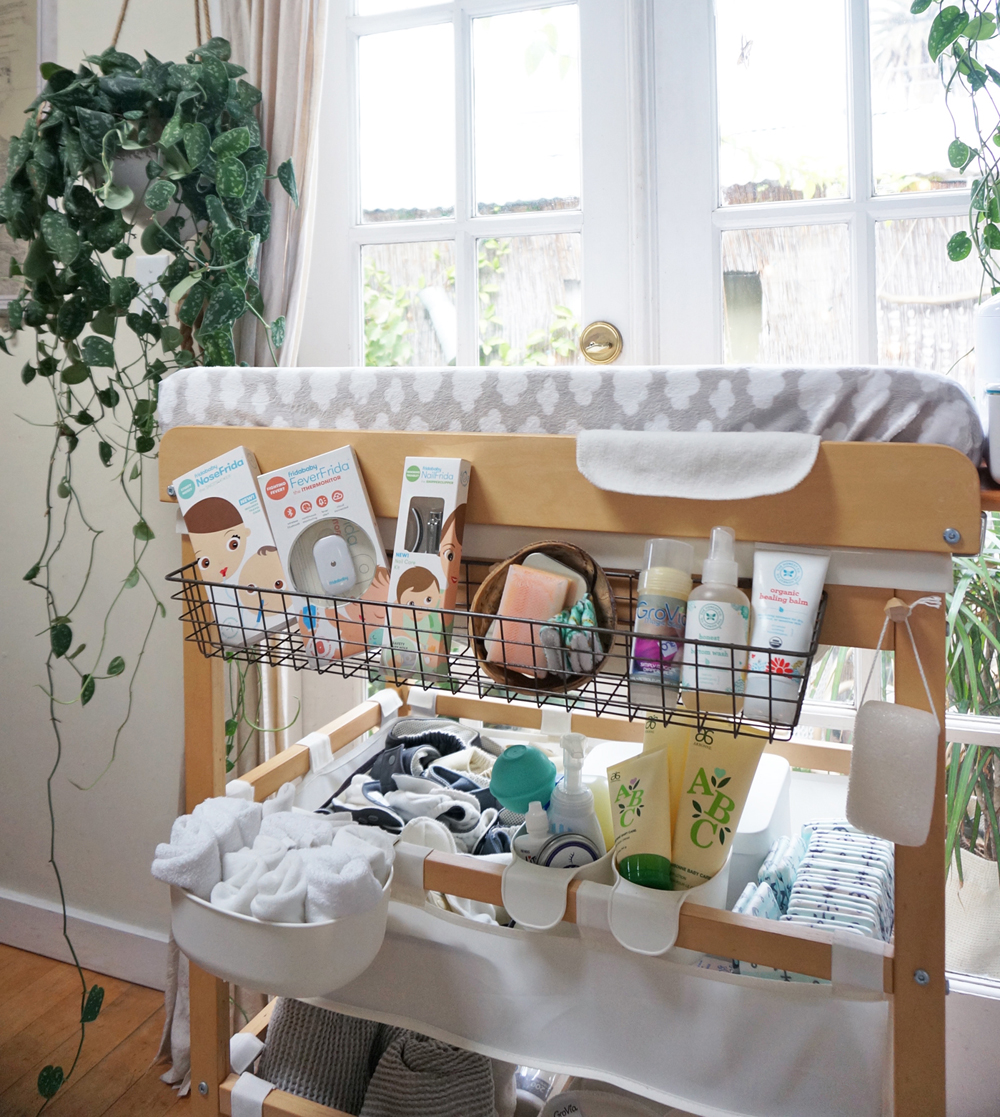
I added a long metal wire basket (from Amazon) to the side of the table to hold baby-care essentials for easy access. Items shown include:
Grovia All-in-one Newborn Cloth Diaper - Via Grovia
NailFrida the SnipperClipper – available at Target
FeverFrida the ithermonitor – available at Target
NoseFrida Travel the SnotSucker – available at Fridababy.com
Handmade Linen Baby Towel - Via Etsy
Some of my favorite goods, which work well in the closet-nursery AND on-the-go:
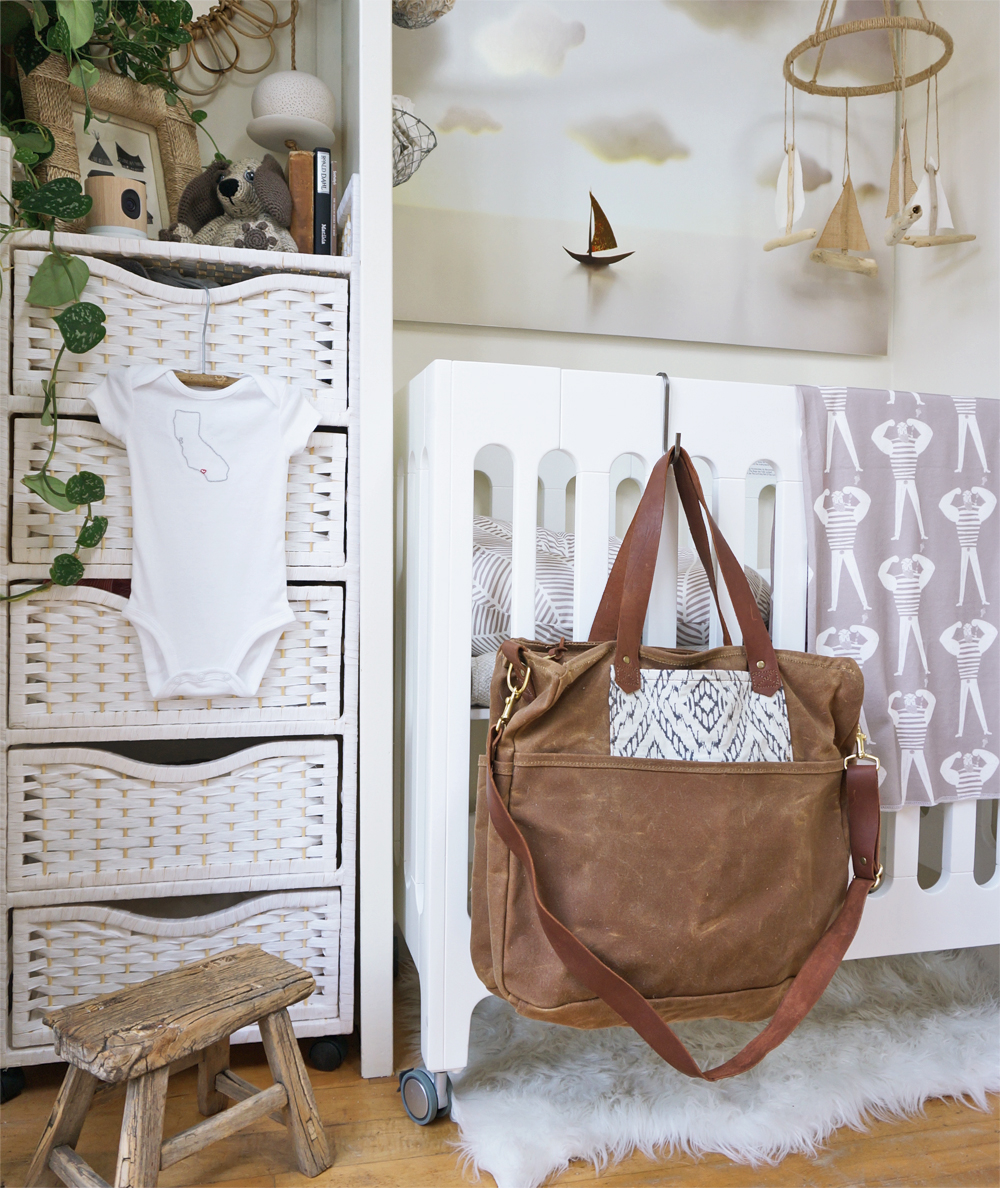
Handmade Changing Mat with Carrier Strap (can be stored vertically, and looks beautiful when hanging up in the house) - via Fawn + Cub
Waxed Canvas Unisex Diaper Bag (completely foldable and easy to stow) - via Kith and Kin
Handmade Wallet + iPhone Tiny Leather Purse by Hustle & Hide (a small, extremely functional handbag/wallet) - via Etsy
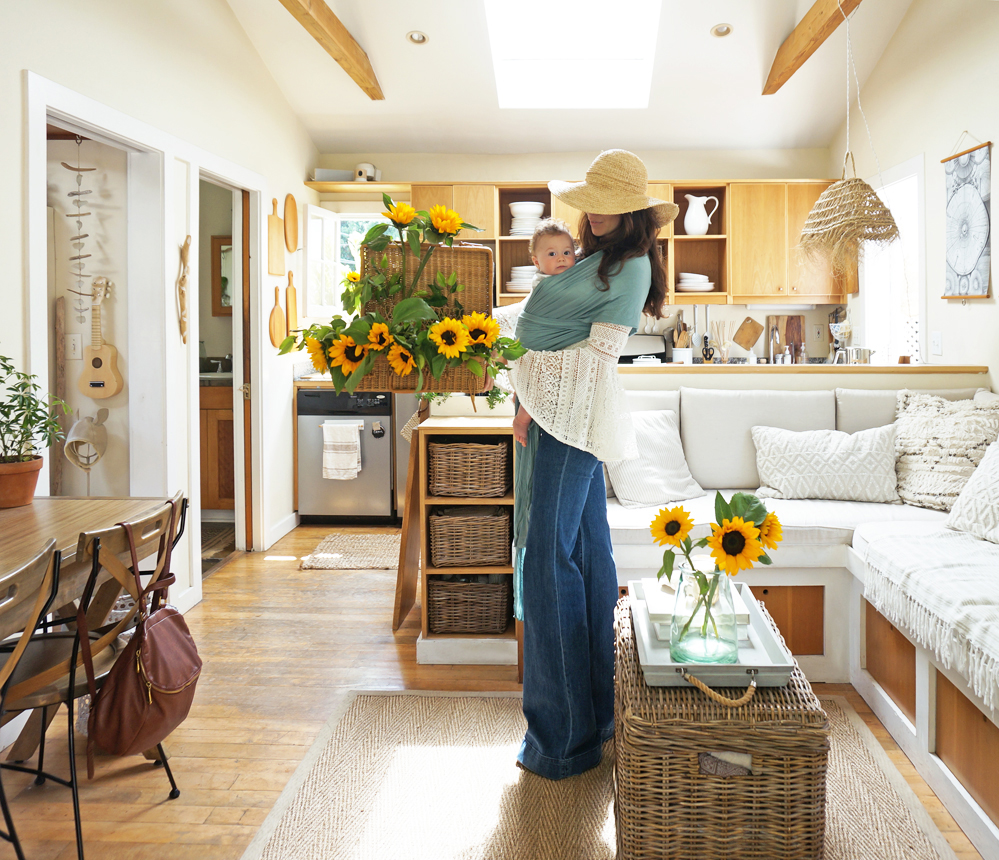
Solly Baby Wrap / Carrier (takes up no space when stored) - via Solly Baby
All-in-one car seat cover, nursing scarf, and cart cover - via Native Wilds

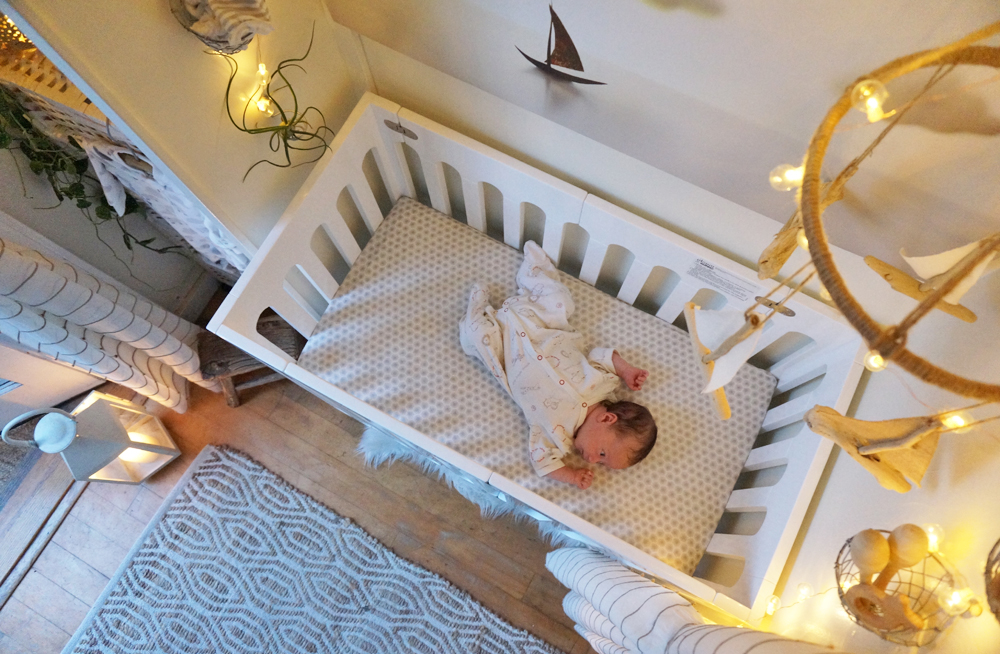
Our mini-crib (via Bloom Global) works beautifully, and fits perfectly in the Bay. But IF we didn't have space for the crib, we could've still made it work via a co-sleeper. My favorite is the DockATot, which is available in two sizes.
Note: The curtains are only near the crib when the baby is out of it or an adult is supervising.
I thought that the Bay was a bit TOO dark at night, but I didn't want to re-instal a ceiling light (they can get too hot, and we don't have real room for one anyway). There also isn't enough available space for a table-top lamp. So I recently installed some battery-operated twinkle lights (from Terrain) to brighten up the nursery, and I absolutely LOVE how they look and function.

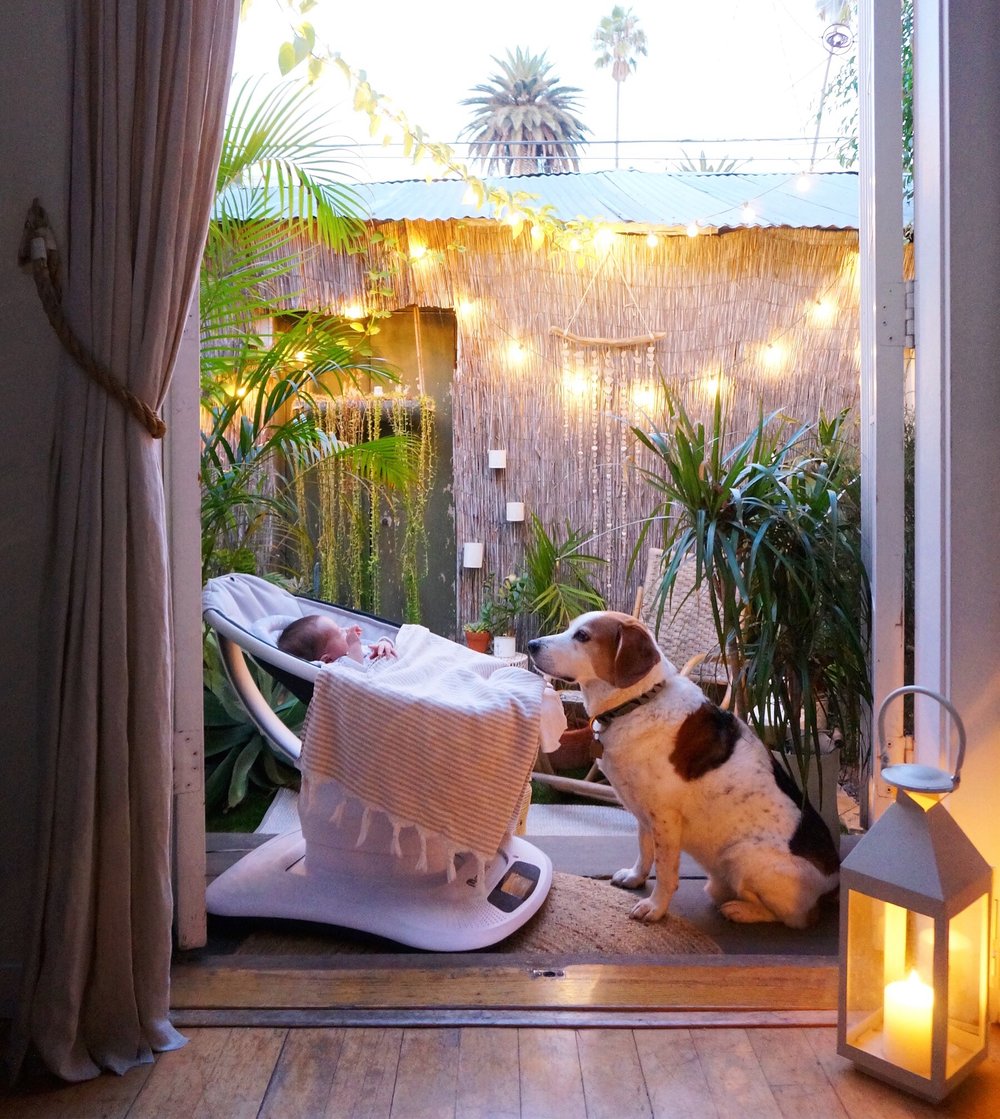
MamaRoo Infant Seat - via Target
This incredible gizmo takes up less space than a traditional baby swing. West loves it. There are varying speeds, movements, sounds, and angles, so he never gets bored. It's a phenomenal help when I'm working at the computer, and when I want to keep the baby upright while he dozes off immediately after breastfeeding.
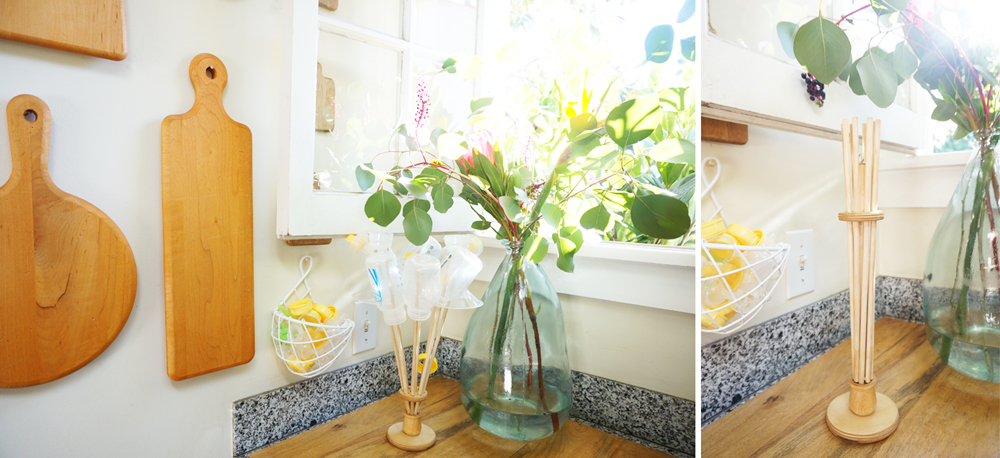
In the kitchen we use a collapsible bottle-drying tree, and a wall basket for bottle-tops, etc. These take up much less space than a traditional drying rack. (Via Amazon)
And, as always, going vertical wherever possible has helped us find place for the pretty little accessories we use on a regular basis, such as burp cloths, rattles, soothie clips, etc.

On a side note: After our first month with West, it's also important to note a few changes we made for the pups in order to prevent them from feeling neglected as we tend to the baby. We've added daily trips to the dog park or beach to the routine (in addition to our regular dogwalks along the Canals). We’ve also started giving them meals from @thefarmersdog (they’re completely obsessed), and we got them new handmade beds from our wonderful neighbors @thewolfnest. So far, so good!
(Please note: the pieces in the nursery and cottage will change as West gets older. His safety is obviously our main priority, and the space will evolve according to his growth, capabilities and mobility.)

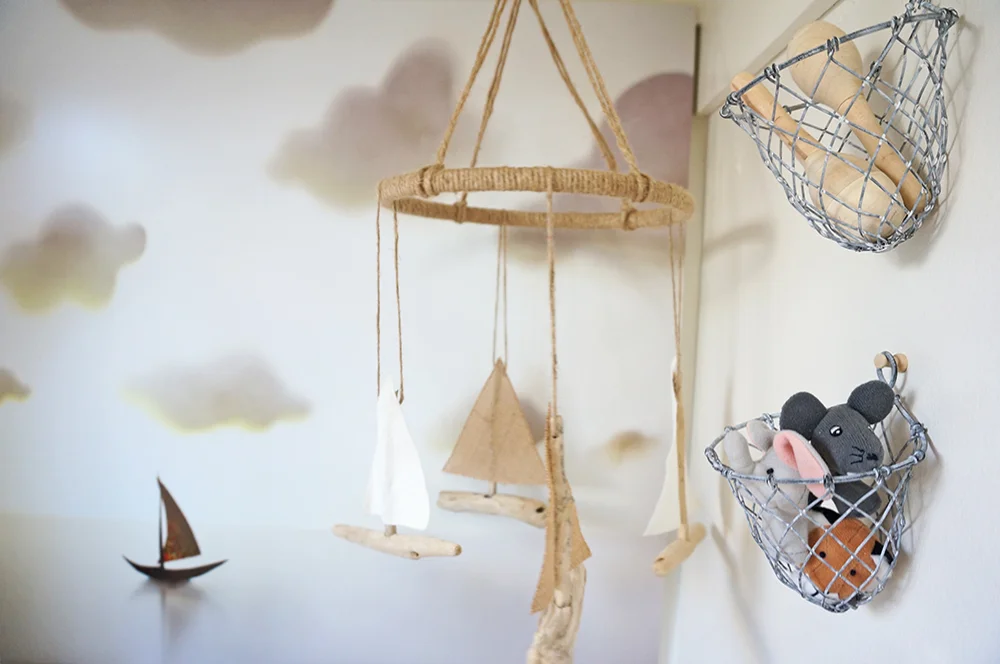
Tiny House Closet Nursery - The Details
My favorite part of putting together the nursery was finding all the little, practical details to use in the space while our son is an infant. My main shopping resource was ETSY, but I discovered incredible products (both new and vintage) from a variety of other makers and vendors as well.

CRIB | The first piece we picked was the crib. We needed a VERY specific size, and this Alma Bloom Mini Crib (on wheels, which is a feature we love and use frequently here,) ended up being absolutely perfect. The crib's platform height is adjustable, and the entire thing is easily collapsable. We couldn't have dreamed up a better design for the baby's Bay.
CLOTHING STORAGE | Next we needed a vertical storage solution for the remaining cubby (to the left of the crib). And again, it had to be a super-specific size. I found a lightweight, simple set of rolling drawers on Amazon. They're well-suited to the space, and we're thrilled with the piece's functionality.
LARGE ITEM STORAGE | The last major element of the Bay to consider was the top shelf. We needed durable storage containers that were roomy enough to hold several items, but we also needed them to be small and soft enough to slide onto and off of the top ledge. (We also had to ensure that whatever we selected would remain secure during an earthquake.) I found three gorgeous jute baskets from The Dharma Door (USA), and not only are they ideal in terms of use, but they're completely beautiful:
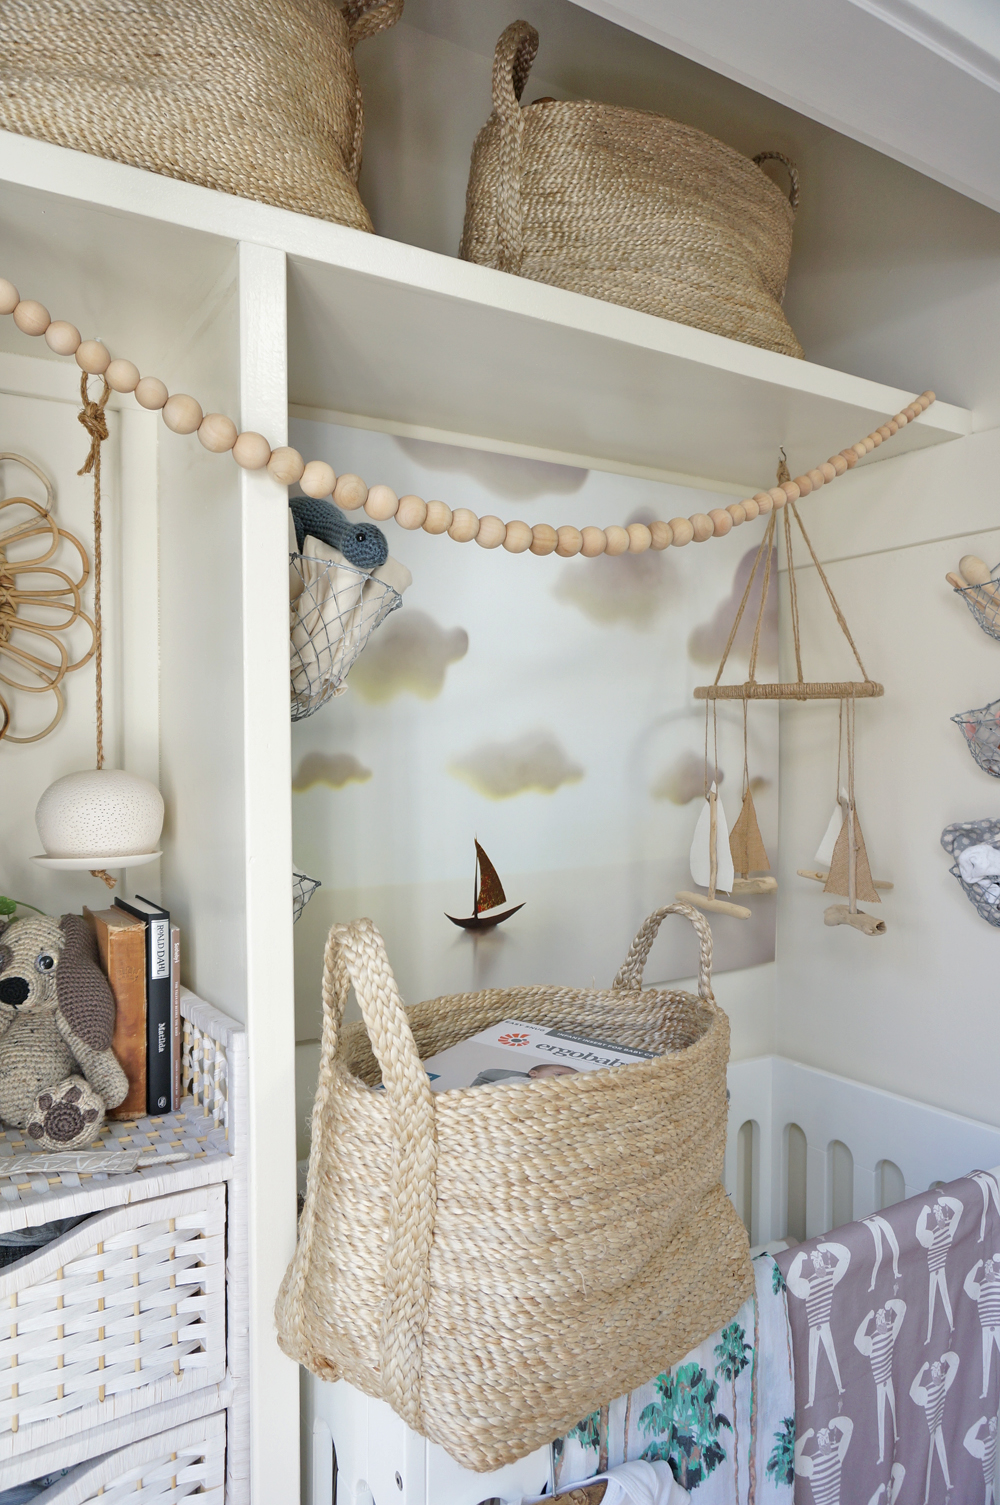
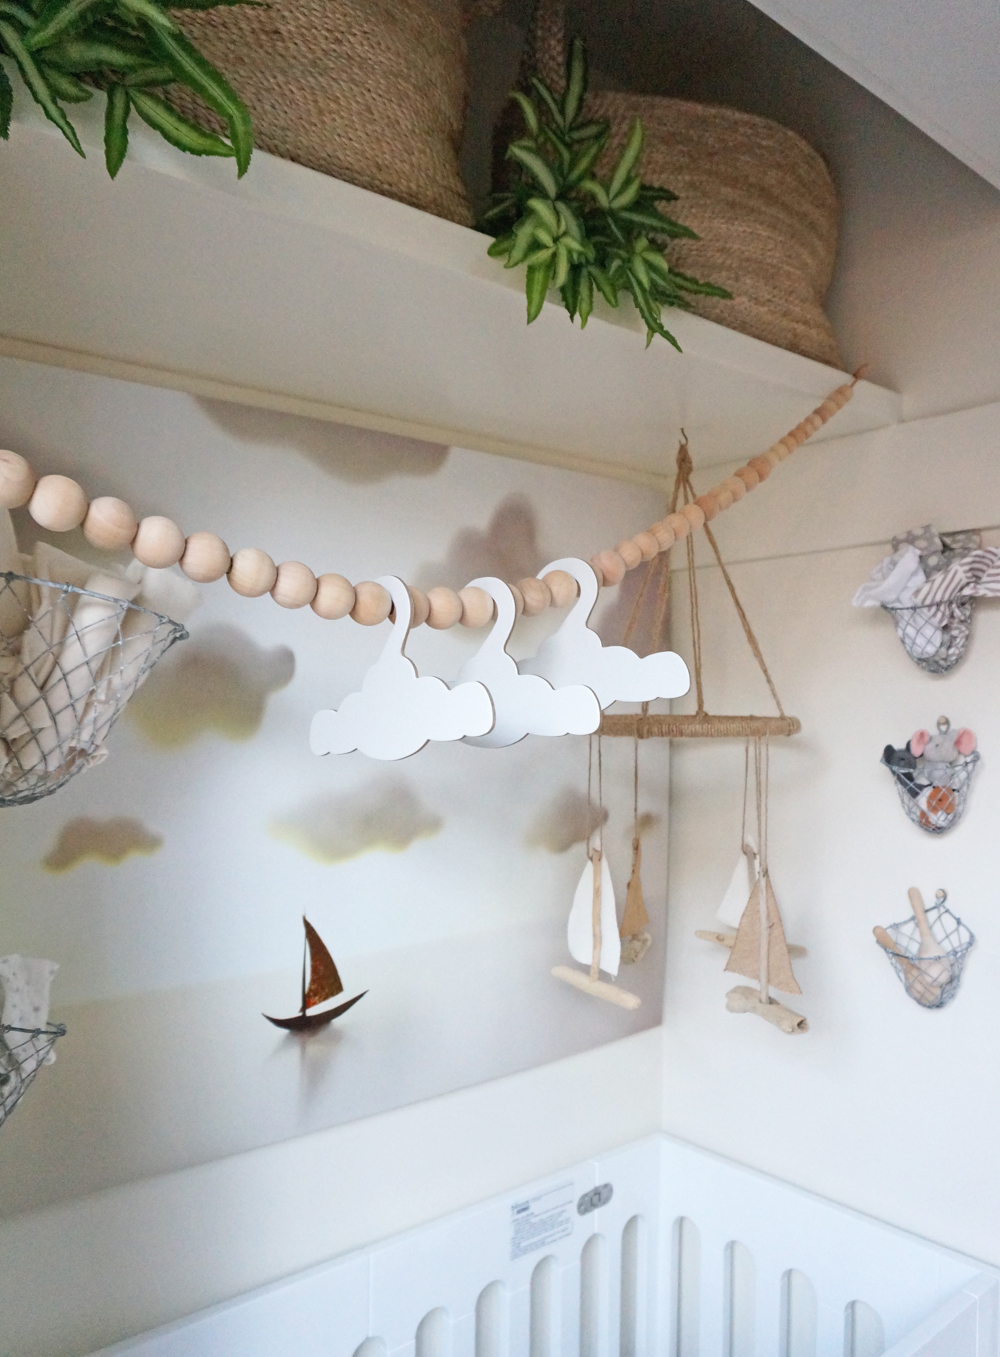
OPTIONAL CLOTHING RACK | We removed the dowel rods from the closet, as we don't intend to hang the baby's clothing in the space. However, in case we do need a place to hang items from time to time, I found a wooden bead garland (to act as a clothing line) via ETSY that I shortened to fit our needs, and then secured to the inner lip of the Bay's top shelf. I can pull the strand out whenever we need to hang something up, and then tuck the strand away again when it's not in use:
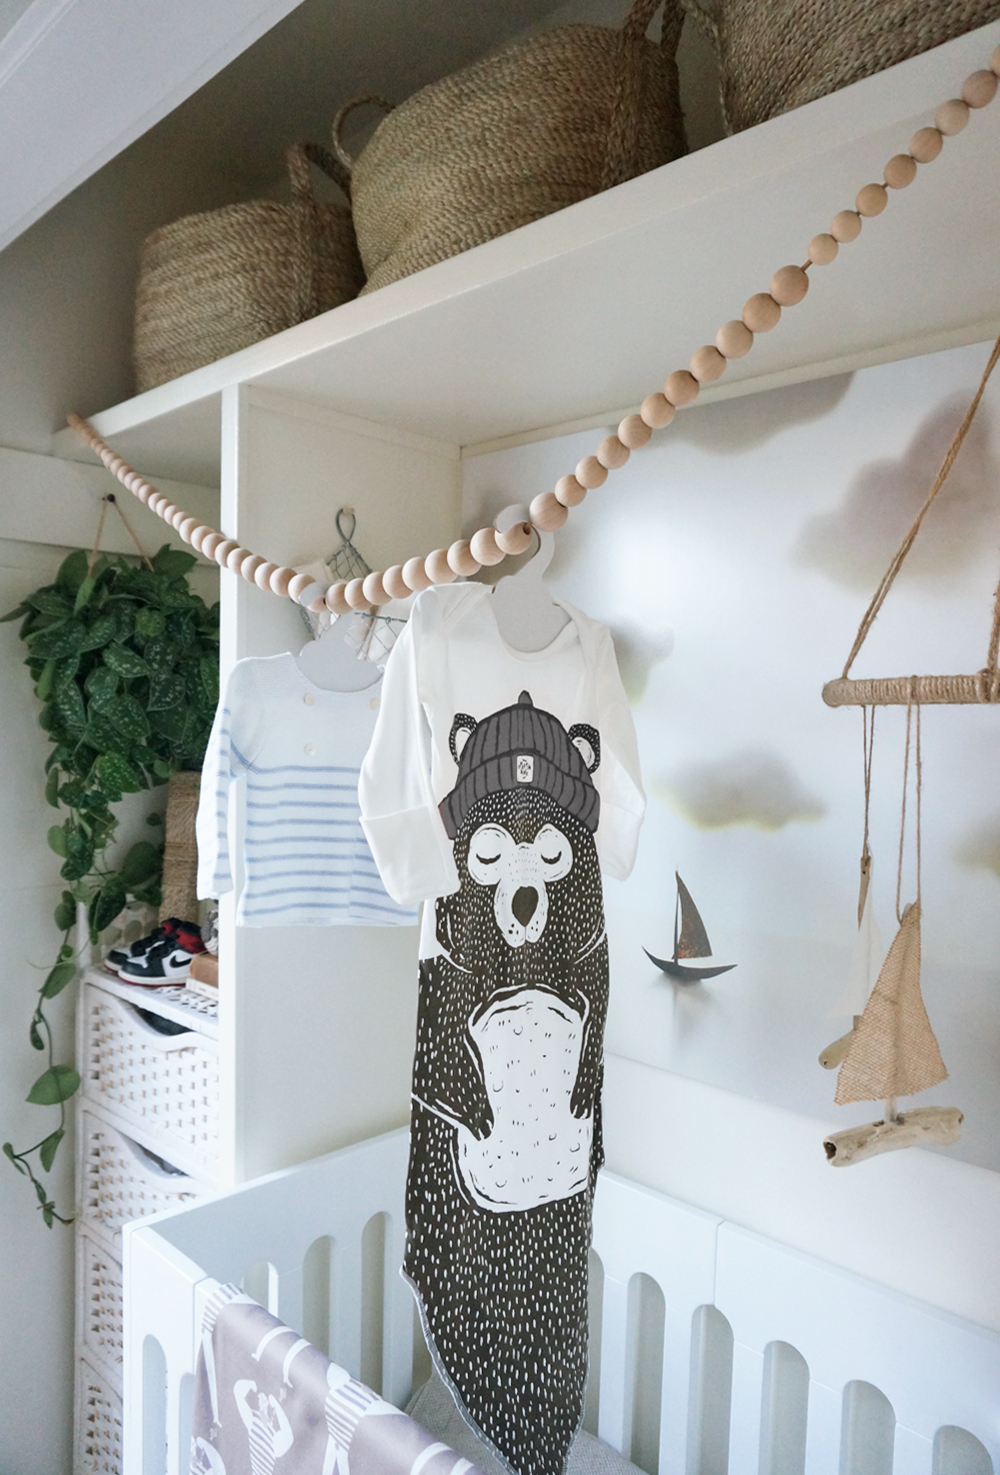
As such, we also needed some small, light hangers. I opted for these adorable cardboard clouds from Little Dundi, as we can recycle them once they're no longer needed:
ARTWORK | Then came the artwork! I wanted the nursery to have dedicated imagery, but for the pieces to compliment the other art within our bedroom. I also toyed with the idea of dark accent walls and/or wallpaper for the Bay. In the end, however, the bright, clean walls decorated simply with the art won me over. (Plus, we want the Bay to be easy to adapt, so it can evolve as our son grows.) I chose the following pieces for the Bay and the bedroom, and kept the possibility of earthquakes in mind when choosing how and where to display them:


Sources:
1. "They Delayed the Workings of the Day..." by Elly MacKay as "Theater Clouds" on ETSY (Link)
2. "Legends" book cover (Vintage)
3. "Homestead" by my friend Gregory Beauchamp as "Beauchamping" on Instagram and ETSY (Link)
4. "Peace Leaves" pen + ink by Britt Fabello as "Sea of Atlas" on Instagram and ETSY (Link)
5. Medium, vintage-reproduction nautical map of the "Reefs of Florida" from Archive Print Co on Instagram and ETSY (Link)
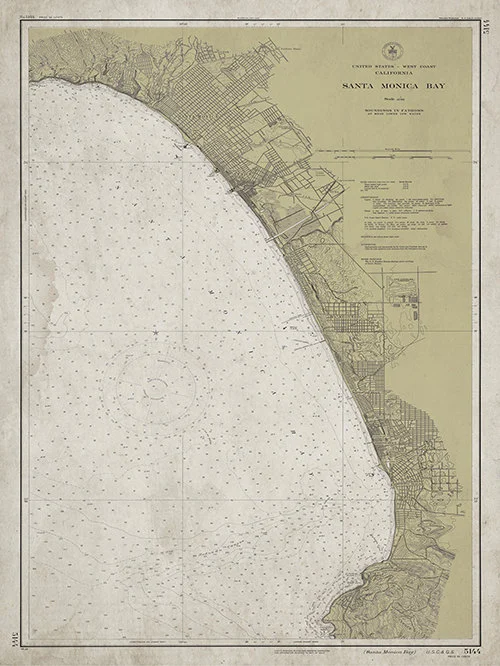
6. Large, vintage-reproduction nautical map of "Old Santa Monica" from Archive Print Co on Instagram and ETSY (Link)
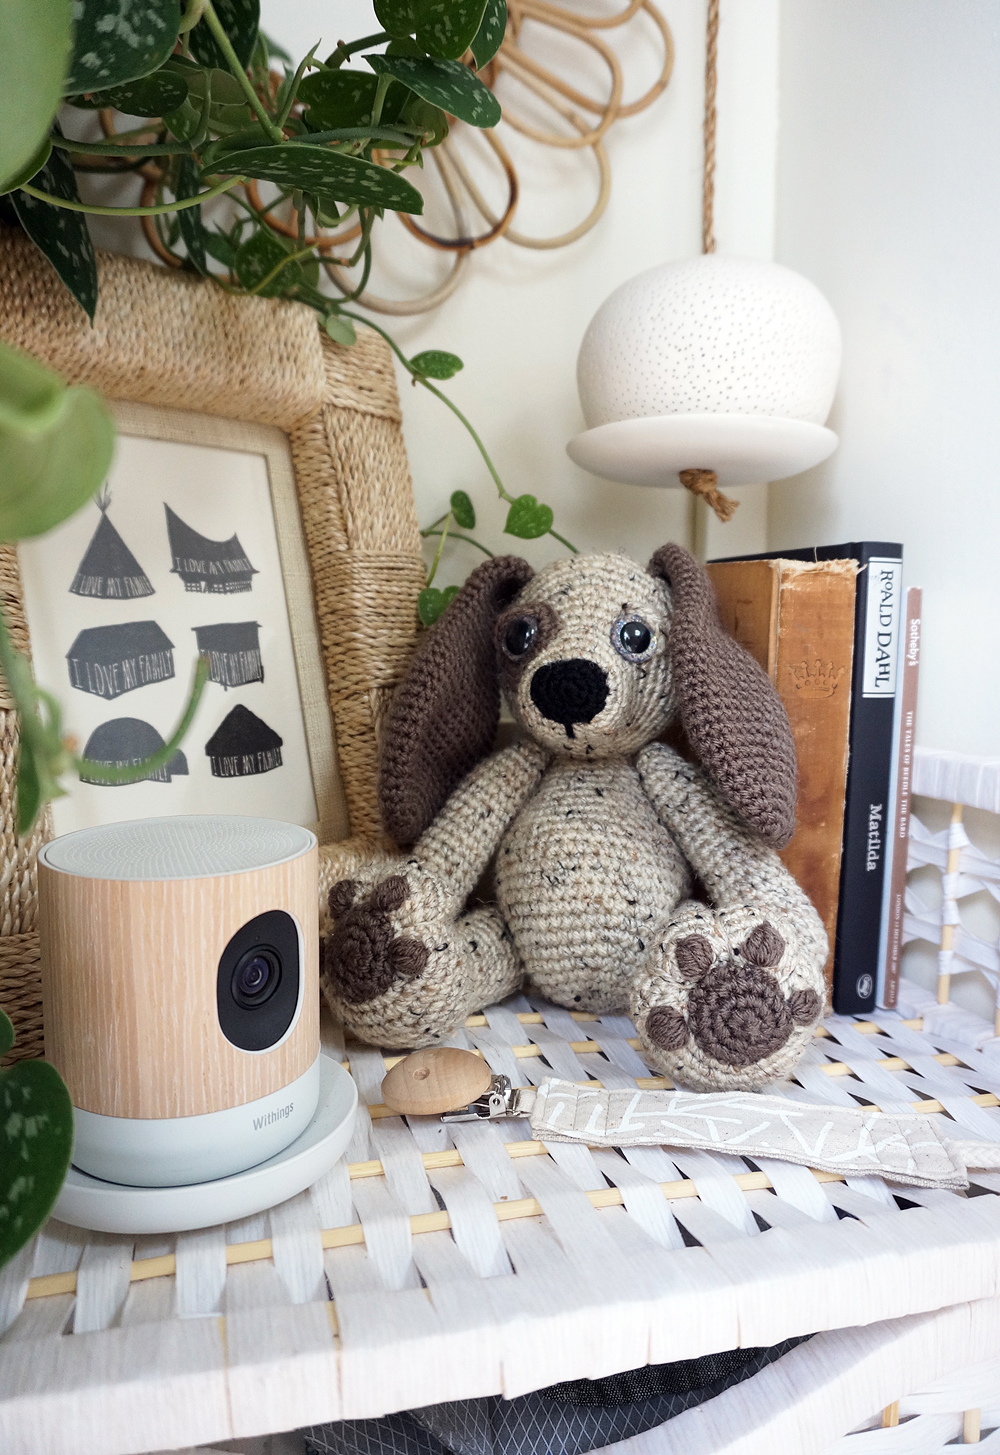
(Also pictured: Handmade beagle plush toy by ADToys via ETSY)

FUNCTIONAL ACCESSORIES
Next on the to-do list was the delightful task of selecting functional accessories to help us easily access and stash various necessities.
I selected these lightweight Otis Wire Wall Baskets that I found on Domino to help hold miscellaneous cloths, tiny clothing, and toys. (As our son grows and begins to be able to reach these baskets, we'll relocate them.)
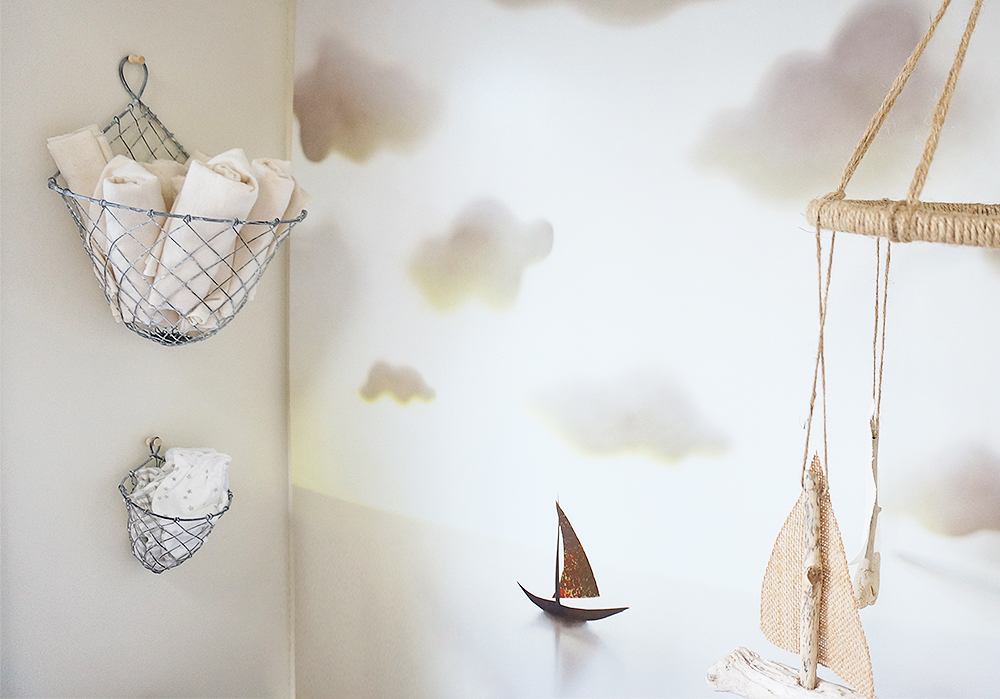
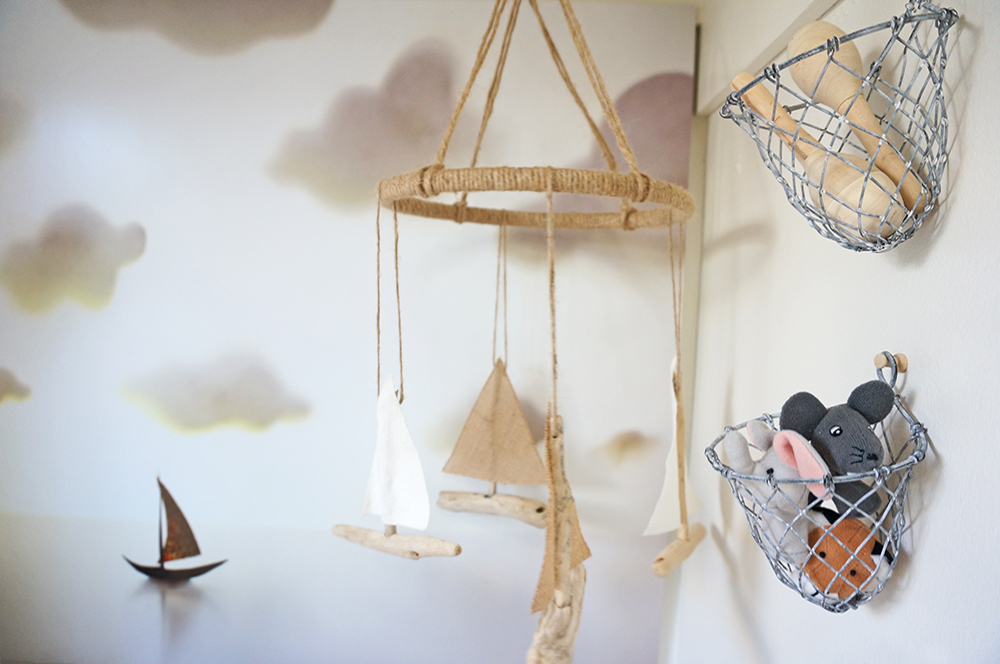
(Also pictured: Small driftwood, burlap and hemp baby mobile-- another ETSY find, via Wiggly William.
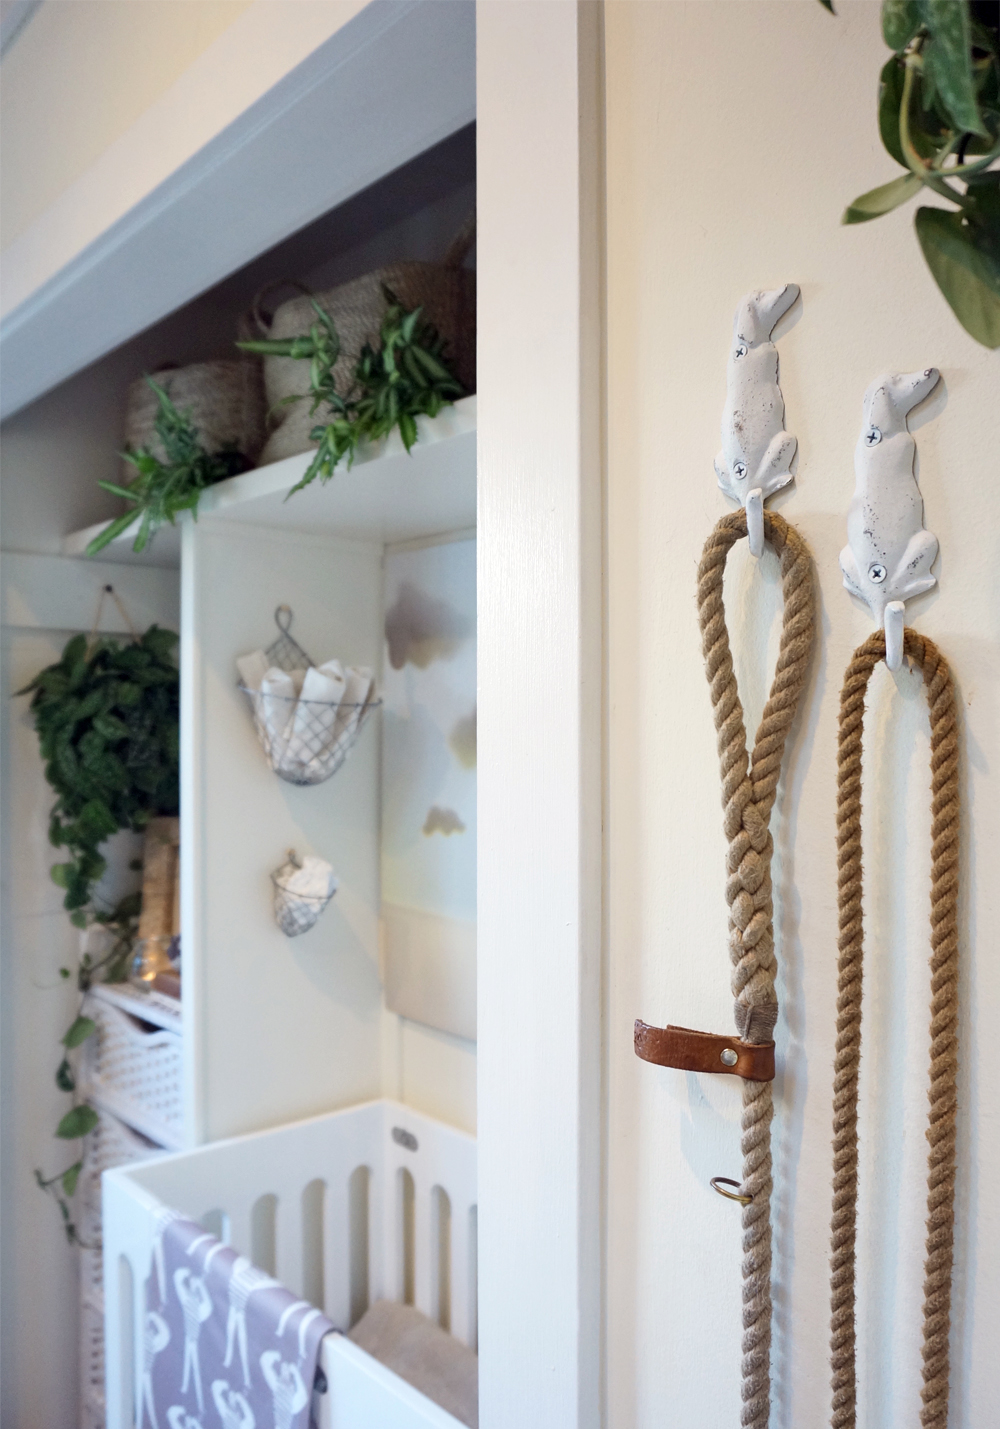
I wanted new hardware to hold Stanlee's and Sophee's leashes next to the Bay. This pair of hound hooks (also from ETSY) were spot on, and blend well with the decor when paired with the nautical rope leashes by Resq Co:
We needed to find a place to stash my prenatal and postpartum paperwork, as well as the baby's ultrasounds and future health records. Rather than opting for another "storage solution" I wanted to find a pretty lil' something that could be left out in the open like an art objet. I stumbled upon a vintage picnic basket at Tower 20 (by Tim Clarke Design) in Santa Monica, and repurposed it into a medical files box:
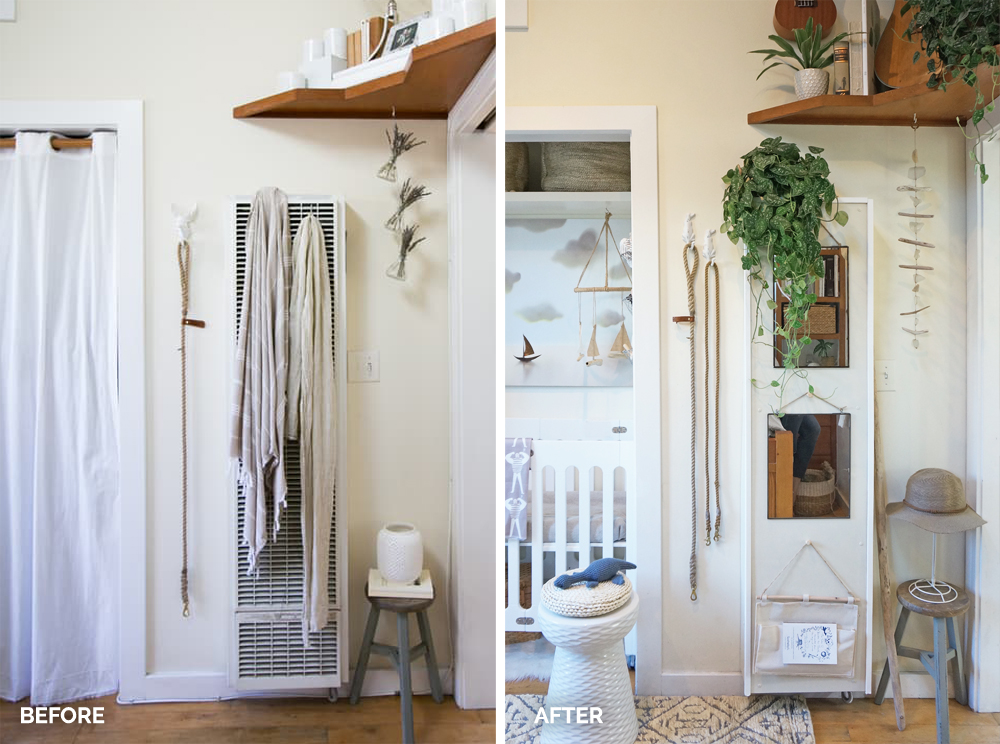
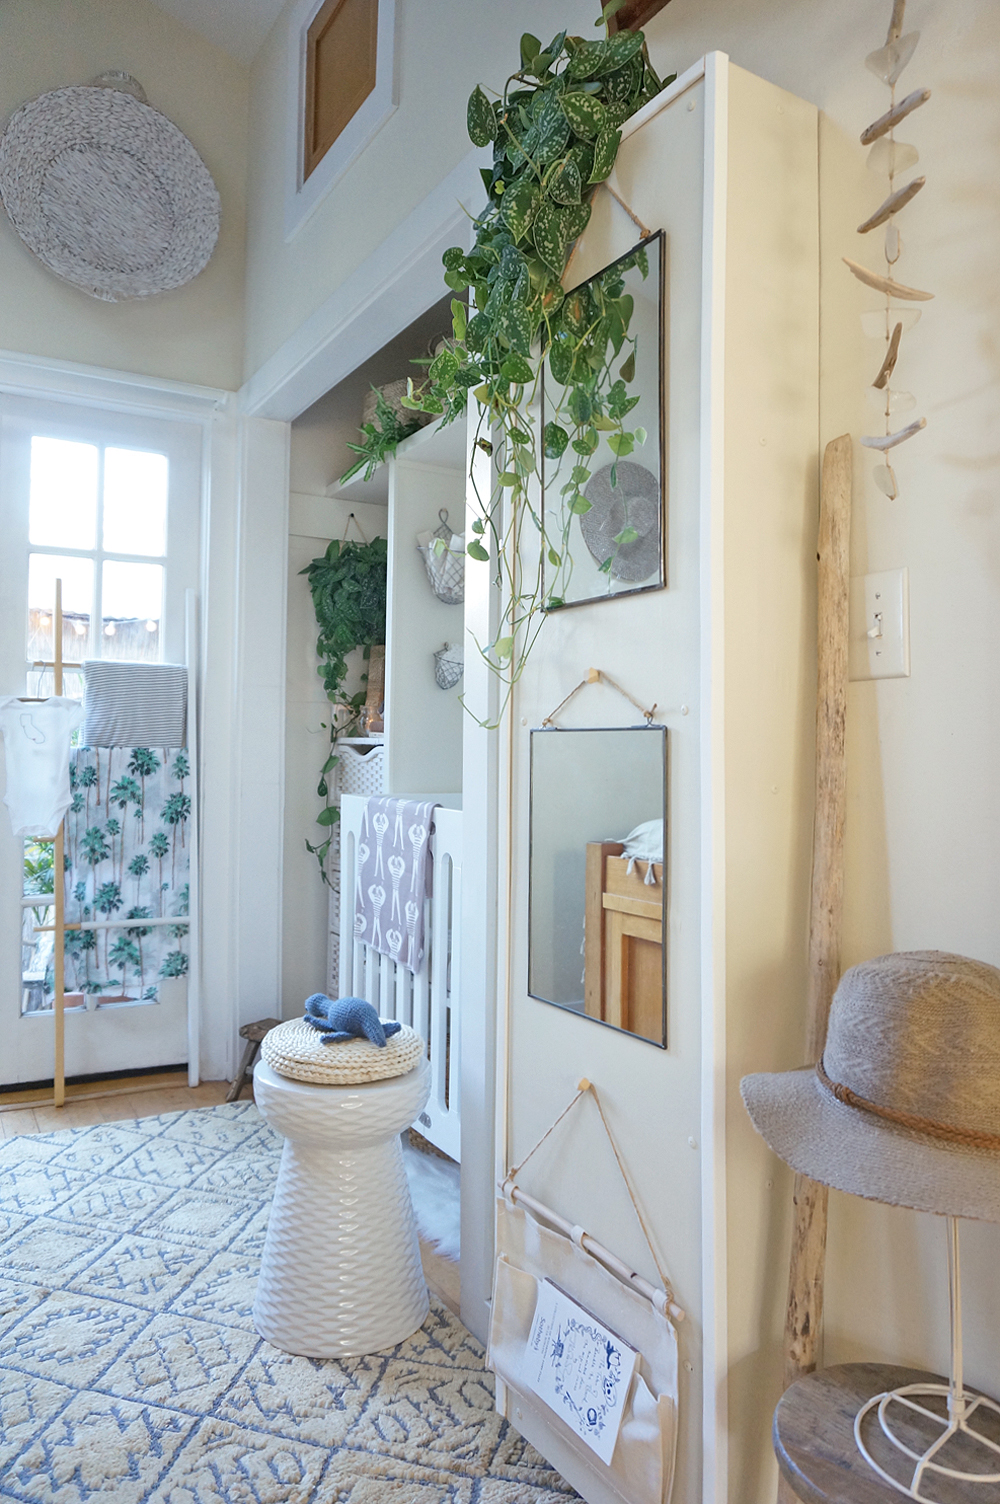
I then decorated the nearby heater cover with lightweight mirrors to help brighten and enlarge the appearance of the space:
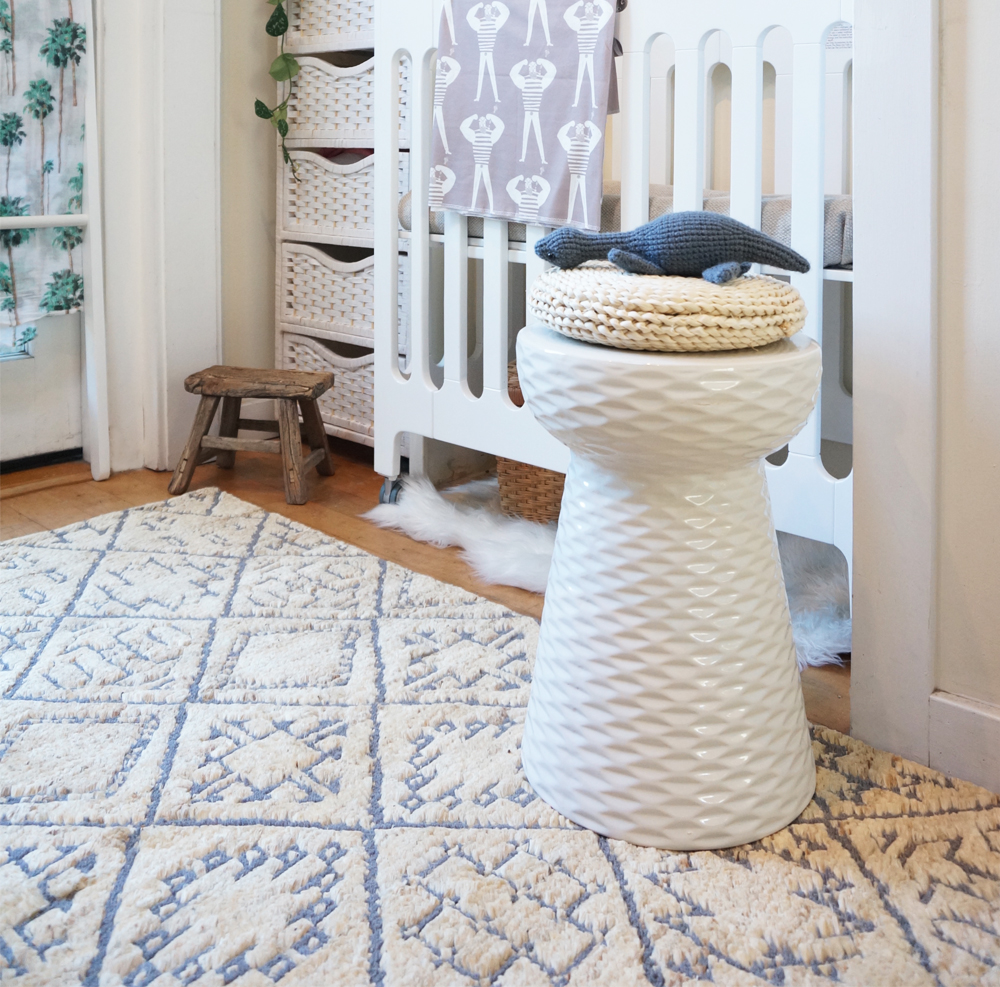
(Also pictured: Handmade Loch Ness monster plush toy by MEVVSAN from etsy // Small wooden stool (vintage) // 2-toned Umbra hub ladder // Daphne white garden stool from home decorators collection // Sailor swaddle by Woolf with me)
We also needed a new, cozy rug to sit on while spending time with the baby. I found the Sahara Rug in Sand via Loloi Rugs, and it's my new favorite item in the bedroom:
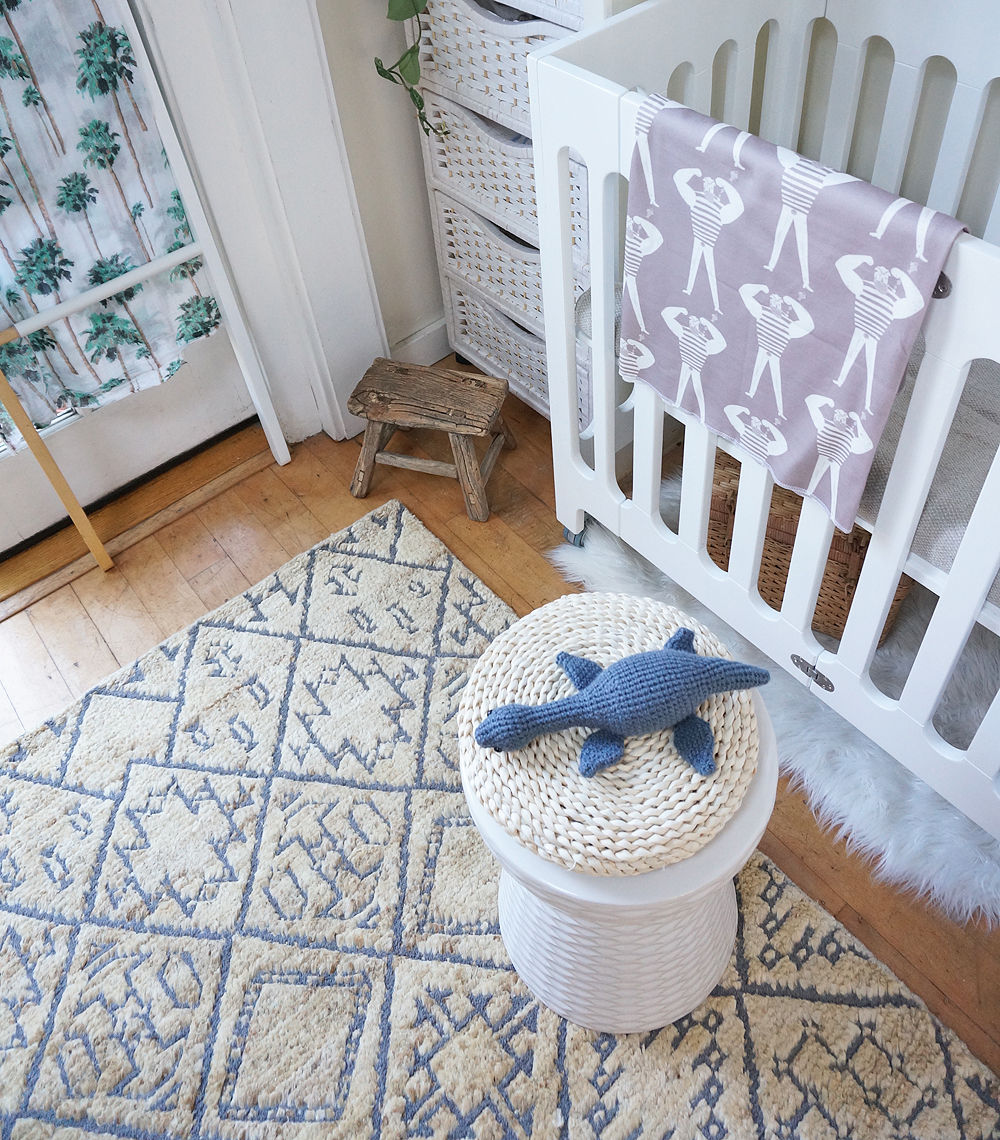
(Also pictured: Handmade Loch Ness monster plush toy by MEVVSAN from etsy // Small wooden stool (vintage) // Daphne white garden stool from home decorators collection // Sailor swaddle by Woolf with me)
Another item on the checklist was a baby monitor. But we also wanted something that could act as a general security and pet cam when we're out of the house. We love the look of this Withings "Home" camera, and that it has several audio features that we can control with our iPhones. (We've started using it already to speak to the pups when we're out, which is always entertaining.) We'll have to find the perfect place for it once the baby arrives!
CHANGING AND BATHING TABLE (+ ACCESSORIES)
Last but definitely not least, we needed to find a changing table and baby bathing solution. While we could've used any place in the house for changing diapers, we wanted something dedicated and mobile. I am nearly 6' tall, and Adam is even taller, so the idea of bending over a low surface for changing and bathing was completely unappealing to us. Meanwhile, our sinks (bathroom and kitchen) are too small and not properly designed for baby bathing. We don't have room for a changing table AND a bathing solution, but luckily we found a rolling combo piece.
... and no, we aren't keeping the combo table outside-- it's just easier to photograph out of the house! It will be a mobile piece within the Cottage.
How cute is this greige sailor changing pad cover by Woolf With Me?!
We've already stocked up the cart with multiple diapering systems from GroVia. (We've used them on our nephews who are here frequently, and they've worked wonderfully.)
When we're on the go, we'll use this handmade changing mat from Fawn + Cub. (I bought this a year before we decided to get pregnant. Crazy, I know, but I just loved it so much.)

Our diaper tote is also made by an ETSY vendor-- a married couple who run a shop named Kith and Kin. Adam and I love how this unisex bag is both durable and beautifully designed:
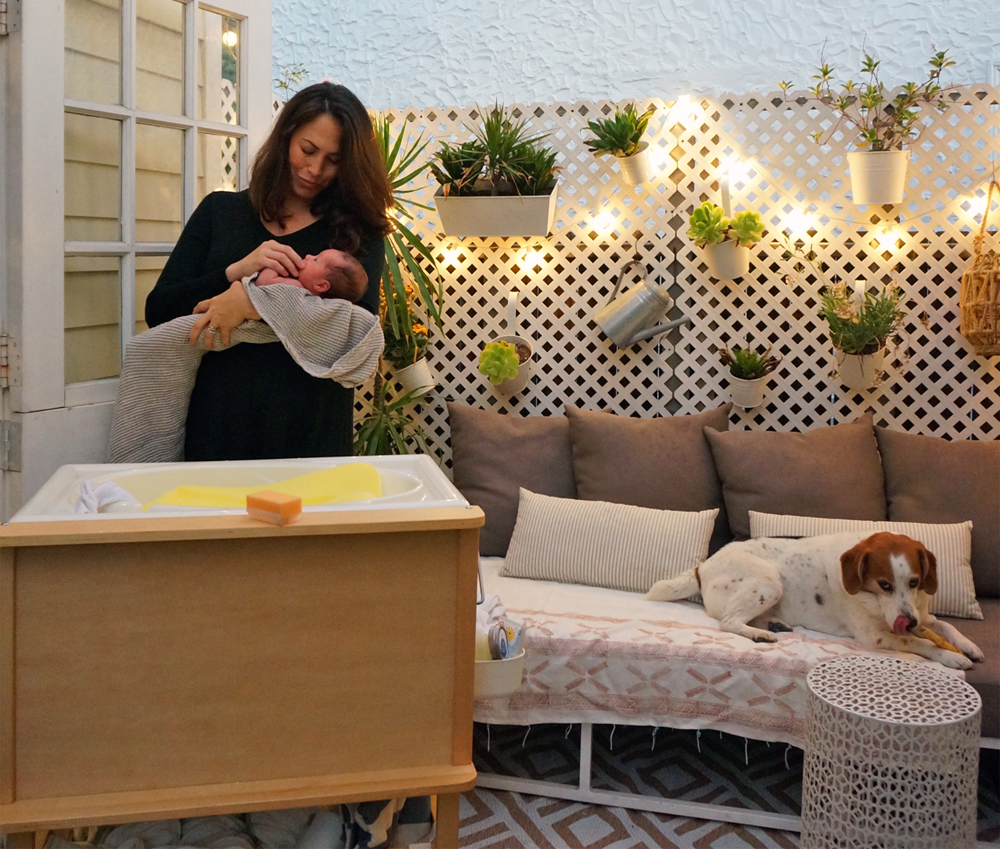
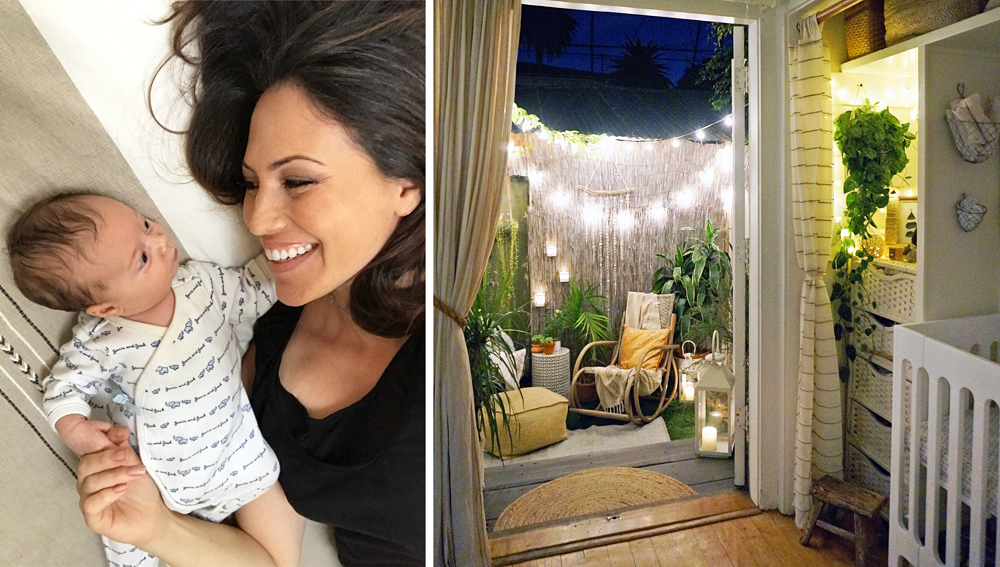
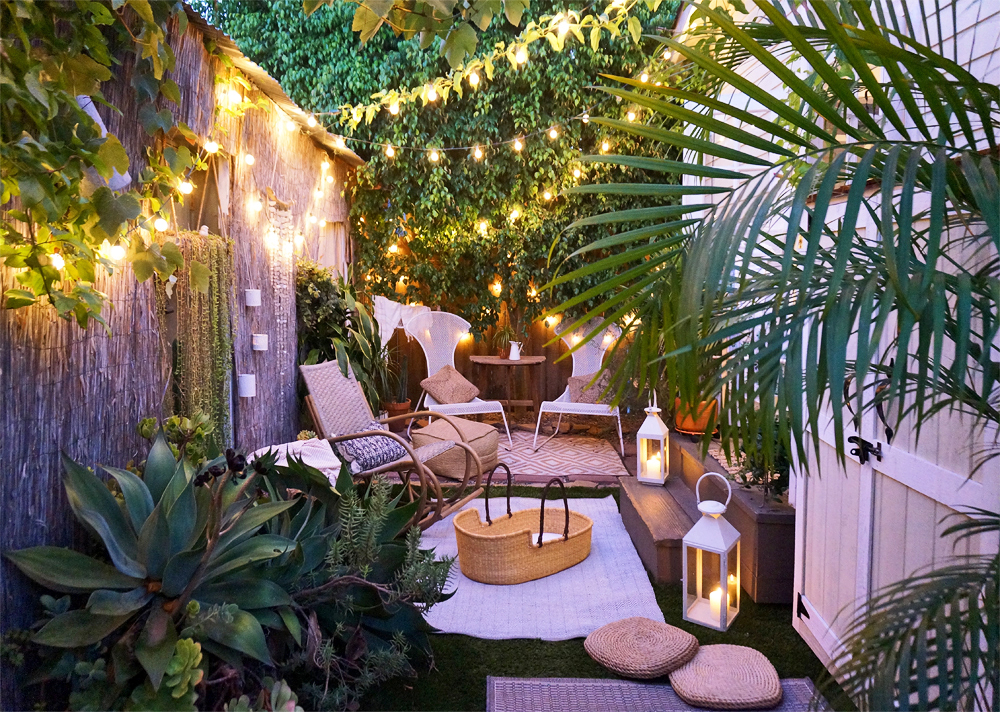
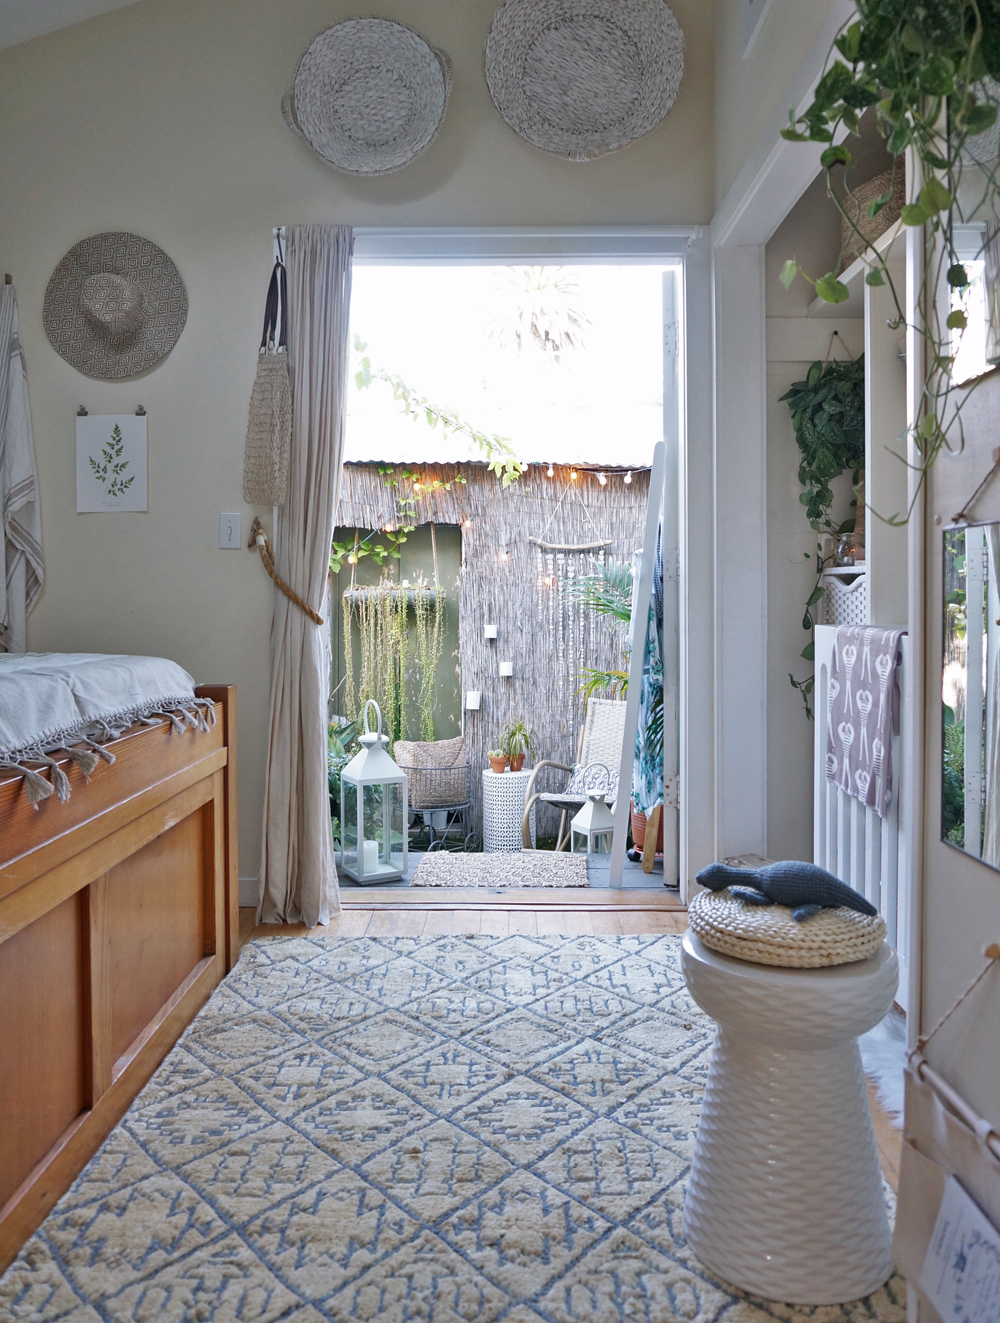
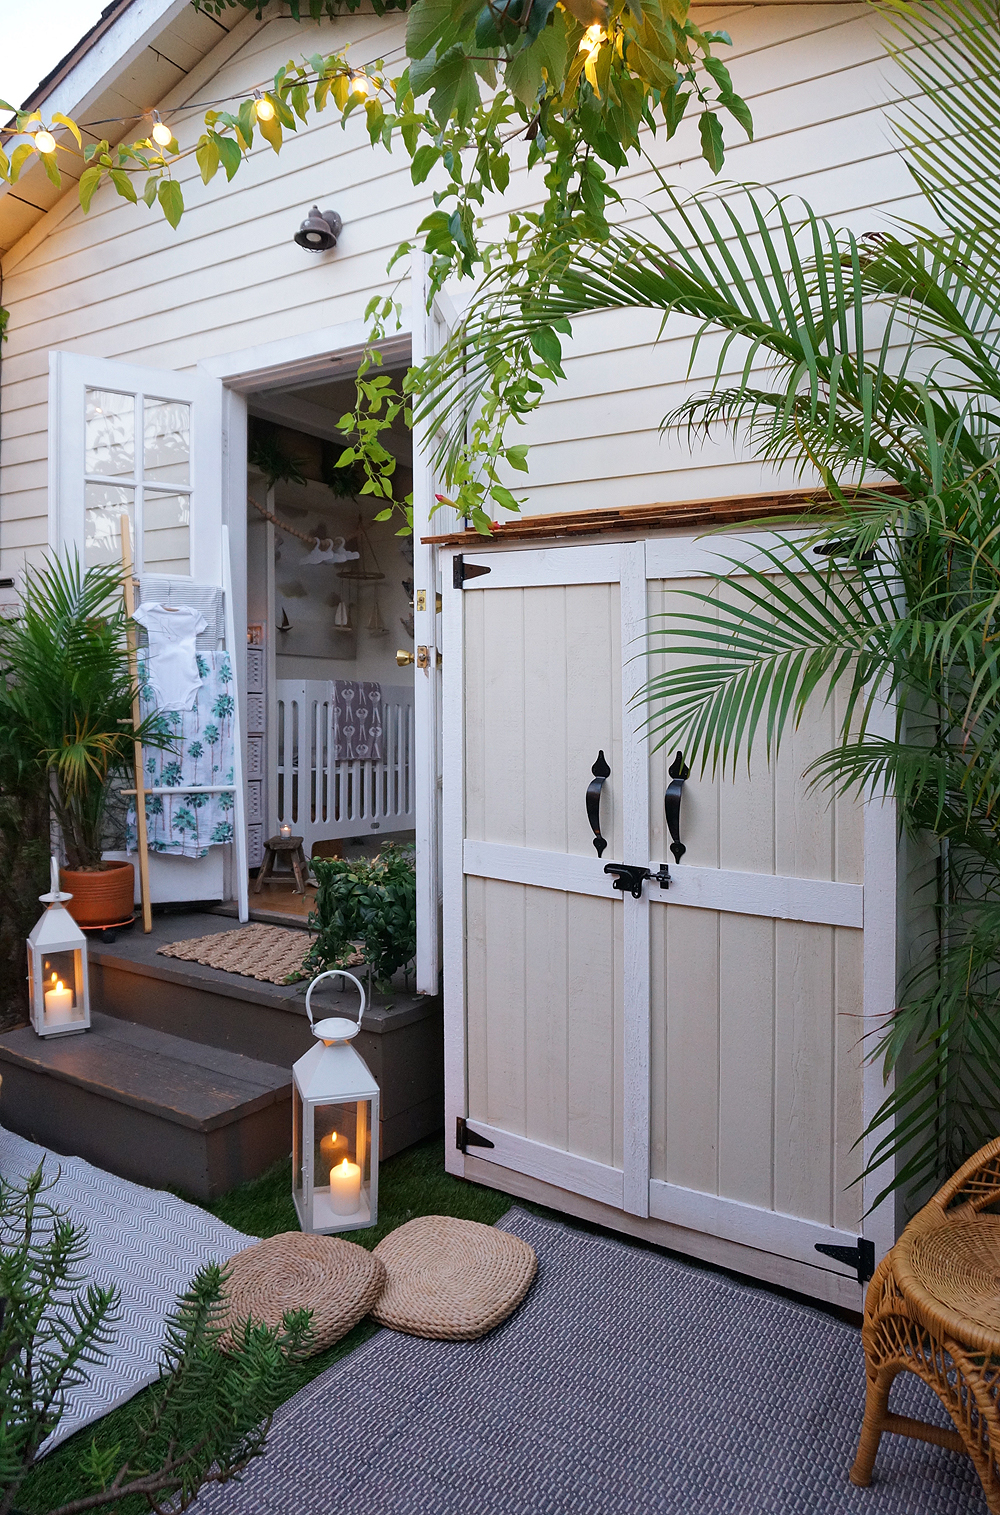
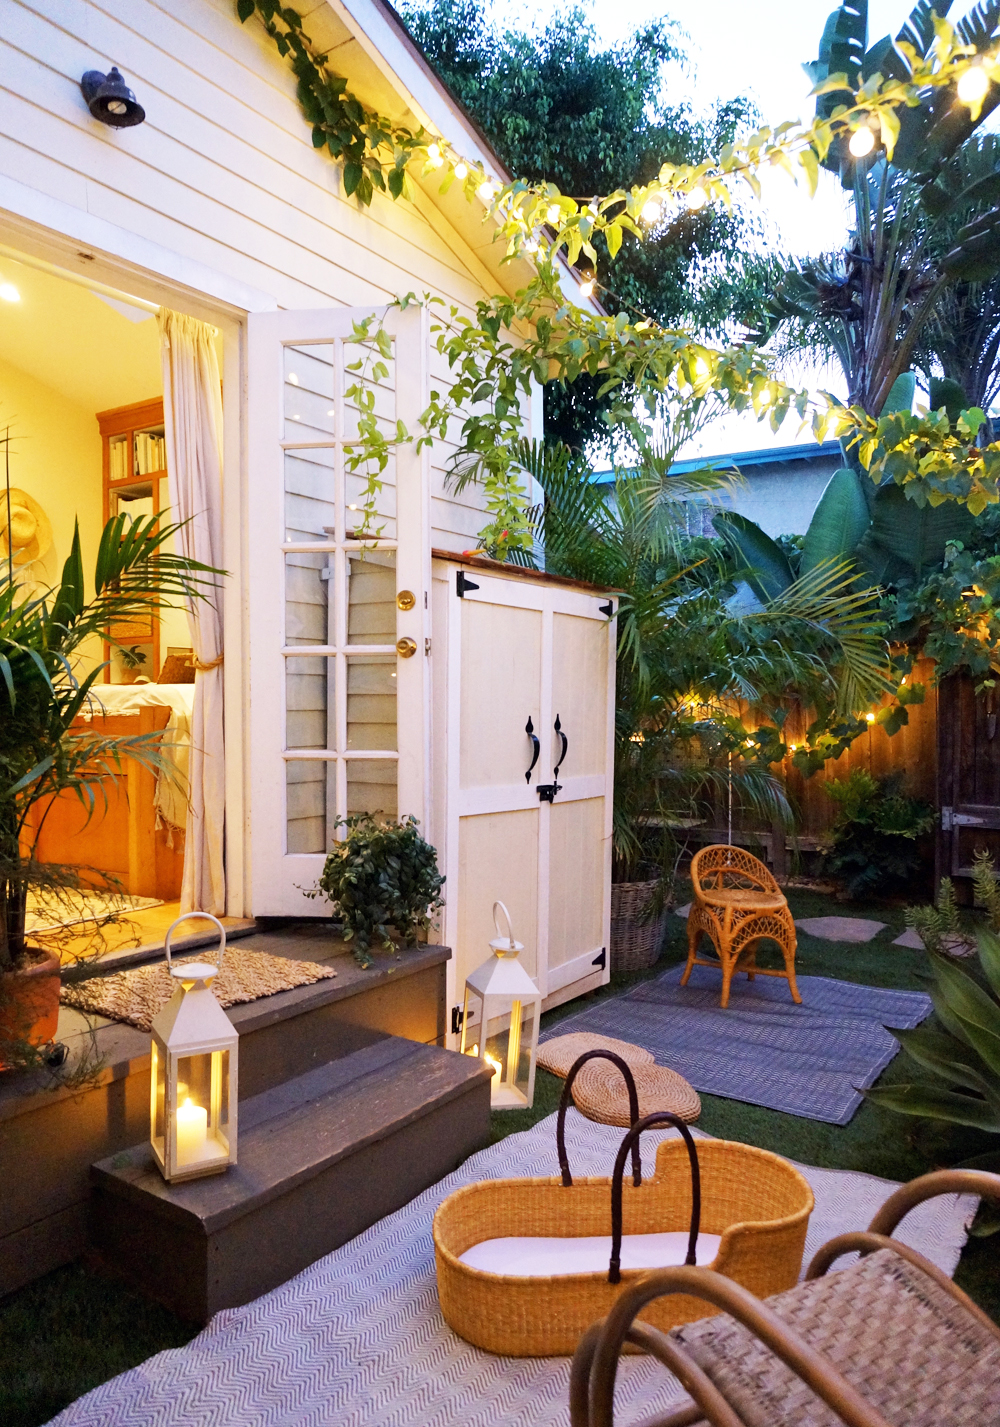
LOUNGING | We don't have the room for a glider inside, so we placed a wicker rocking chair from Joss & Main in the garden just off the bedroom/nursery stoop. We dressed up the space with outdoor rugs, throws, lanterns, and a 5' handmade mobile by Sea & Glass. If the baby isn't in our arms while we're enjoying the garden, he'll be in this gorgeous Moses Basket from Plum + Sparrow:
WHEW. Now I think the only thing we still need is... THE BABY. Hurry up, October! We are can't wait to meet our son and introduce him into this loving, little world of ours.

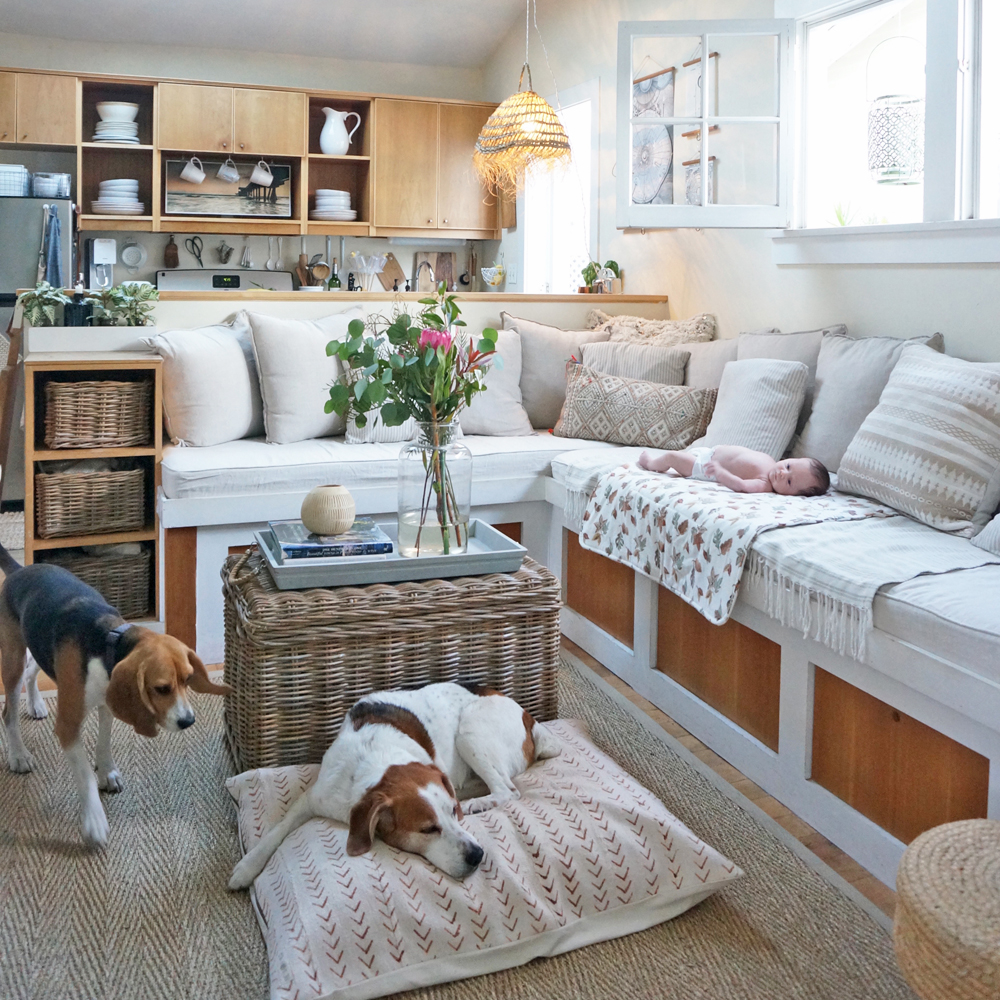
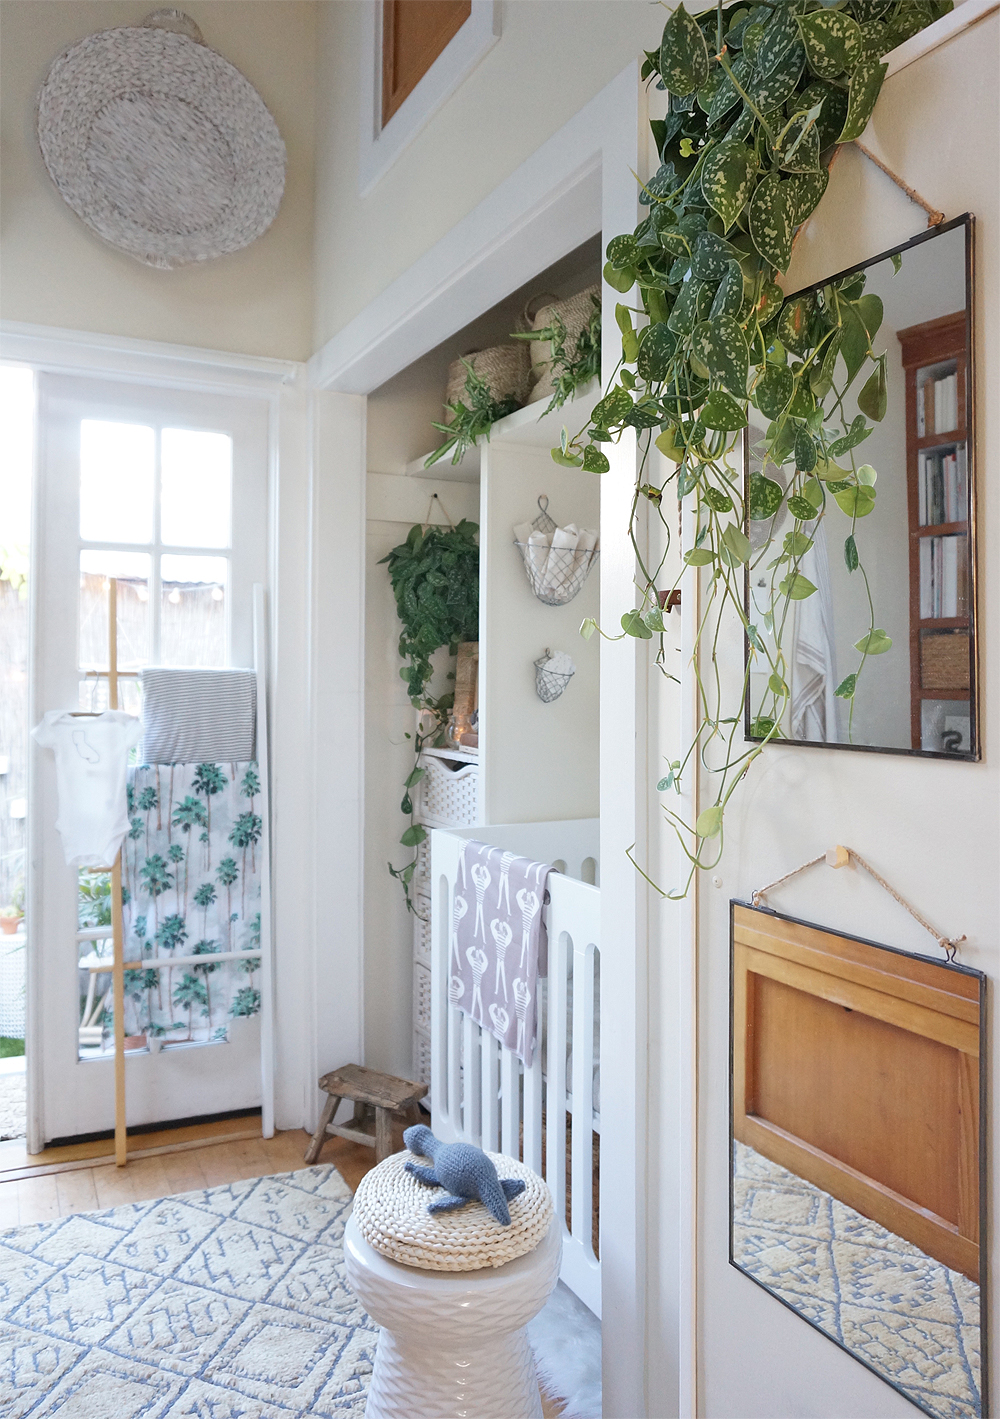
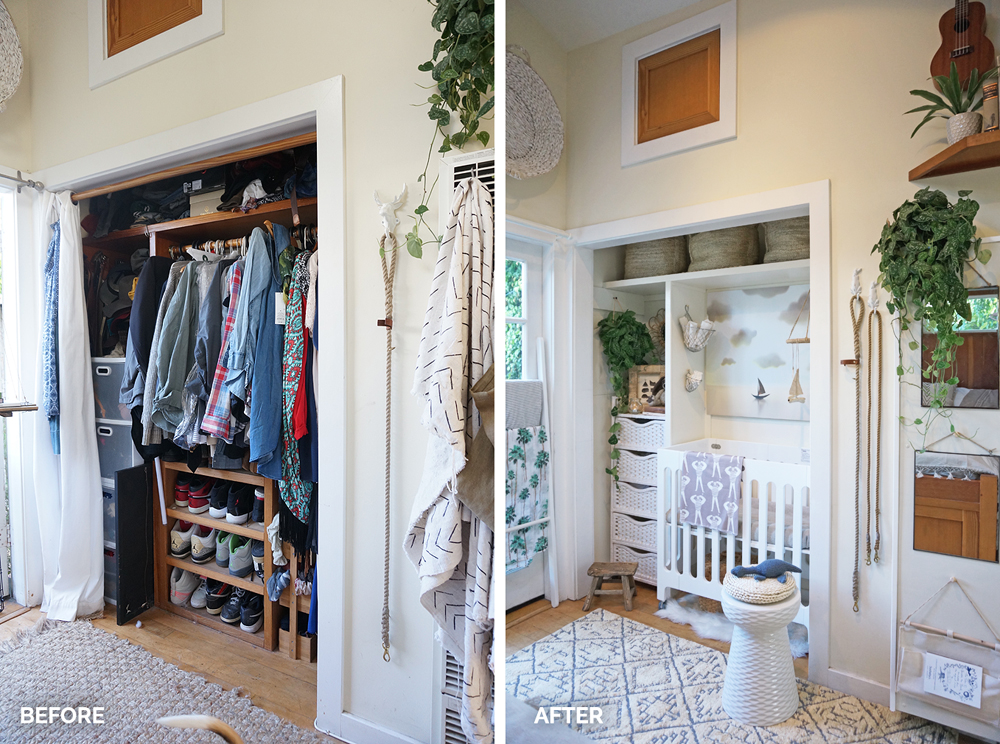
Tiny House Closet Nursery - The Baby’s Bay
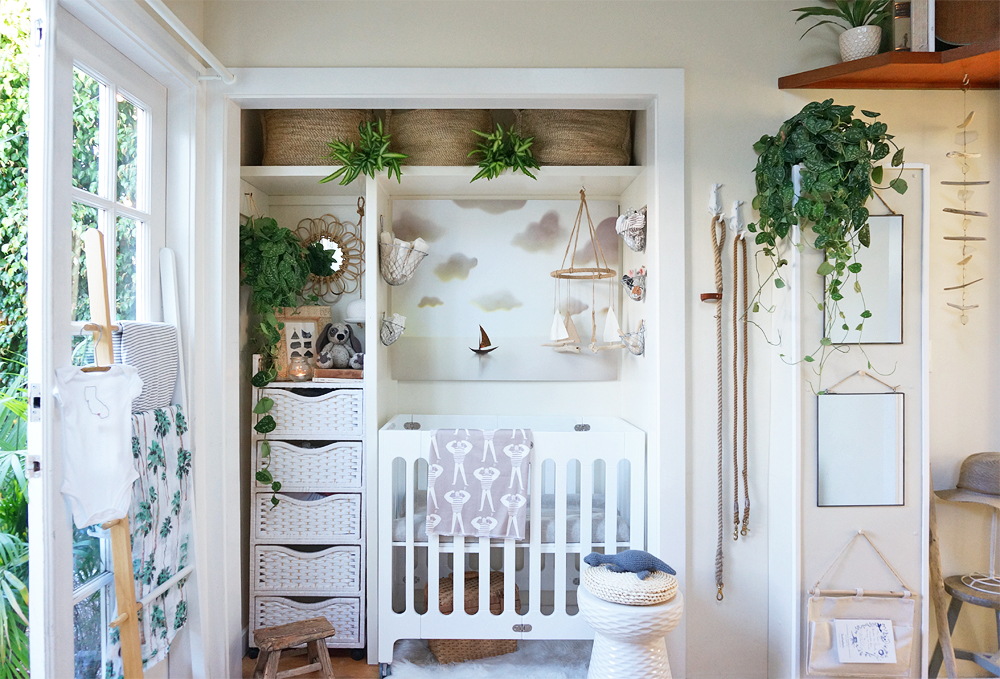
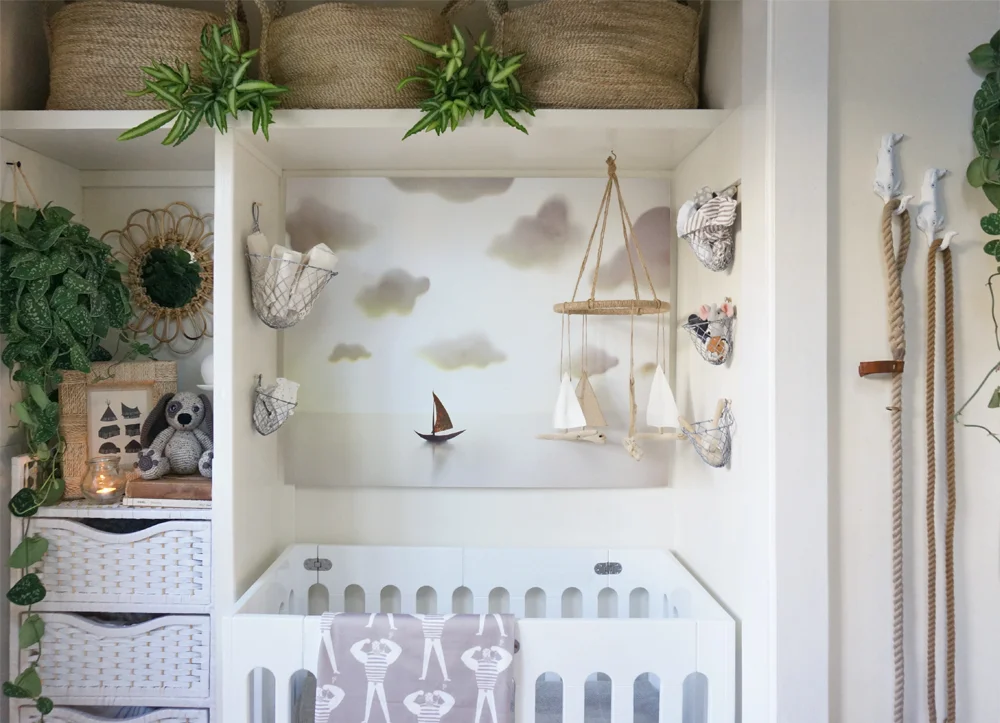
When selecting a dedicated area for our son’s nursery, we did what many small-space dwellers do and opted to convert our closet into his little room. I didn’t intend to have a “theme” for the space, but it happened on its own over time. The colors, textures and prints I selected were sandy and neutral, and the artwork I loved most reminded us of our lives here along the ocean. Before I knew it, we had a subdued coastal vibe going on. As such, I started referring to the little alcove as "The Baby’s Bay."
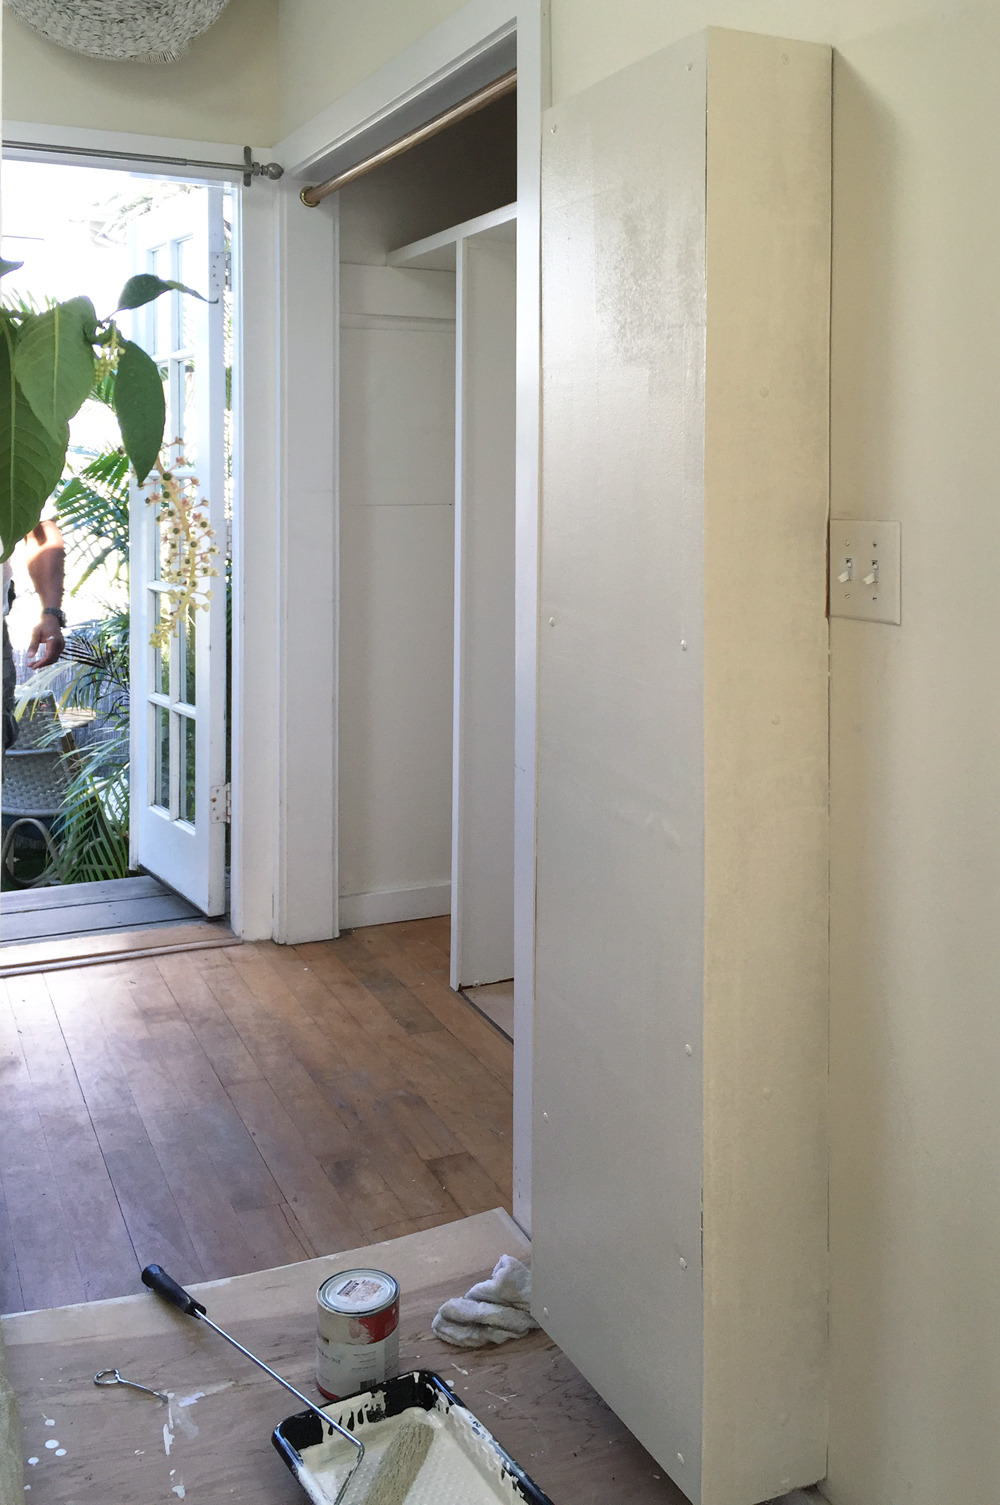
There were some basic updates that needed to happen before we could safely and practically convert the closet into the Bay. Thankfully they were all simple:
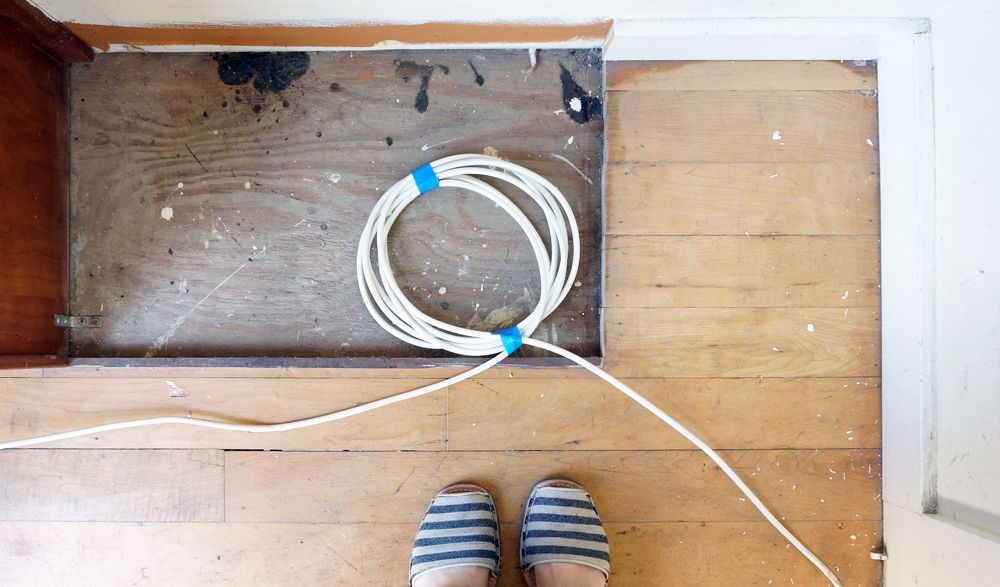
1. Deconstruct the built-in shoe rack, and fill in the gaps left behind after its removal. We hired a local handyman to do this. He ripped out the built-in shoe shelf, and then used a mix of old and new materials to fill in the gap in the floor where the shelf previously stood. Meanwhile, I visited The Home Depot to pick a trim that matched the rest of the closet, and had it cut to fill in the gap in the molding left over from the shoe rack removal:

2. Remove the internet cable cord, which was fastened to the molding on the perimeter of the closet. Our internet provider sent a technician to help us with this process. He removed the ugly cords that sat inside for years, and relocated them to the crawl space under the cottage.
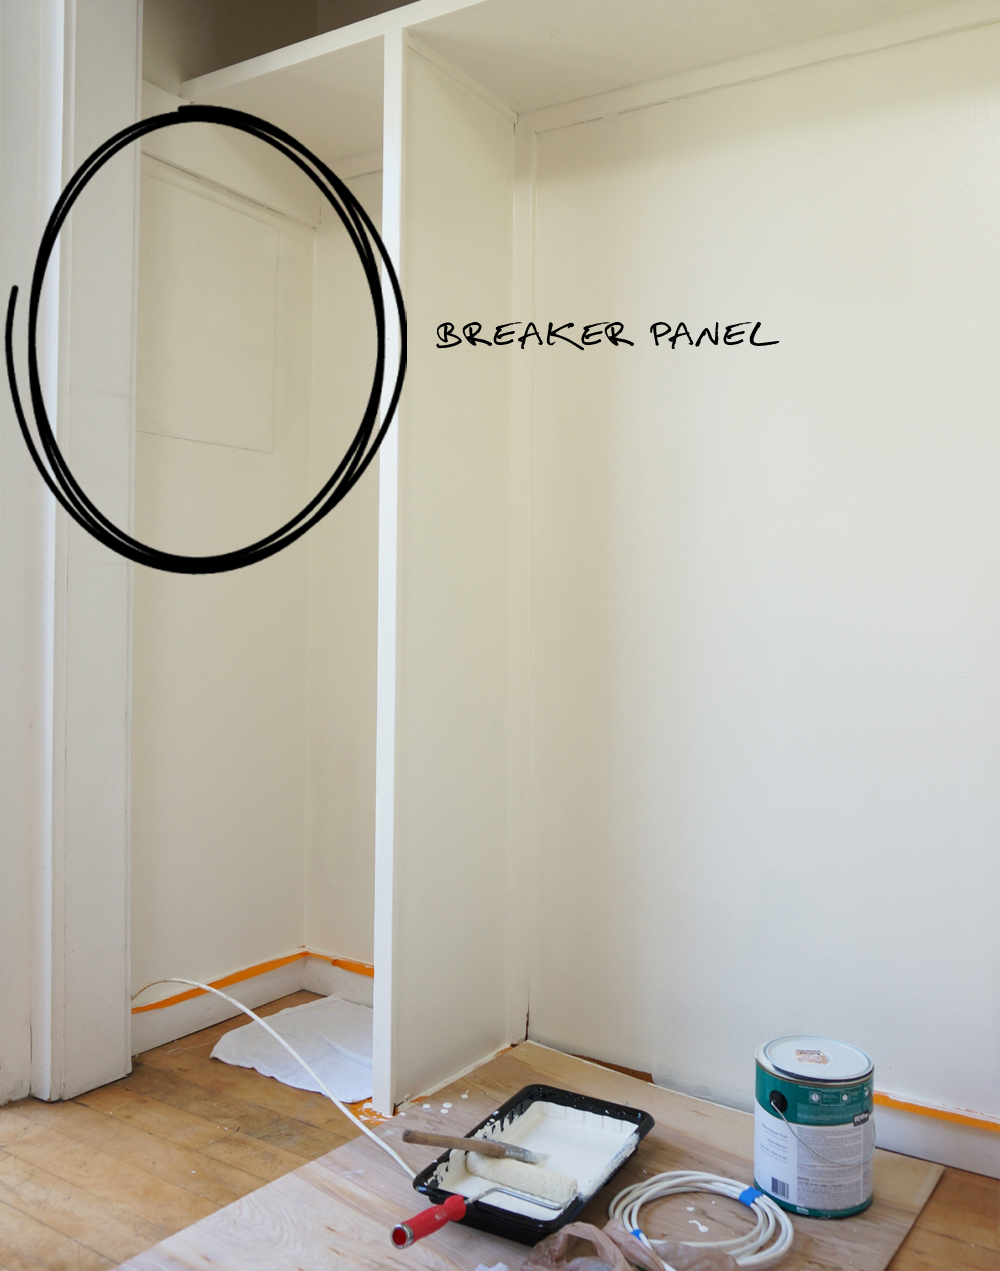
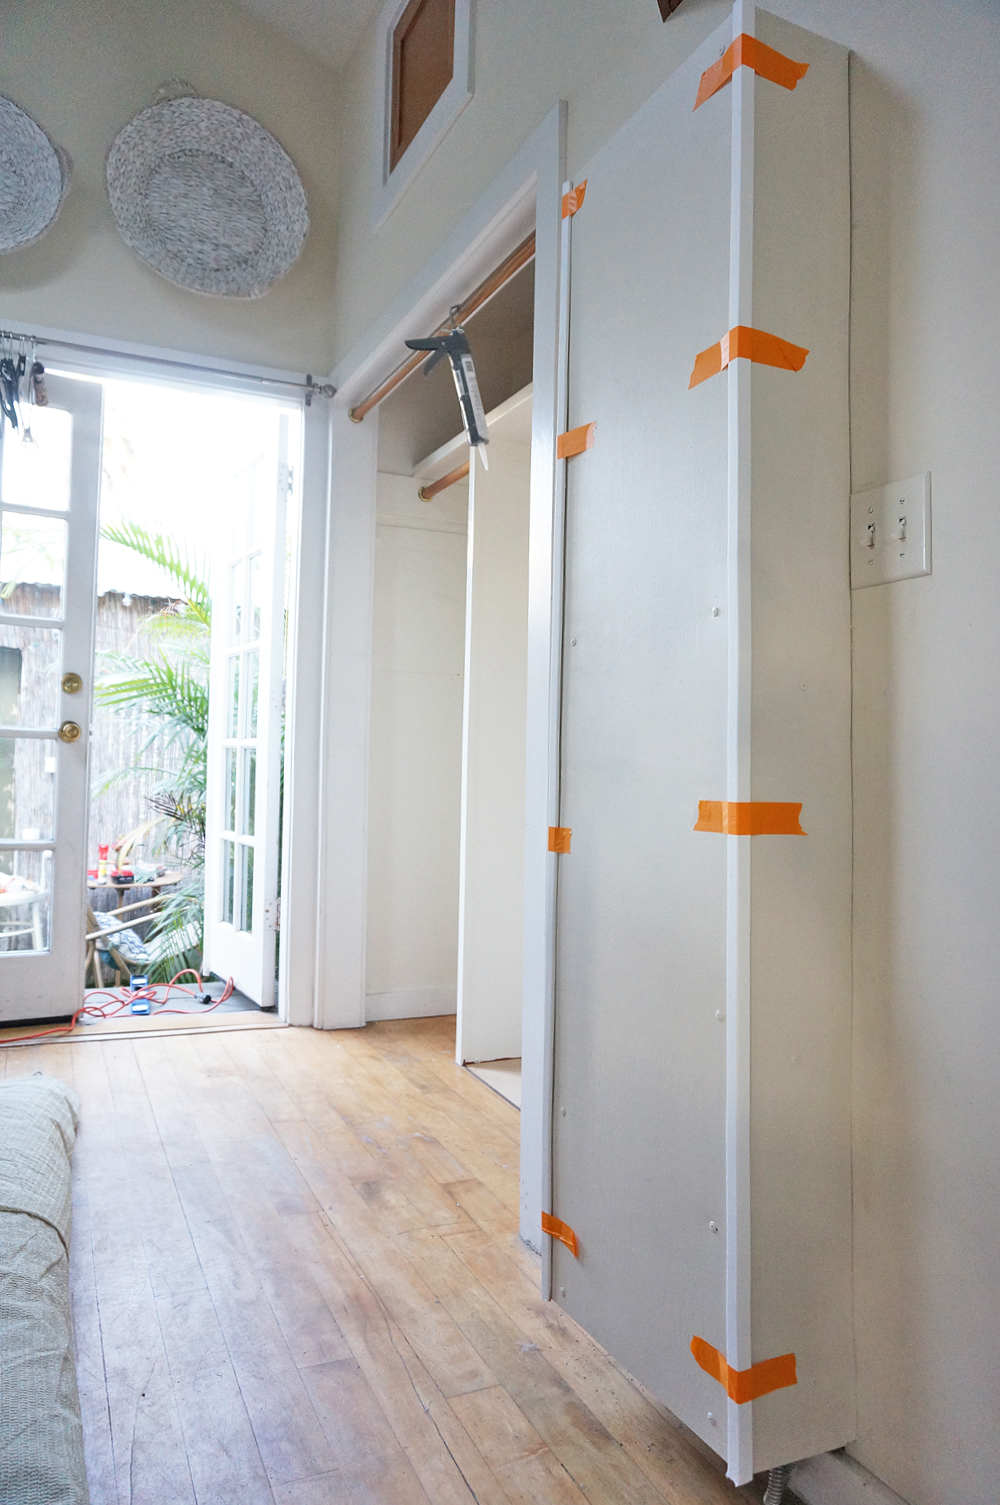
3. Cover the breaker panel, while still leaving it accessible: There’s a standard grey electrical panel on one side of the closet. We need to maintain easy access to the door, but I wanted to cover it up for the nursery. I used a magnetic sheeting overlay to mask the hardware, and painted it to match the color of the wall:
4. Remove the heater control panel box, closet dowels, and miscellaneous hardware. We had an electrician help us with all necessary wiring modifications. Beyond that, it was a simple matter of applying spackle and wood-filler where necessary before repainting everything.
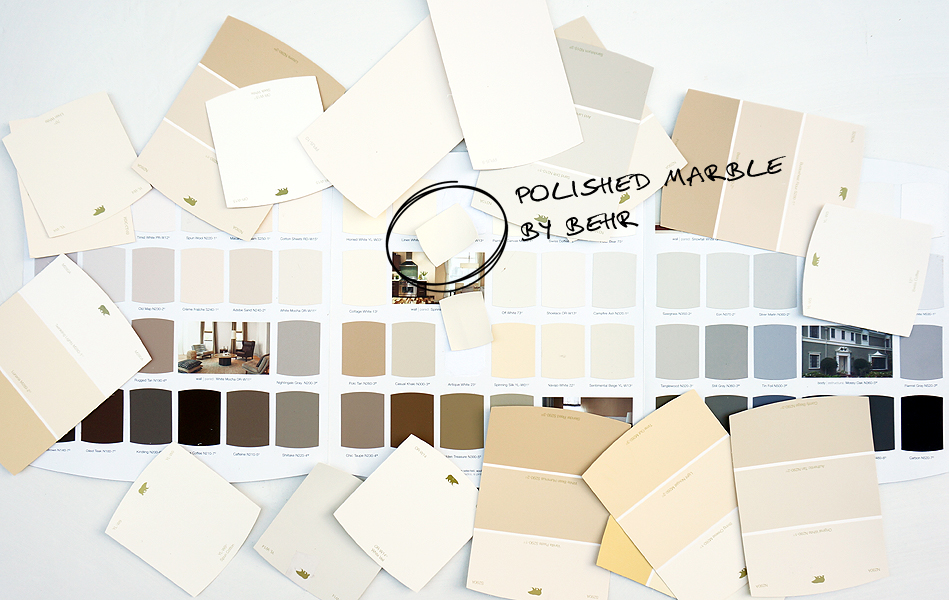
5. Leave the remaining built-ins (a high, closet-wide horizontal shelf and vertical divider) in place to help protect the baby from items that could displace during an earthquake, but better-blend those walls into the overall space. We always planned to leave the remaining built-ins within the closet for safety, and aimed to work with them when outfitting the space. But the dark wood lines drew attention to the dividers, and made the alcove feel even smaller than it is. So we chose a paint color that’s a few shades lighter than our bedroom walls to brighten up the previously shadowy Bay. I selected “Polished Marble” by Behr. I love how it appears to blend with the rest of the room, even though it’s actually quite a bit whiter:
Once we had this new, blank canvas, I could finally visualize the nursery. I found a little white garden stool from The Home Depot’s décor brand, Home Decorator’s Collection. I placed it by the crib, and I sat there rearranging and restyling the room in my mind for hours. The space then came together easily, despite its size.
Before we updated the closet, I used to obsessively close our curtains to avoid seeing the overflowing contents behind them. Now the closet is a bright, airy, and happy component of the Cottage. It feels as though it should’ve always been outfitted this way.
You don’t need to start from scratch to transform your existing square-footage into a space that better suits your evolving needs. With a bit of creativity and paint, you can turn a box into a Bay. You don't need to live large to live beautifully!
I acknowledge that The Home Depot is partnering with me to participate in this nursery makeover project. As a part of the project, I am receiving compensation in the form of products for the purpose of promoting The Home Depot. All expressed opinions and experiences on this blog are my own, and are written in my own words. My post complies with the WOMMA Ethics Code and applicable Federal Trade Commission guidelines.

Tiny House Closet Nursery - The Garden Shed Wardrobe
When Adam and I decided to have a child, we knew we wanted to stay here in our tiny home. As we already share the space with our two dogs and my small business, we knew it would be a challenge to add a nursery to the mix, but we were so excited to make it work. Given our budget, we basically had two choices when tackling the nursery project in our tiny house:
Leave nearly everything as-is, downsize our belongings in existing storage spaces to make room for baby care necessities, and rely solely on mobile/rolling nursery components.
Create a dedicated nursery within an existing space by downsizing and relocating our other belongings from that area.
We went with option two, because thanks to the sunny, dry SoCal climate, we knew we could get creative with indoor/outdoor lifestyle and storage solutions. (If we lived somewhere that gets a a fair amount of rain or any snow, we would've stuck with option one.) We decided to convert our bedroom closet into the nursery, by downsizing and relocating part of our wardrobe to a 2'x4' cedar garden shed from The Home Depot.
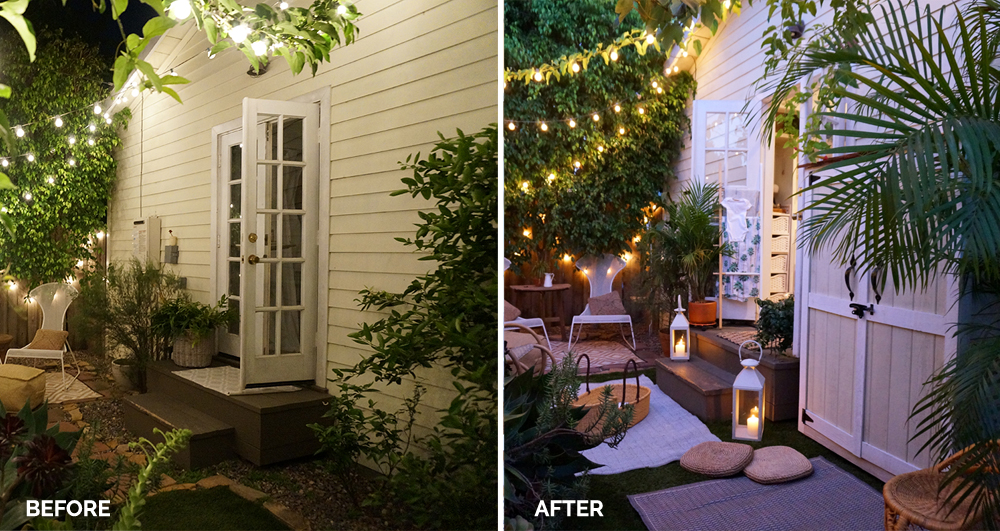
It's important to note that it VERY RARELY rains in Los Angeles, and the weather usually hovers somewhere around the 50°s to the 70°s. As such, our patio furniture stays outside and uncovered year-round, while select garden decor and accessories come indoors in the unusual event of rain. We've been using our outdoor spaces in this manner for over 5 years now, which gave us the confidence that we could pull off an unusual outdoor closet solution. Here’s how we did it.
DOWNSIZING
While storage solutions are obviously important in homes of all sizes, the clearest path to living simply is to not own too many things. While we extended our usable storage space at the Cottage via our new 2x4’ shed, Adam and I were able to make the wardrobe relocation project work by getting rid of nearly 1/2 of our clothing. Giving away belongings is second nature to us now, but it definitely took some practice at the beginning. For those of you struggling to let go with your unnecessary belongings, I recommend exploring The Life-Changing Magic of Tidying Up by Marie Kondo. (Try reading the digital version rather than the print edition and VOILA! You’re already on the path to reducing your physical possessions!)
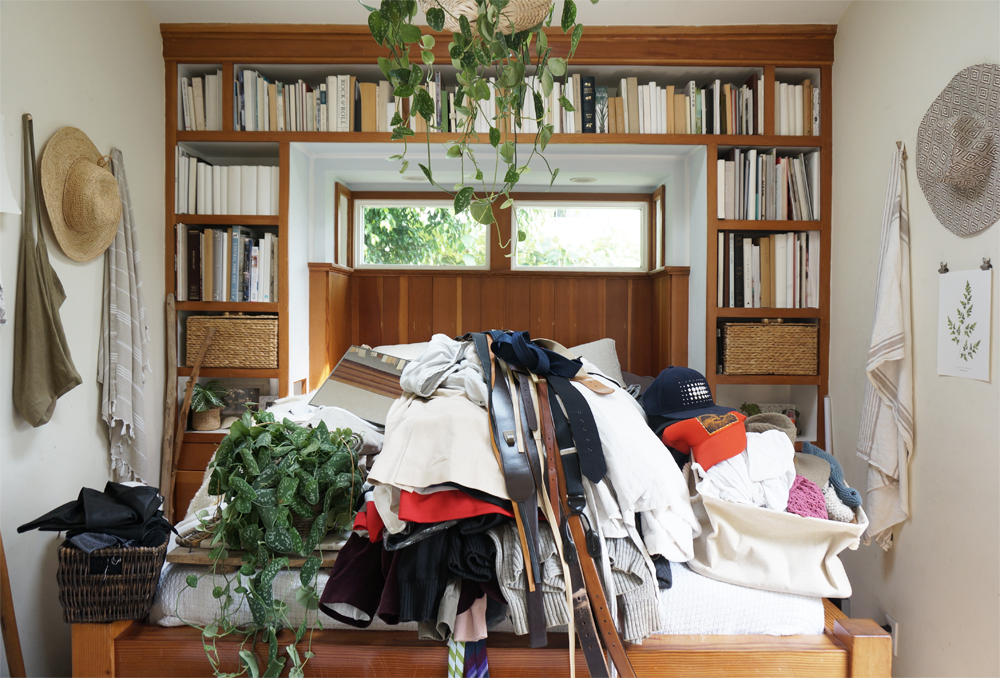
We removed everything from our shared closet, and created four piles:
The Giveaway Stack - I keep a folding bin from The Home Depot’s décor brand, Home Decorator’s Collection, in the laundry unit we share with our neighbor. Adam and I place our donation items in the bin weekly, and then drop its contents off at Goodwill and/or our local community housing organization about twice a month. We filled this bin (along with several other bags,) when cleaning out our closet for the nursery. I found that the start of my third trimester was the ideal time to tackle this undertaking. I hadn’t been able to wear my “regular” clothes for months due to the baby bump. It was therefore fairly easy to assess what I missed and needed, vs what I did not.
Infrequently Used but Useful Clothing - We put our winter/travel coats, scarves and other such infrequently used but handy clothing in two plastic, lidded storage bins. (The bins are now stowed at the bottom of the shed, beneath our hanging clothes.)
Weekly Wear to Hang - I had about 18”w of hanging clothes (dresses, tunics, etc) that needed to remain on hangers. We suspended those in a cedar wardrobe from Home Decorator’s Collection within the new shed, alongside Adam’s work shirts and sweaters. (Photo below.)
Daily Wear to Fold - I eliminated everything I didn’t need, and fit all of my daily casual dresses, tops and pants into one of the two trundle-drawers built into our bed. (Photo below.) The neighboring trundle was, and still is, our hamper. Adam bested me by downsizing his clothes even further— he managed to find a home of the rest of his pieces in the drawers that are part of the bed frame, beneath the bookshelves on his side of the bed.
We now keep all of our shoes in the built-in cubbies beneath the couch. (Photo below.) Socks, swimwear and underwear fit into the drawers that are part of the bed frame, beneath the bookshelves on my side of the bed


The fun (yet tricky) part of this project was finding a shed that was juuuuuust riiiiight for our little garden. We didn’t want to build on to the house— we just needed a simple shelter that was about 2’ deep by 4’ wide by 6’ high. Luckily we found this shed from The Home Depot, which was the perfect size for our needs:
We carefully weather-proofed the shed’s seams, and painted the exterior to match the Cottage with contrasting Behr Paint colors on the panels and trim. Next, we installed a custom-cut dowel rod for our hangers, and selected this cedar wardrobe in which to stash our hanging “weekly wear.” Lastly, we secured the shed to the side of the house for safety, in case of earthquakes.


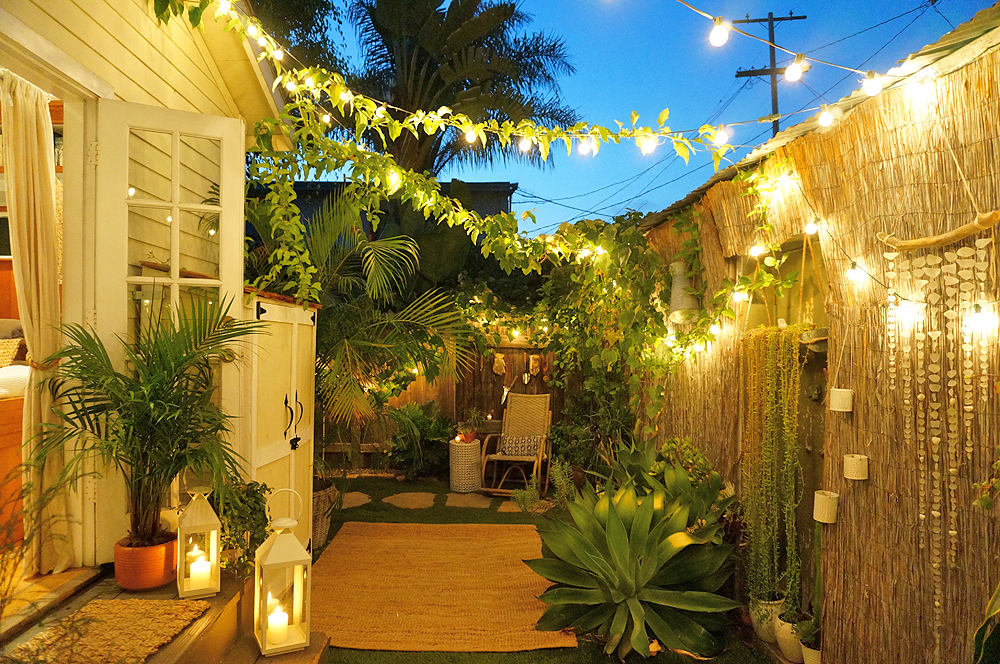
The entire process took about a day, from unpacking the shed at the start, to hanging up our belts and hats at the finish. We added some accessories— such as this outdoor rug— to make this part of the garden feel more like a room, and to tie it into the nursery’s outdoor lounge area.
The shed is only five steps from the bedroom closet, so it’s no inconvenience. Adam and I joke that our clothes are probably actually better protected now that they’re living outside in a sealed shed and garment bag, seeing as how we keep our house wide open 10 months out of the year. Our clothes have pretty much been living an indoor/outdoor lifestyle for 5 years anyway!
I acknowledge that The Home Depot is partnering with me to participate in this nursery makeover project. As a part of the project, I am receiving compensation in the form of products for the purpose of promoting The Home Depot. All expressed opinions and experiences on this blog are my own, and are written in my own words. My post complies with the WOMMA Ethics Code and applicable Federal Trade Commission guidelines.

Tiny House Closet Nursery - The Heater Cover
We moved into the Cottage over five years ago, and every day since then our vertical wall heater (located in the bedroom) has driven me insane. Not only is it a total eyesore, but it collects dust and dog hair, and needs to be cleaned off regularly. We rarely need a heater in our home, as “winter” in Los Angeles doesn’t really exist. In the past when we’ve used the wall unit, it only seemed to blast hot air to the top of our bedroom, frying our bookshelf, drying out our plants, and leaving the temperature in the rest of the house seemingly unchanged.
When redoing our bedroom to accommodate the nursery, we didn’t want to remove the unit completely— we’re legally required to have a heating source built into the house anyway. But since the grate is only about a foot from the nursery, I wanted to update the facade so it wouldn’t continue to stab at my eyeballs. Plus the ugly temperature gauge stuck out into the closet, preventing the crib from rolling in and out of its dedicated space, so the little control box had to go. We opted to create a custom heater cover with basic materials that we found and and customized at The Home Depot, which is just down the road from our home next to Adam’s office.
Of course we were very careful to make sure that the heater was completely off and disconnected from the gas before covering it. And we had an electrician visit the house to safely manage the wires beneath the heater and behind the control panel before we sealed everything up.
In order to create the custom cover (which basically acts like a shoebox top over the heater), we really only needed the following items, all of which we got at The Home Depot:
Three custom-cut plywood panels to cover the sides and front of the heater
Decorative and functional molding to join the seams of the panels
Paint (and corresponding paint supplies) for the panels and molding (we chose to match the bedroom walls and trim with Behr paints)
The drill and screws to hold it all together

The whole process of covering, painting and decorating the heater took about three hours. You can see nearly all the steps required via the images above. I can’t believe I waited YEARS to it.
The end result is a simple, smooth surface from which I can now hang wall decor, linens, plants, artwork, and/or lightweight storage pockets. Until the baby starts walking and grabbing things, I’ve opted to hang 2 lightweight mirrors, which help bounce light off the wall and make the room feel more spacious. I also added a 1-pouch magazine rack, where I’ll keep the baby’s daily health log during his first months:
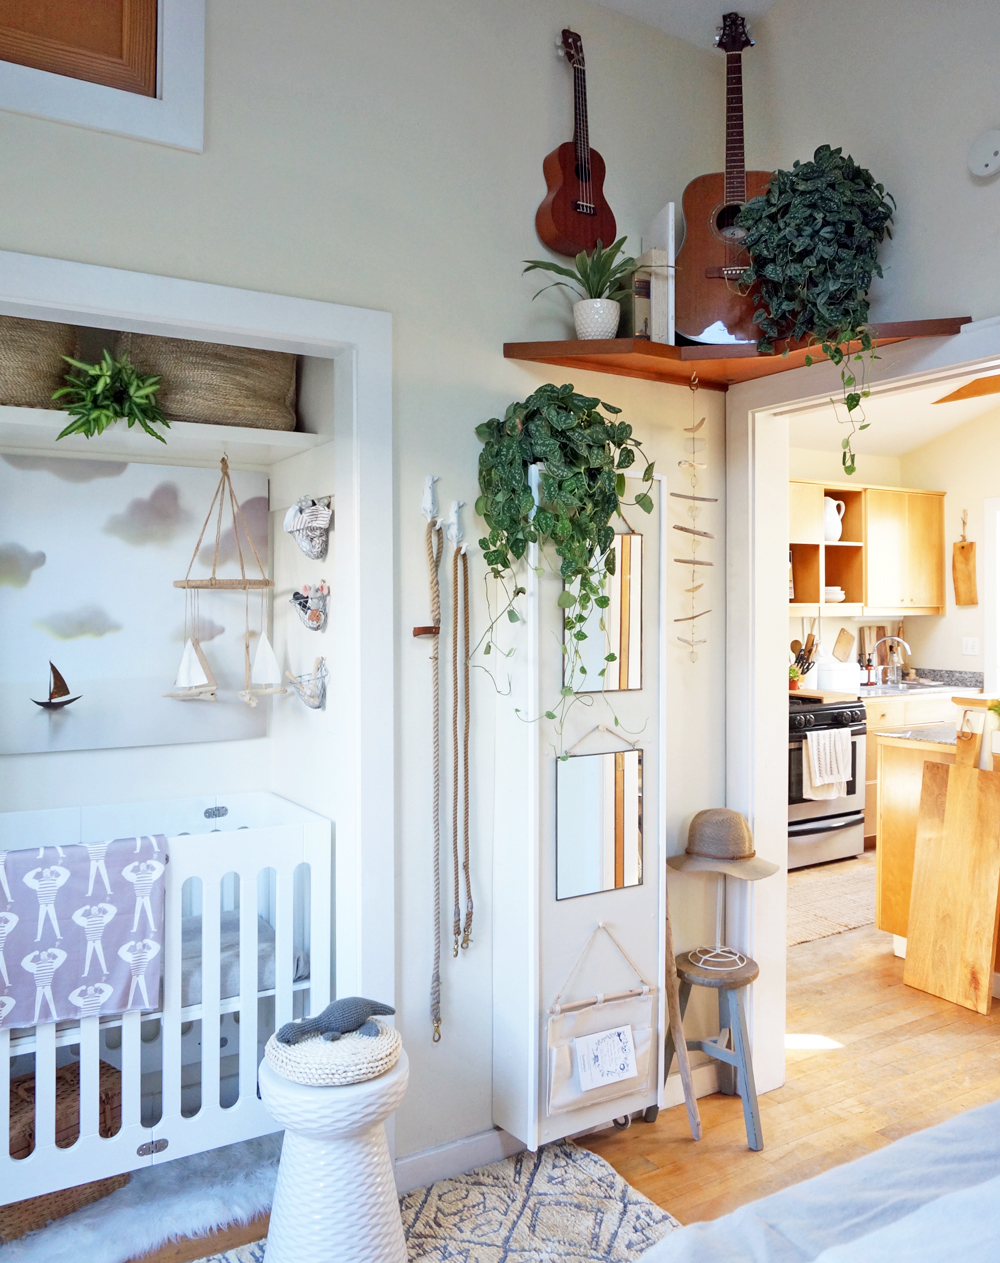
The heater now blends perfectly and purposefully into the nursery, and I love it. During the brief, mild LA winters, we’ll use a modern, compact, energy-efficient space heater instead of the wall unit to better keep our family of 5 comfortable. Win-win!
I acknowledge that The Home Depot is partnering with me to participate in this nursery makeover project. As a part of the project, I am receiving compensation in the form of products for the purpose of promoting The Home Depot. All expressed opinions and experiences on this blog are my own, and are written in my own words. My post complies with the WOMMA Ethics Code and applicable Federal Trade Commission guidelines.

Basics Don't Have to be Boring
I'm obviously a fan of keeping things simple. From color palettes to every-day goods and clothing, "the basics" help me save space and money, without sacrificing versatility or creative expression. Here's how.
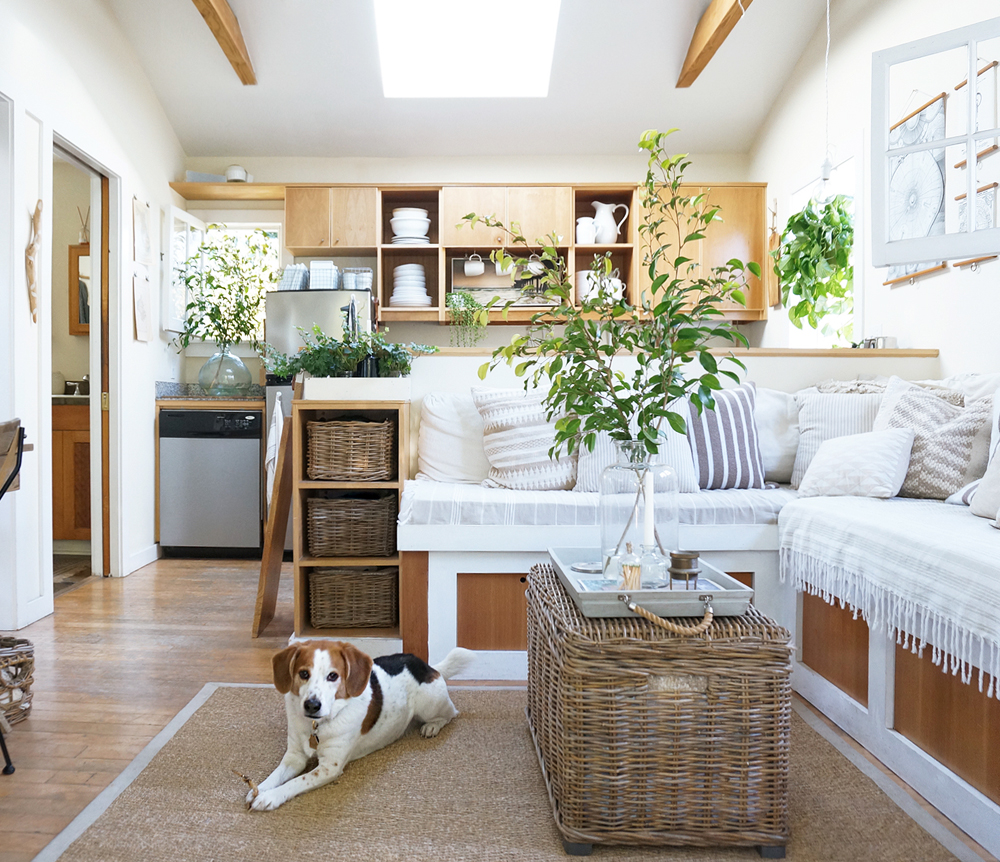
DECOR - In small spaces, I've found that it's usually best to functionally decorate with neutral + white tones. They reflect light and allow a space to feel bigger than it truly is. Once you have the key items in place (in your cohesive color palette), liven things up and keep yourself from getting bored with your surroundings by using throws and market florals. You don't have to buy an entirely new coffee table to switch up the look and feel of your small living room-- just clip some fresh greenery from around the neighborhood and swap out your pillow covers and/or throw blankets on your sofa, and voila! It's amazing what a difference this can make, and all for a very low cost. (There are dozens of examples of this on my Instagram account.) Donate your old blankets to a local non-profit or a disaster relief organization-- they can always use the goods, and you won't need to find a place to store your old stuff.
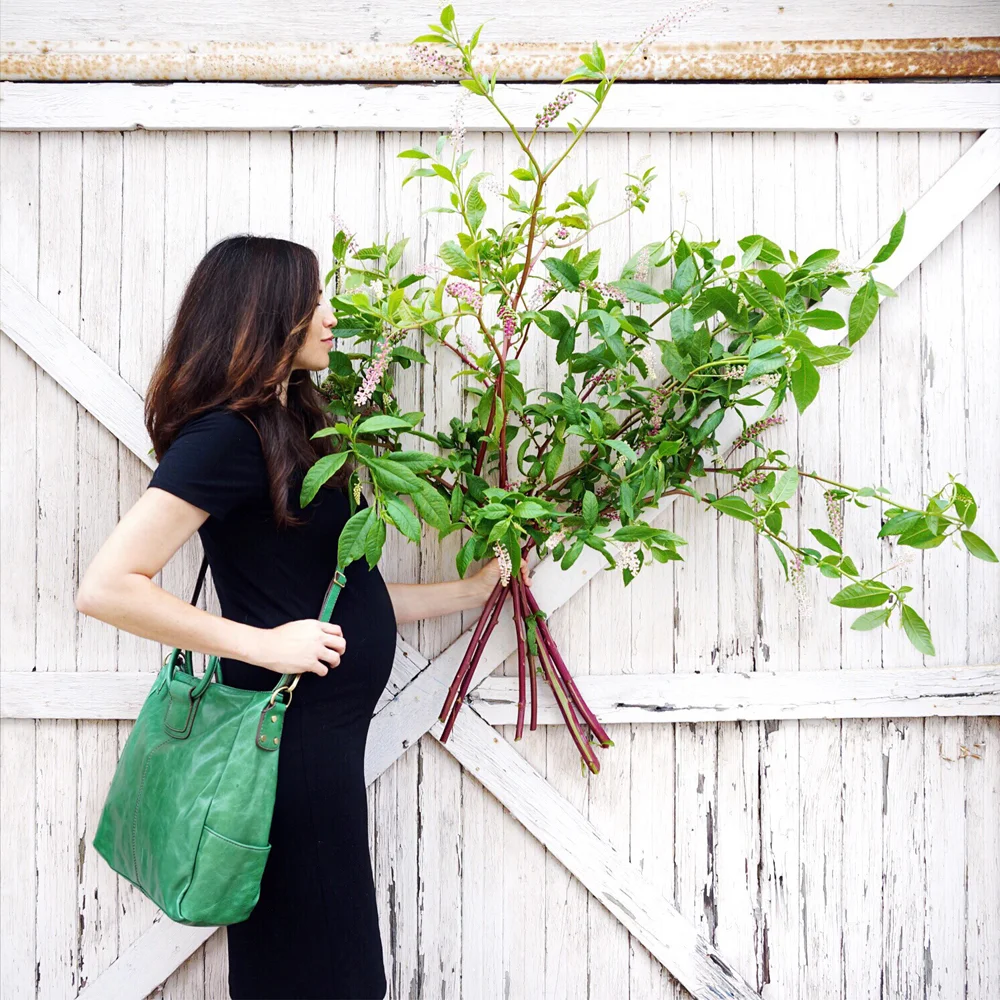
This basic approach has helped me learn how to stop searching for "the next thing" and just be happy with what I have here at home. I've accumulated fewer belongings, and have found a wonderful level of contentment in the present. It's also why I'm so obsessed with my Friday morning market missions-- they've become a creative outlet / little weekly art project that helps me refresh and continually enjoy our tiny home:

WARDROBE - Applying the same technique to my wardrobe has made sharing a (small) closet with Adam an easy task (images & info on our clothing storage here). By sticking to the basics and using a few bright accessories to layer and liven up my look, I never get tired of my clothing-- and I don't have to routinely buy new articles that I'll then have to store. (Did you read the wonderful write-up in The New York Times by Carl Richards about this cyclical issue? I highly recommend it: "New Rule: All Purchases Subject to a 7-Day Mental Quarantine")
I will admit, one of the things that I really DO need storage for is my collection of market baskets, all of which I use on a weekly basis for the aforementioned purposes, and for carting botanicals to-and-from photo shoots. Luckily I found this vintage basket rack on Everything But The House, and I love it. It's simple, pretty, practical, and it brings me joy every day when I see it. (Sophee chewed through the plant that was there for the past 5 years anyway, so it was time to find a beautiful and useful replacement piece.)
So I challenge you to liven things up in your home & closet by paring your belongings down!

Small Spaces + Pregnancy (Week 26)
This weekend marks the 26th week of my pregnancy! We've made numerous behind-the-scenes changes around here in preparation for our baby boy's arrival in October. Thus far it's been a lot of simplifying and decluttering. We will tackle the majority of the nursery makeover in August and September, and I'll be sure to share photos, tips and resources when that time comes.
But before we consider the more pin-worthy projects (such as wallpaper, specialty cribs and multi-functional nursery goods,) we should address an obvious obstacle when it comes to small spaces and pregnancy: how do you handle the inevitable wardrobe transformation when you barely have any closet space to begin with? As your belly balloons outward, where do you keep the newly acquired maternity and/or pregnancy-friendly clothing and personal care items?
First, it's important to start with the fundamentals of downsizing. Nobody likes to hear the following, but I've found that these are truly the two handiest tricks when it comes to dealing with clutter and storage, regardless of your square-footage:
1. JUST GET RID OF IT. This is the single best tip for living well in a small space. You don't need to devise clever storage solutions when you don't have much crap to store in the first place.
2. ONLY BUY WHAT YOU REALLY NEED. Controlling what you bring into your home is the best way to avoid accumulating clutter.
So! What do you NEED when it comes to maternity clothing? My jeans stopped fitting midway through my first trimester, yet these are the only new items I've truly needed in order to dress comfortably every day thus far:
1. Storq Basics Bundle
I layer the items from this beautiful, simple Storq pack with my "normal" clothes for daytime outfits and evening wear. There are 4 products in this pouch (which itself is so easy to store-- photo below). I love that the pieces in this bundle create a simple foundation for endless maternity outfit possibilities when paired with your usual layers and accessories.
2. Over-The-Bump Jeans
My opinion: Don't waste your time with the demi-panel maternity jeans. They're uncomfortable and you outgrow them quickly. Get a pair of the over-the-bump jeans, and easily store them by donating 1-2 other clothing items you no longer love.
3. T-Shirt Dress
Ideal for lounging, sleeping, running quick errands, etc.

I even decided to downsize and declutter my toiletries. My skin changed a great deal when I reached my mid-thirties, and pregnancy has changed it even more drastically. So I got rid of my old skincare and makeup items, and simplified my routine and medicine cabinet. I decided to stick with a small selection of products from Glossier, Kate Somerville, Naked (by Urban Decay), Foreo, and Aesop. Nearly everything else went into the recycling bin. It always feels so good to get the bottle clutter under control. (Read more about our bathroom storage here.)
The biggest changes wardrobe-management changes will come in August and September, as we begin to clear out our closet in order to transform it into our son's nursery. In the meantime, we've been able to make do with the storage we have, which is pictured below:
1. Bathroom Shelving (read more about our bathroom storage here)
2. Whitney's Under-the-Couch Shoe Storage
3. Adam's Under-the-Couch Shoe Storage
4. The Closet (soon to be turned into the nursery)
5. The Bed Built-In Hamper (cameo by StanleeStubs)
6. The Bed Built-In Clothing Bin (photo by James Tse for "The Knot" Magazine)


Pregnant or not, small-space living can be frustrating if you have too much stuff. What I love about our home is that it reminds us to keep things simple, and requires us to routinely downsize our belongings. Since we've adopted this lifestyle, we've discovered that we have more energy and time to devote to one another, and to the things that matter most in our lives.
Disclaimer: All brands mentioned above are ones that I genuinely love to use as described. I have received compensation in the form of product for some of those mentioned in this post, but all opinions expressed are my own, regardless of compensation.
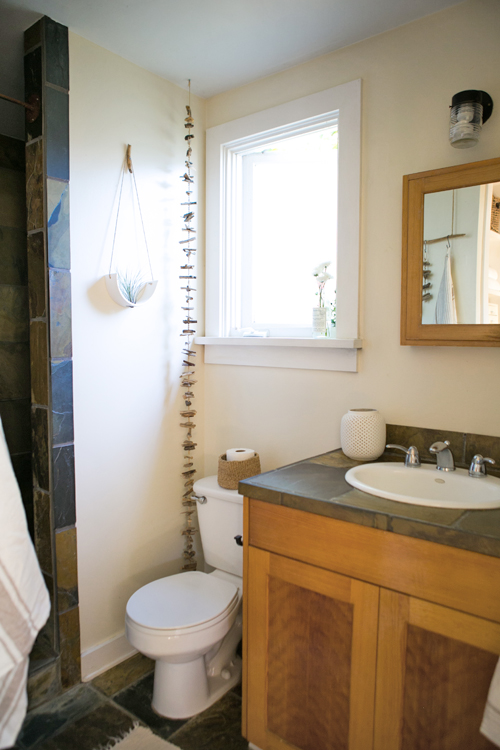
The Cottage Bath
Lately, we've received numerous requests for photos of the Cottage bath. While the room is actually larger than you might think, it's designed in a way that makes it tough to photograph, meaning we have very few images available:
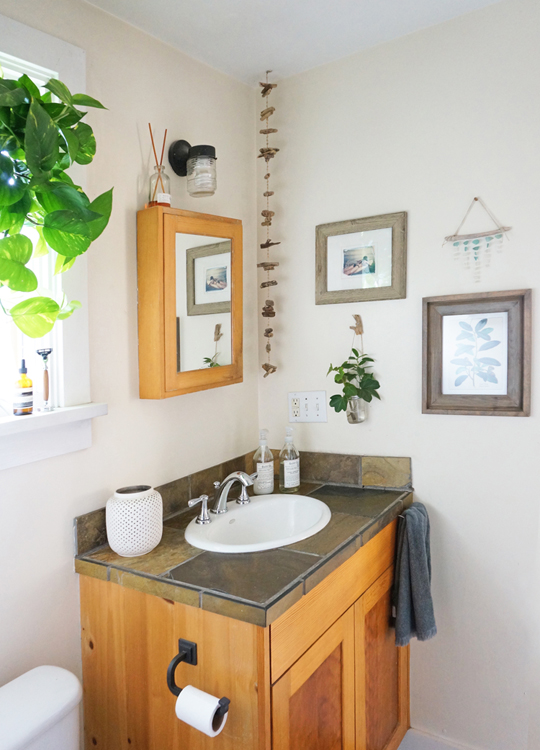


I'm often asked how we keep the bathroom organized and uncluttered, given its small size. Here are some of my top tips:
Only buy what you REALLY need:
I know this sounds basic, and it is. But controlling what you bring into your home is the best way to avoid accumulating clutter and wasting your money. We have ONE shampoo dispenser. ONE pet wash. ONE body wash. Etc. You don't have to come up with creative storage solutions when you don't have too much to store in the first place!
Upcycle:
I keep my makeup in an old metal hardware drawer set that I found on ETSY (reference: photo #7). I spray-painted the box, applied liners to the base of each drawer, and used the original metal hardware organizers within the drawers to keep my palettes and tools separated and easy to find.
Functional decor:
If you have limited cabinet space, try organizing your must-have items (such as spare toilet paper, extra cotton, etc.) in containers that fit with your style-- that way you can keep them out on display as functional decor. For example, we stash our extra bath goods in a white metal mop bucket from West Elm.
Save counter space:
Limited surface space? Try organizing your jewelry in slim hardware drawers. They come in varying sizes and depths, and are easy to stash in cabinets and next to sink U-bends. I purchased one like this years ago, which I keep in the vanity in front of our spare towels and travel pouches. It not only saves us counter space, but it also saves us time. This organizer helps me expedite my out-the-door routine on a daily basis, as I rarely have to untangle chains, and I don't have to sift through pouches to find the item(s) I'm looking for.
Let Go:
Don't let expired bottles, nearly-empty beauty products, and samples you've never used clutter up your limited space. Routinely clean out your medicine cabinet and drawers. Donate extra products to your local community housing corp or homeless shelter.
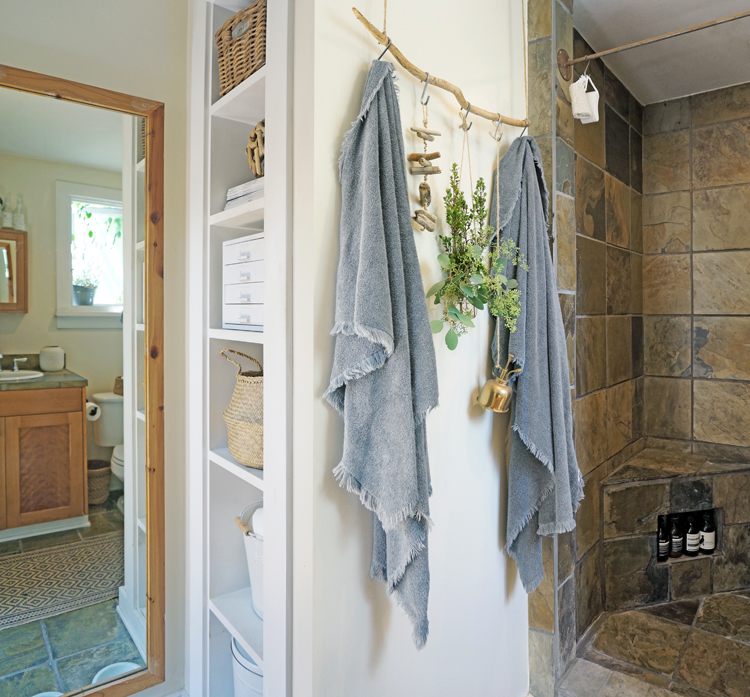
DIY:
Save money and get creative! Try making your own racks and/or curtain rods. Instead of buying a standard metal towel rack, I opted to craft one of my own. All it required was jute twine, S hooks (to hang towels and accessories), screw eyes (to secure the unit into the ceiling), and a wooden branch I found at my sister's wedding in Idaho. My good friend Lindsay over at Casa Joshua Tree did the same thing while renovating her house in the desert, and look at how great it turned out:

Our bathroom is a little too long for a standard bathmat to cover the necessary floor space, but it's definitely too small for two throws or a larger area rug. I searched Etsy and easily found alternatives to typical bathmats that have all worked beautifully over the years.
Lastly, for some strange reason, there is a recent story circulating that claims the Cottage is a converted garage or guest unit. That is inaccurate. While our home has been updated over the decades, it has always been its own free-standing house, consisting of a main room (including a kitchen), a bedroom, and a bathroom. So no-- we did not have to add the bathroom to our home. The Cottage was one of four identical, neighboring houses built in the 1920s. Three of those four are still standing today.
Photos by Whitney Leigh Morris & Monica Wang Photo.
Tiny Live/Work Office Space
Lately I've received numerous inquiries about my live/work office space. (Does it REALLY look like that? Where's all the stuff? What is it like working and living in the same tiny space?) In this post, I'll provide a list of my go-to supplies that help keep the room organized and uncluttered.
Here is how the office generally looks on a daily basis. Sometimes it's a bit messier, sometimes it's a bit more simplified, but this is usually the norm:

First off, I should mention that nearly all of my business work is done digitally. My office is not a traditional artist's studio, so I don't have to house hundreds of materials and tools. Having said that, I do store craft supplies, a printer, a scanner, my business documents and standard materials, chords and tech accessories, reference materials, and other such office items my tiny home-office.
This is what is in, on or around my desk at all times:

1. Apple AirPort Time Capsule
Like so many people, I've experienced a total loss of my main hard drive... and it was pretty devastating, both personally and professionally. For better or worse, our computers are now our record collections, photo albums, filing cabinets, bookshelves and more, so I will never again make the mistake of failing to back up my machine. The Airport Time Capsule by Apple looks clean and minimal while backing everything up in case of calamity. Plus it provides a strong WiFi signal (with multiple network logins) so my collaborators and team members can work throughout the cottage and garden with me.
I got this particular Airport Time Capsule from ENJOY, which just launched here in LA (they're in numerous other cities as well). One of their experts (Umair) brought it to the cottage and installed it for me at no additional cost. Umair set up the Capsule and reworked the new WiFi networks within 30 minutes. (We also arranged a special discount code for $50 off any Apple product from Enjoy.com to share through 6/30/16: RAF-WHITNEY)
2. Big Jambox Bluetooth Speaker
The Big Jambox Speaker is great for small spaces. It's about 10" x 3" x 4", and comes in a variety of colors. This one blends into the cottage perfectly-- I keep it in the corner of the main room, above the kitchen cabinets. I can hear it clearly throughout our home and garden. It's wireless, and the charge lasts for around 15 hours. I stream Spotify or iTunes to it from the iPad and my old iPhone all day long.
3. Brother DS-620 Color Mobile Scanner
This little gizmo is one of the best purchases I've ever made. I scan all of our financial records, medical documents, pet paperwork, cards and notes. It saves me from accumulating piles of paper around the cottage, and helps my business run more efficiently. It measures 11.5" x 2" x 1.5" inches-- basically the size of a thick ruler. I highly recommend it, or a similar model.
4. Muji Handy Paper Shredder
After scanning all our documents, I need to shred a good deal of them. Usually it's just a page or two, along with a few receipts per day, so I use this amazing mini shredder from Muji to get the job done. It measures about 7.5" x 2", and is sleekly designed.
5. Poppin Supplies
Poppin is pretty much the best. They make modern, beautiful office supplies in a variety of colors to suit your taste. For those of us in small spaces, it helps when functional items are also pleasing to the eye-- that way we can leave them sitting out (as storage is so limited), while maintaining a clean and mindful space.
6. Cord Taco by This Is Ground
(See item #8 for details)
7. BackPack for iMac by Twelve South
The BackPack for iMac shelf is probably the handiest tool in my office. It stores my portable scanner, hand-held shredder and client hard drives-- all safely and out of sight. I recommend it to everyone with an iMac, no matter what size space you have.
Here's the description from their website: BackPack is a sleek, sturdy shelf designed exclusively for your iMac or Apple Display. This gorgeous slice of steel makes a perfect perch for hard drives, USB peripherals or business cards. Included vertical support pegs prop up tall drives, Time Capsule or even your MacBook Air. BackPack hangs on the back (or front) of your iMac using two clips and gravity. Built-in cable management rails hold your power cords in place for grab-and-go convenience. BackPack is here to help you create the minimalist zen-like workspace your Mac was made for.
8. Tech Dopp Kit by This Is Ground
I'm obsessed with This Is Ground-- they make the greatest leather organizational tools I've ever used. I also love the team behind the company-- they're based in downtown LA, and I've worked with them on several occasions in the past. This is the regular-sized Tech Dopp Kit, and I use it to hold my mirrorless camera's accessories. I also use their Cord Tacos, Mod Laptop and Mod Tablet daily.
9. Not Pictured: Organizational Pouches in Baskets
Lastly, I keep organizational pouches containing miscellaneous tools, cords, envelopes, etc. in zippered toiletry cases from West Elm (but you can get these pretty much anywhere). I keep them in baskets throughout the living room. Much like the printer, the baskets are stashed in the few built-in cabinets (some exposed, some covered) surrounding our couch.