A Summer’s Day to Night in a Multitasking Space
This post was sponsored by Terrain. All photos & opinions are my own.
As is the case in most smaller homes, every space here — whether indoors or outdoors — multitasks. Here’s a glimpse of the most frequently used, and most versatile, spot on our porch:

Above: Reclaimed Work Table with drop-down sides.
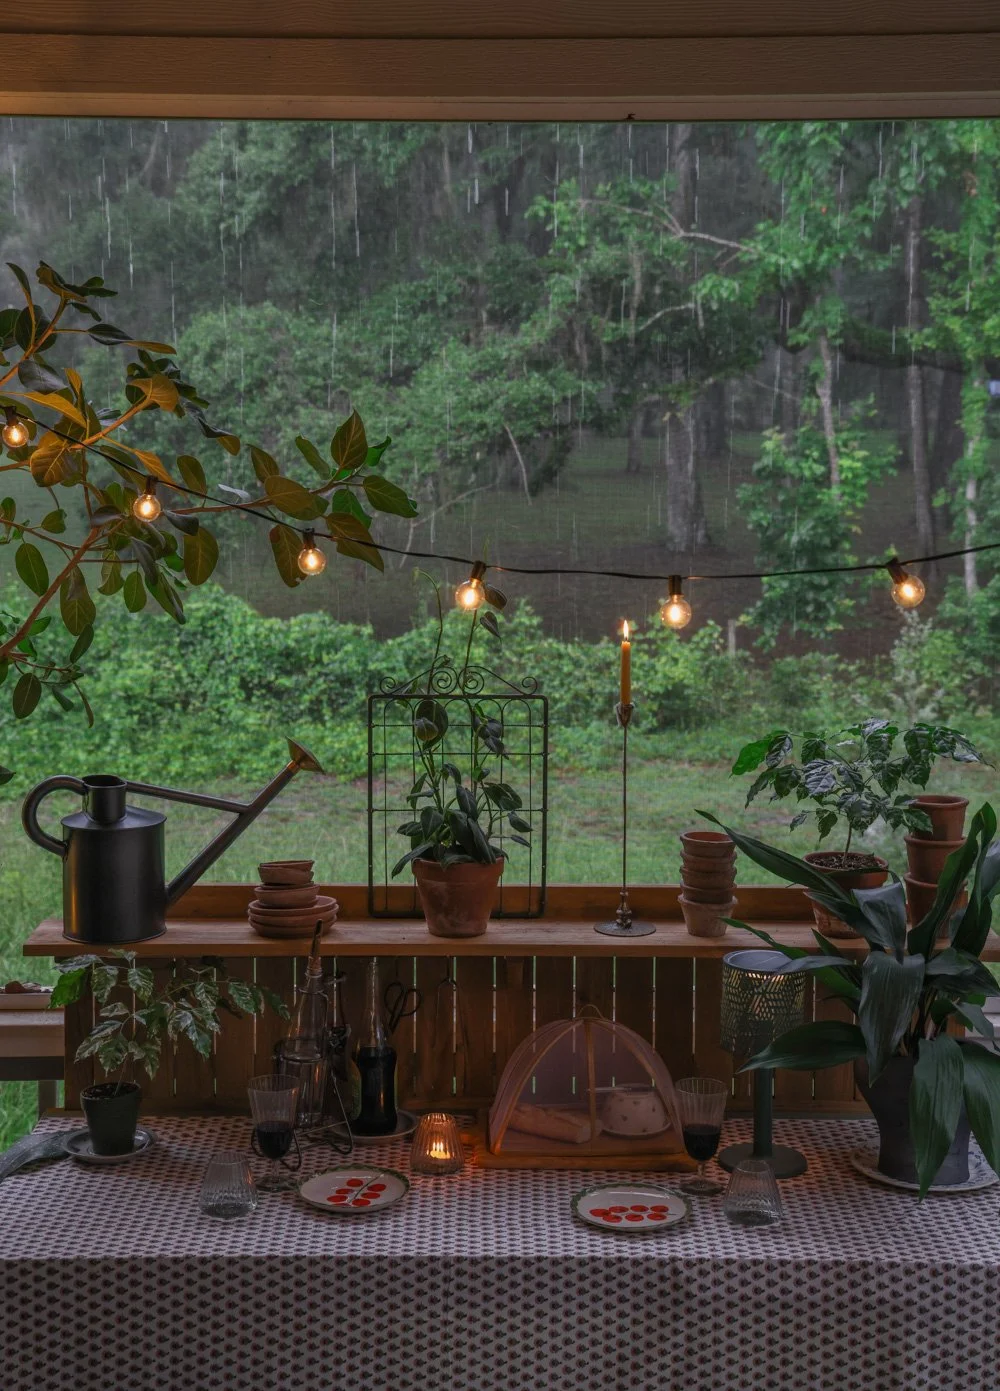
By day, this is a potting zone, largely open to the elements, but shaded from the hot sun via the reclaimed pine ceiling (and blissfully protected from the mosquitoes thanks to the screen). Come evening, this is a conversation bar — a spot where we can gather with neighbors and friends to connect and brainstorm without disturbing the kids in their shared bedroom off of the kitchen.
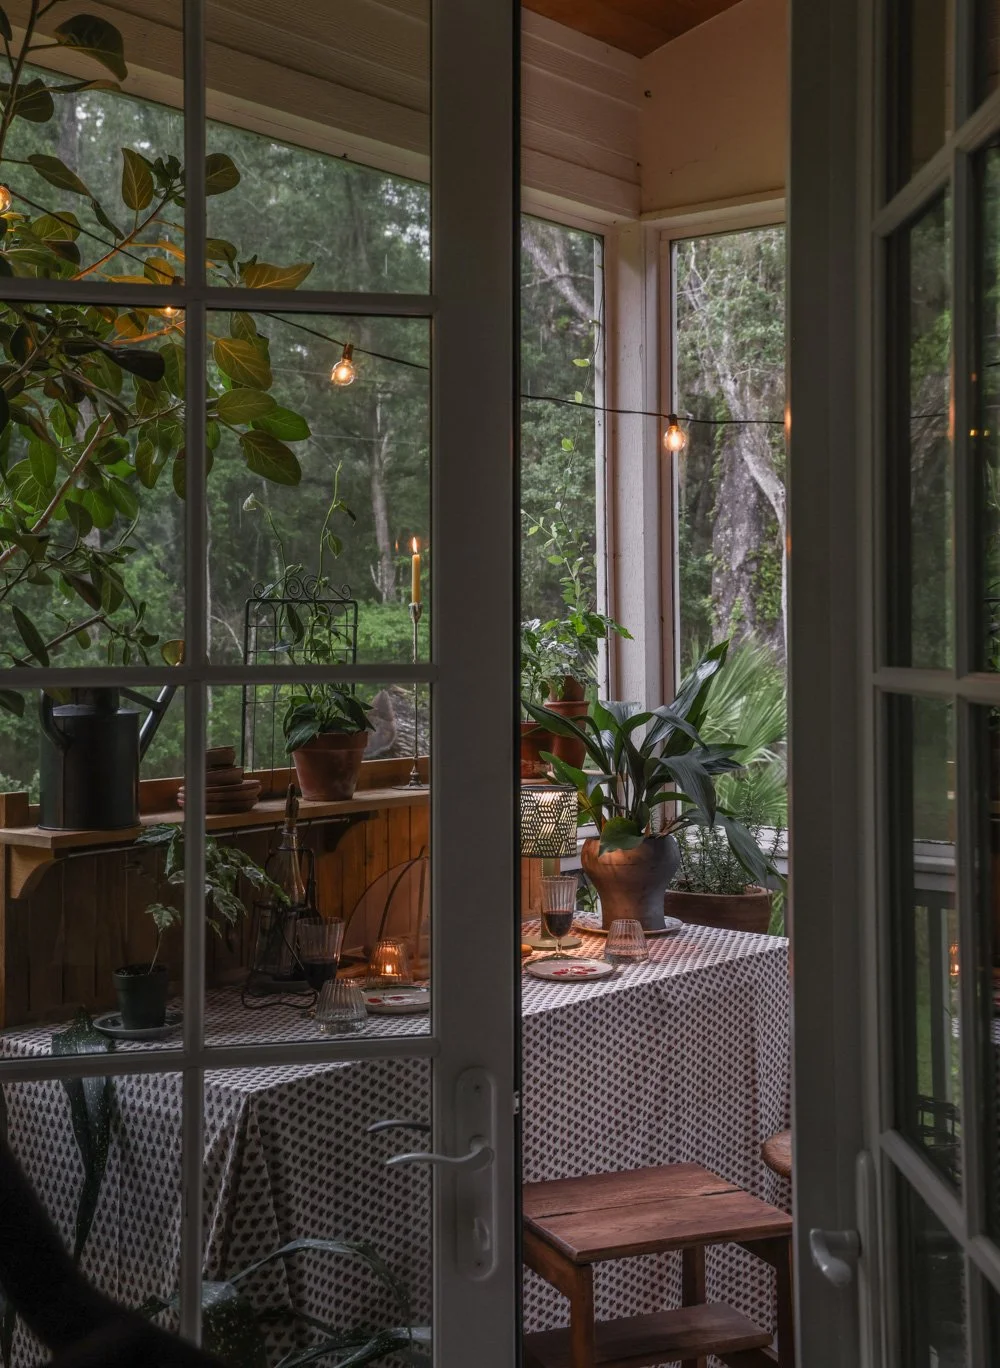
Above: Cotton Tablecloth + Stargazer Strands
As usual, this area is comprised of a mix of thrifted, hand-me-down, and repurposed items. Everything is supported brilliantly by an expandable recycled + reclaimed potting surface from Terrain. The table’s combination of two drop-leaf sides and a back rack with shelf make this design particularly friendly for smaller spaces in need of increased versatility. (It would be a wonderful piece for a deconstructed kitchen.)
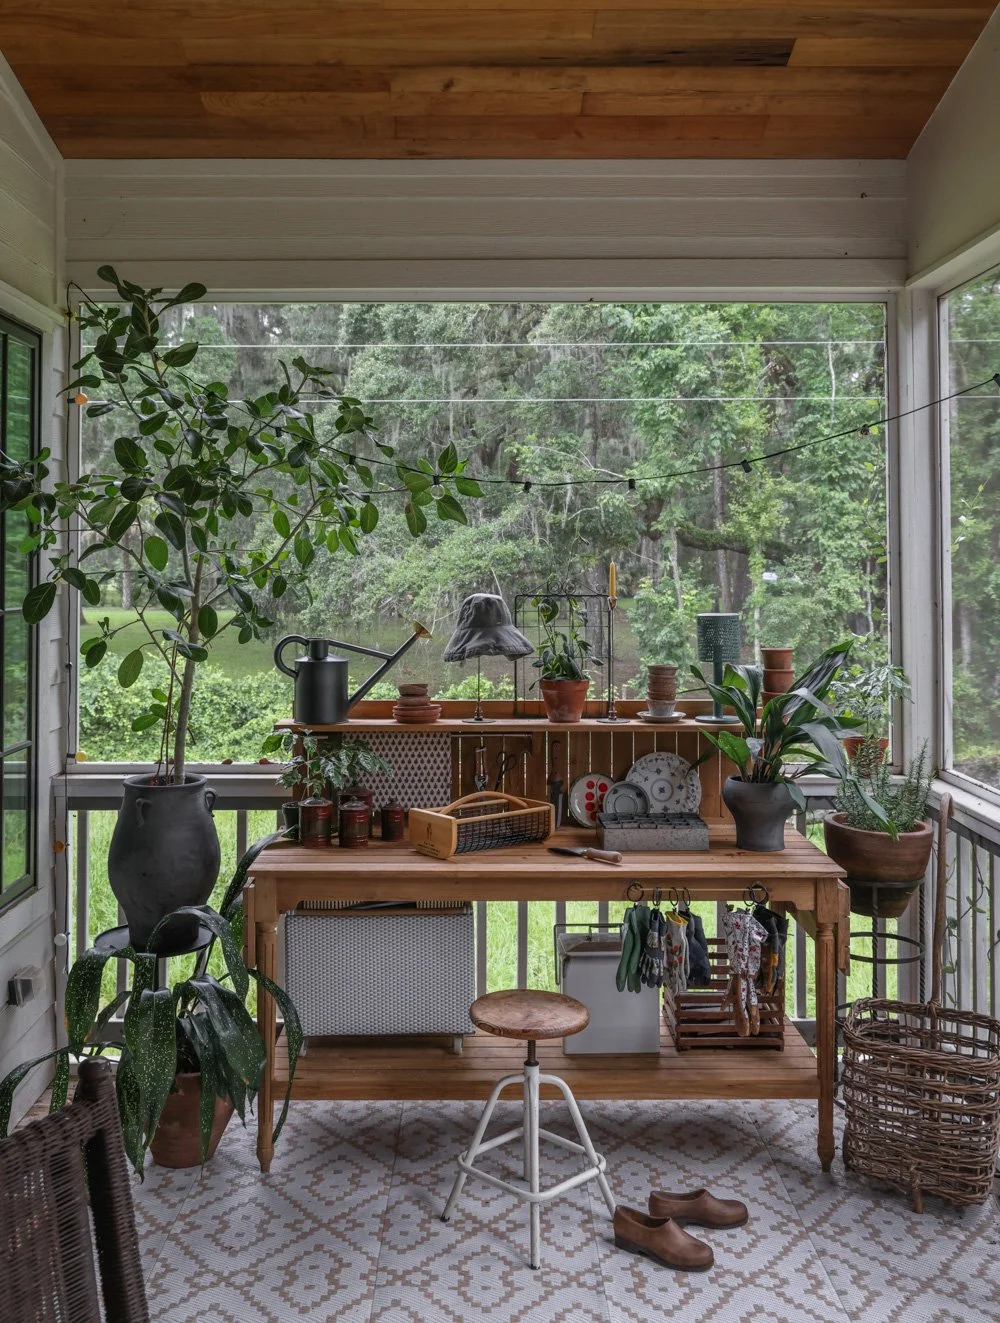
Above: Slip-on clogs (made from recycled materials) by an adjustable secondhand stool.
I customized the table by attaching a secondhand tension rod paired below the built-in shelf to create a spot for hanging tools and linens.
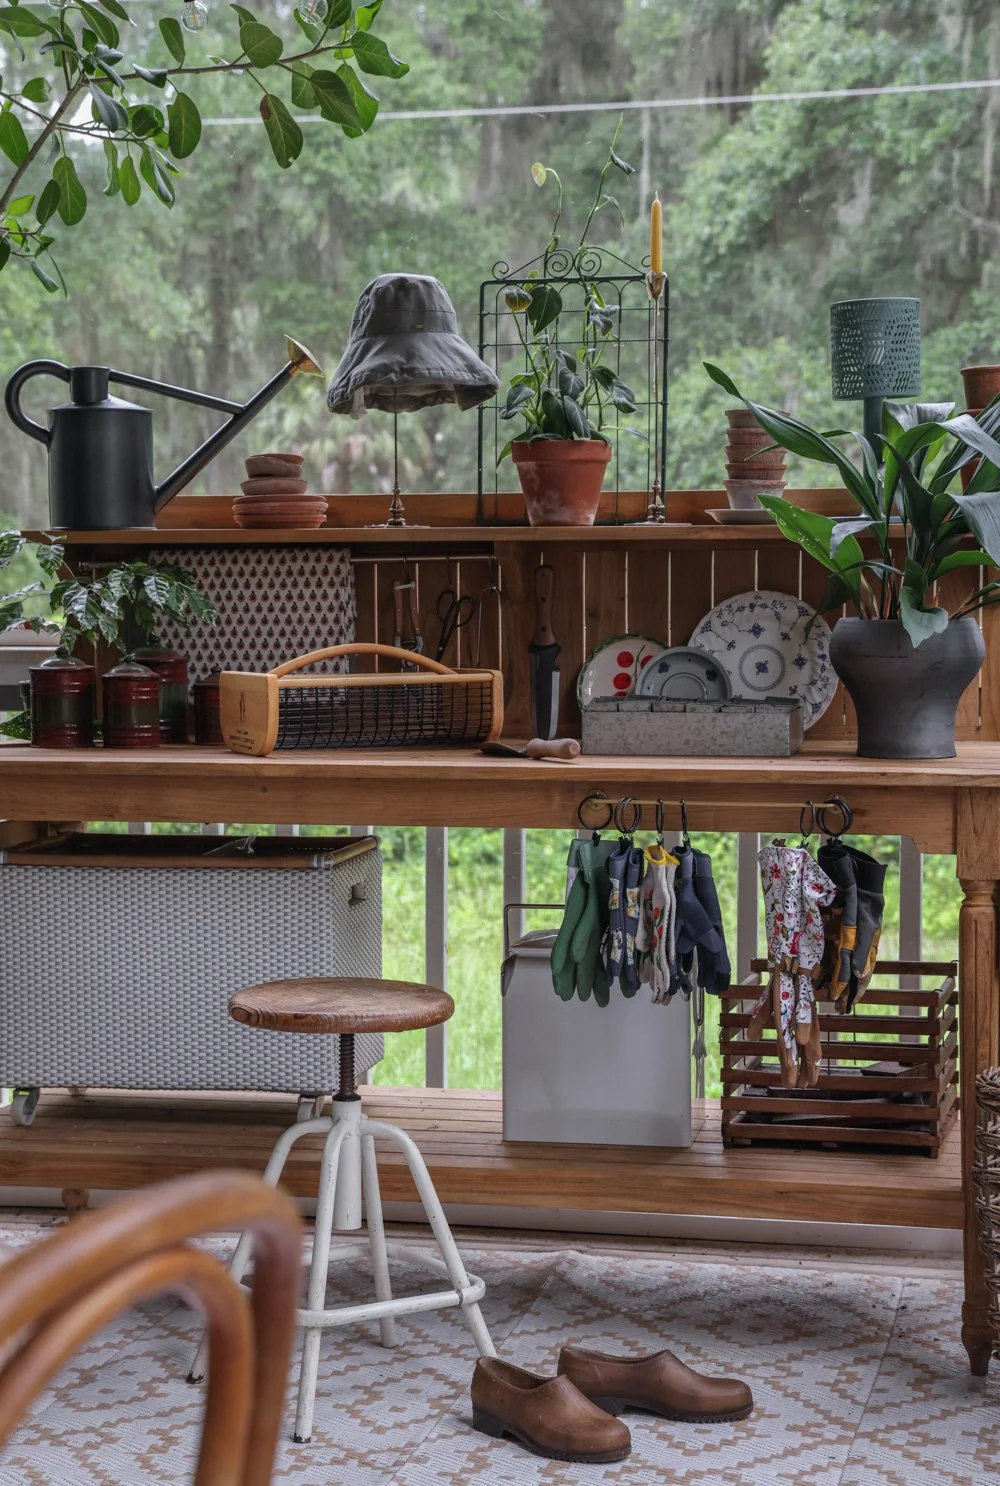

Above: Watering Can + Cotton Tablecloth
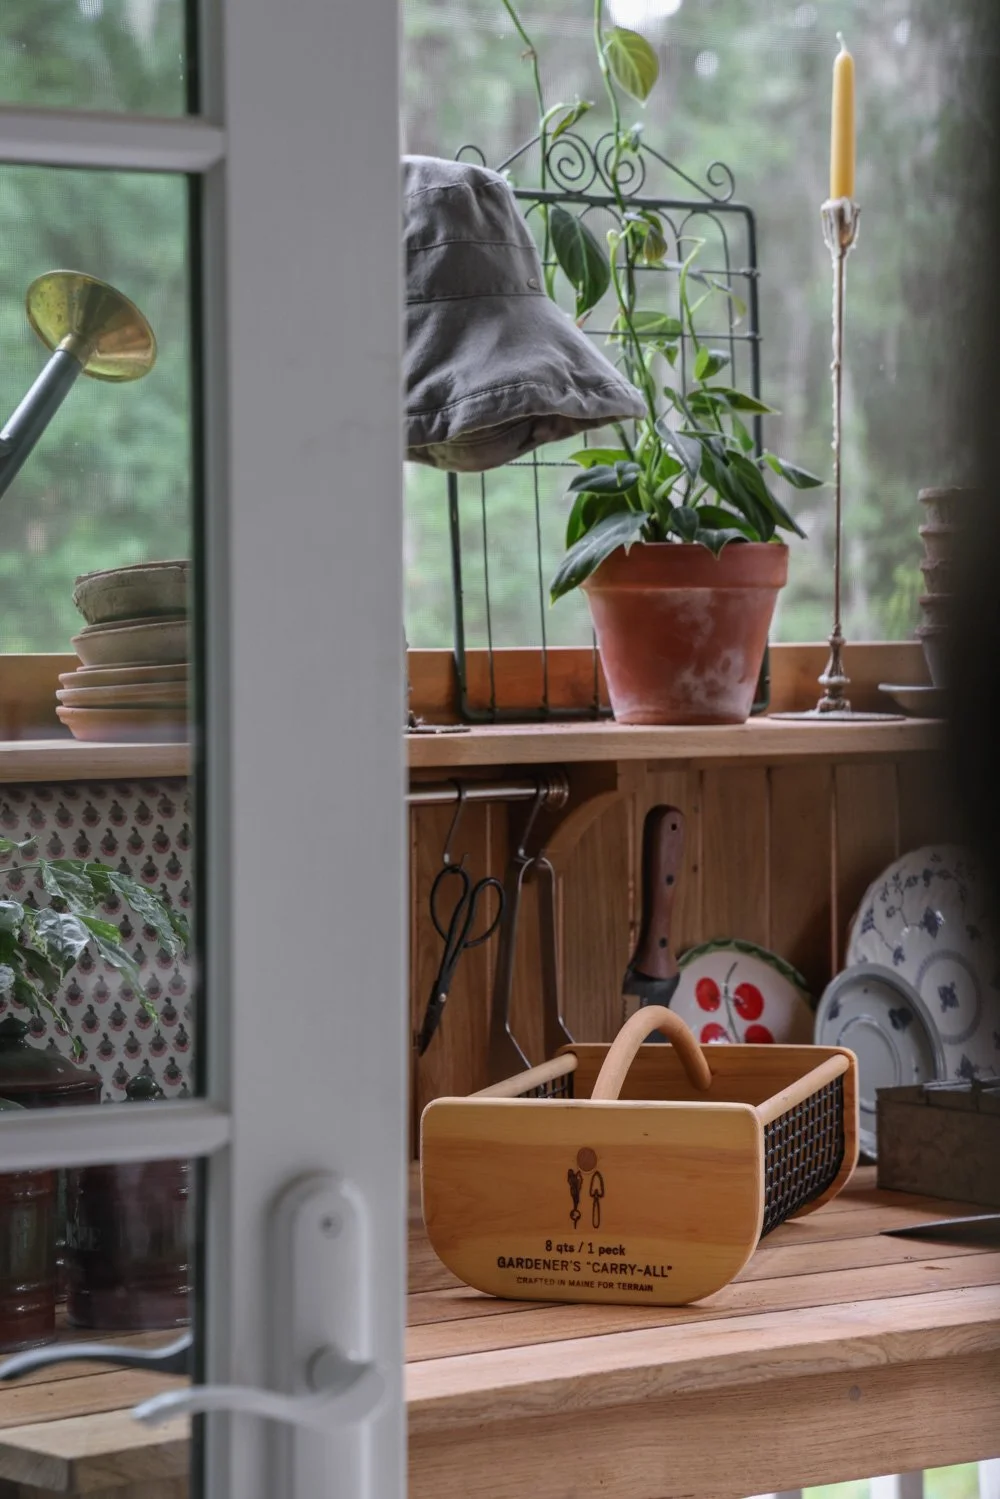
Above: Garden Carry-All Basket + Snips
I also added a small, thrifted towel rack with repurposed curtain clips to the face of the table for a spot for hanging our family’s gardening and work gloves.
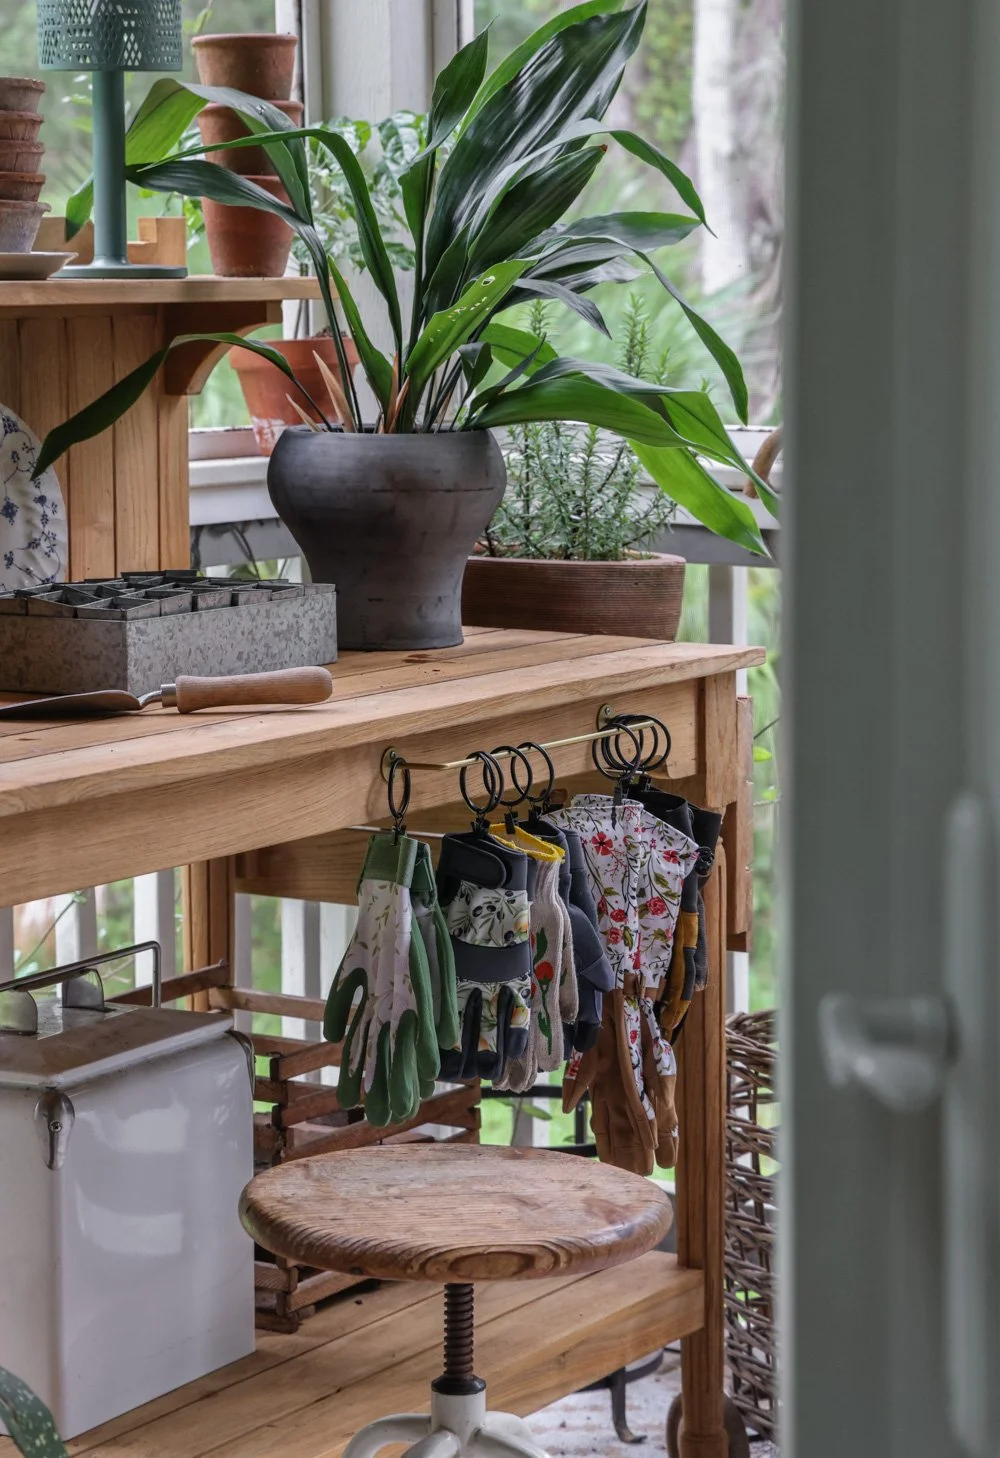
Above: Eartha Pedestal Planter and a thrifted towel bar turned into a rack for my Long Gloves and other garden + work gloves.
The end result is a spot that can easily transform from utilitarian work zone by day to a hosting zone by night, regardless of the weather.

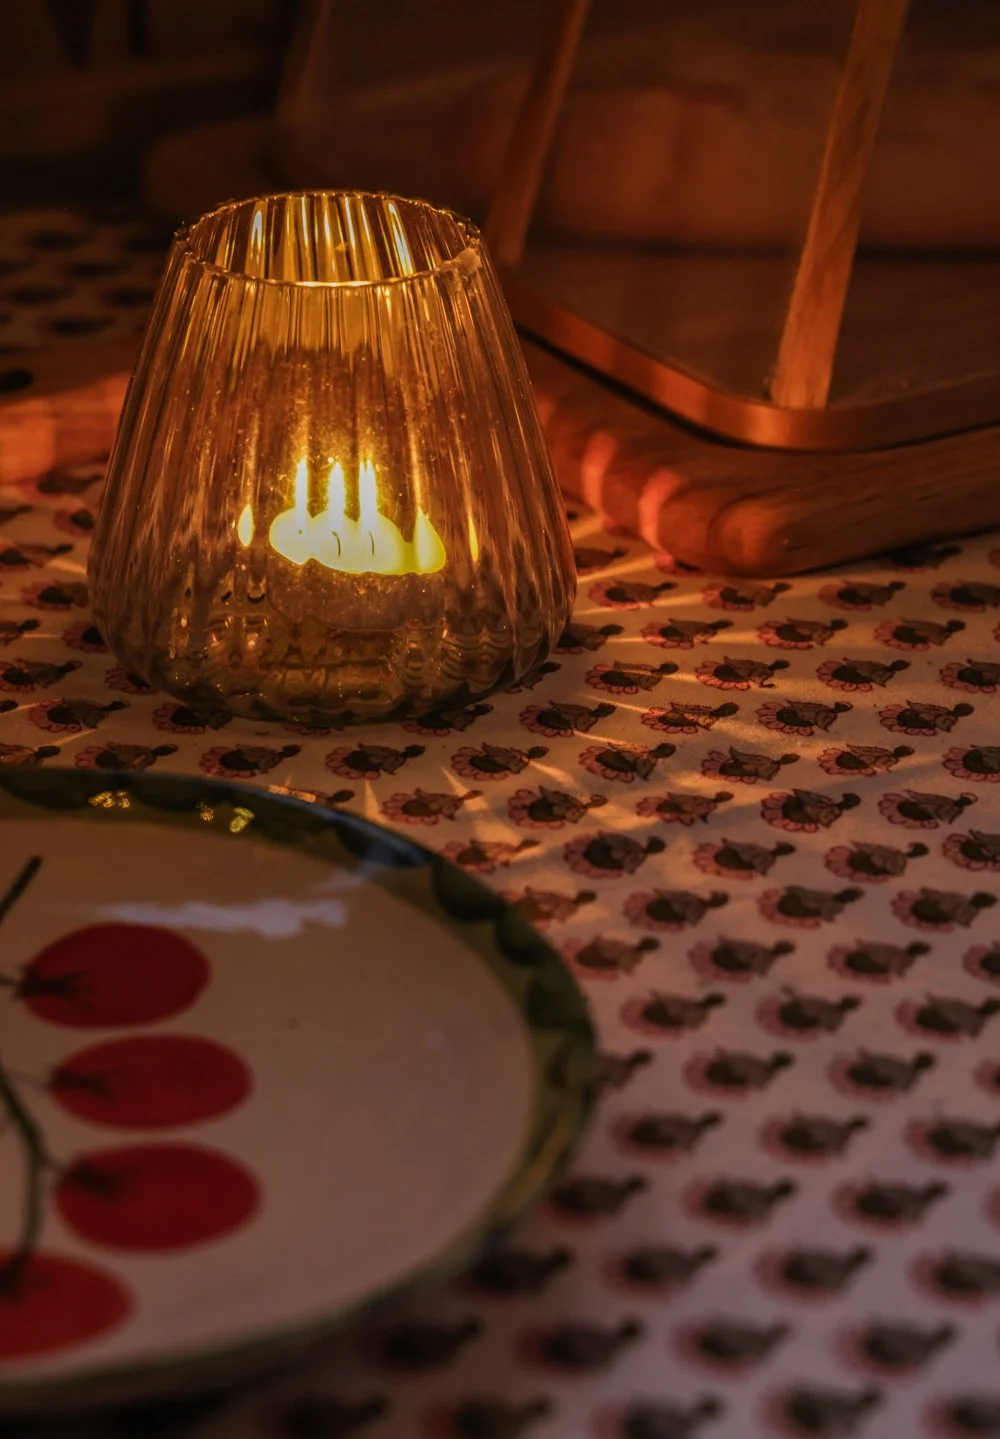
Above: Optic Glassware + Solar Lamp


Here’s to making every space count — inside and out.

Above: A Copper + Brass Tulip Sprinkler watering the upcycled garden space just beyond the porch.


5 Ways to Invite the Outdoors In via Thoughtful Design
Whether you’re starting from scratch or responsibly re-imagining your space, here are five ways to create intentional and enduring interiors with the help of biophilic design.
Note: Thank you to Marvin for sponsoring this post and supporting our small business.
The arrival of a new year often inspires folks to streamline their homes, providing a simplified and organized slate for the months ahead. But this cycle of discarding (and ultimately replacing) goods is not ideal for our wallets, nor for the planet. So when I help my clients and readers declutter and/or update their spaces, I hope to help them do so for the long run.
My north star for designing and organizing with intention is nature. The idea of living inner-connectedly with the outdoors has always inspired me, as I believe that nurturing our bodies, our minds and each other cannot happen completely without remaining rooted deeply in the natural world, whether in a city or rural setting. Focusing on bringing in organic and natural elements (rather than on-trend home goods) can help us craft timeless, durable, and healthier spaces.

Each of the four rooms in our 900 sq ft cottage is meant to pull focus to the natural world around us and spark our innate instinct to interact with it. Whether you’re starting from scratch or responsibly re-imagining your space, here are five ways to create intentional and enduring interiors with the help of biophilic design.

MINDFUL SELECTION OF INTERIOR MATERIALS
Selecting natural and non-toxic materials that are rich in earthy textures and acquire a natural patina over time is important when crafting a biophilic interior. Not only do these materials keep our indoor air and surfaces cleaner and healthier, but they become visually richer with age, freeing us from the worry of character-filled wear over time.
Here are some examples of natural materials that have a huge impact on how an interior looks, feels and functions:
Lime Paint
Our primary bedroom walls and ceiling are painted with a mossy green Lime Paint, which is free of solvents, and toxic chemicals, and is composed of all natural material and mineral pigment that provide a durable, breathable coating. Lime’s high pH makes it a naturally mold and mildew resistant finish. Plus the textured look and feel of the brush strokes help conceal nail holes and similar markings.
Tadelakt
Tadelakt, the plaster we used in our only bathroom (which is also the laundry room), is an ancient plaster finish that originated in North Africa. It is composed of materials such as slaked aged lime, marble dust and clay, which come together in a water-resistant and durable finish. Not only is the finish stunning, strong and smooth to the touch, and visually interesting, but it’s also resistant to mold, mildew, and fungus, resulting in a healthier living environment.
Wood Windows
What better way to invite the outdoors in than by selecting a wood finish for the interior windows? Wood-clad windows offer a uniquely earthy feel in the exact places where the indoor and outdoor truly meet. In our home, we chose Marvin Elevate Casement windows, as their natural wood interiors and Ultrex® fiberglass exteriors ensure beauty and durability for years to come. We selected divided lites to best suit our cottage design aesthetic, and to help keep the birds in this wildlife haven safer.
Wood Trim with Natural Whey Stain
I love the look of trim that’s hand-coated with a natural whey stain made from minerals, and natural pigments. Such stains are an eco-friendly alternative to traditional synthetic formulas, and allow the grain of wood to shine while keeping tones within a unified spectrum of hues.
Natural Wood Floors & Shelves
Our wooden floors, shelving, nightstand tops, headboard ledge, and sink vanity are all made with ethically river-recovered, character-filled pine and cypress board remnants. While we lightly sanded the wood in order to remove deep-settled dust, everything except the headboard ledge was left unstained and natural in order to preserve the color, texture and matte finish of the wood. This way, nature takes the lead over trends, so we can be confident in the earthy and timeless aesthetic of our decision for as long as we live here. Each of the 500+ boards has a story to tell from years of impact from insects and sap, and every piece has naturally-occurring curls, knots, arching grain patterns or vertical pinstripes.

DIY FUNCTIONAL DECOR
When it comes to design, one of my greatest interests is brainstorming creative ideas for troubleshooting and enjoying small, shared, and unusual interiors. Time and time again, I’ve found that the best tools for our funny little homes are not, say, store-bought plastic drawer organizers that can be used for little else (although many repurposed items can be used in their place). Instead, the most ingenious items for our awkward spaces are often the ones we craft — however inexpertly — to suit our precise needs, tastes and specs. And, thankfully, those sorts of things can often be deconstructed and reconfigured in new ways to serve numerous purposes over time. Foraged items can not only usher in a certain natural aesthetic, but can also provide function. Organic linen, hemp and jute can provide our rooms with rich texture and layers. Vessels made from reclaimed and repurposed wood, rattan, seagrass, and similar woven materials can be used for storage that hides in plain sight. Repurposing salvaged, foraged and vintage materials to suit our specific spaces and needs can enrich our spaces in a way that’s more flexible, sustainable and character-filled than mass produced alternatives.

USHERING IN NATURAL LIGHT
Natural light helps eliminate dark corners, makes compact interiors feel airier, and can lift our moods throughout the seasons. Plus there’s no need to entirely overhaul wall decor for a fresh look and feel when nature is providing us with an ever-changing view. Here are some ways to usher in more natural light in a space of any size:
French Doors
French doors — whether used in exterior or interior frames — help keep a home feeling open and airy while still allowing for the division of space and privatization.
Pocket-Doors
When left open, pocket doors allow for uninterrupted light and airflow within an interior, without consuming valuable floor inches like a traditional door, or usurping usable wall space like a sliding barn door would. In our cottage, oversized double pocket doors generously connect the bedroom to the windowed and skylight-filled main room / kitchen. This provides a wrap-around, panoramic view of the wooded setting.
Mirrors
For anyone who wants a lower lift method of inviting natural light into their space, use mirrors. It’s a small hack with a huge impact. Just test the waters to see what I mean! Prop or suspend a small mirror in a darker corner where it can bounce light from an opposing wall’s window, let it sit for a few days, then remove the mirror to see just how lifeless the corner and wall look without it. The difference can be staggering! Opt for one larger mirror, or several smaller ones. Either way, you’ll instantly brighten up your space, which can uplift moods in darker seasons.
Unexpected Windows
We added small gable windows on the north and south peaks of the main room for extra natural light. As such, we needed no built-in overhead lighting in our main room / kitchen, which was a goal of ours given how artificial lights left on at night can interfere with the flight patterns of migrating birds. Thankfully a few smaller lamps can provide more than enough illumination in more compact square-footage.

VENTILATION
The most straightforward way to naturally improve our home’s air quality and pull focus to the outdoors is to keep our windows and doors open wide, when possible and safe. In our small space, the air flows through the house regardless of the direction of the wind, as casement windows on each side of the house make it possible. With Marvin Elevate casement windows like ours, each operable window has an optional screen that can easily be popped in or removed from the inside, making maintenance and installation easier in our situation.

PLANTS
Other than mirrors, plants are perhaps the easiest way to bring the outdoors in. For small households with little room for potted plants, consider tiered hanging options or wall-mounted vessels when possible. For folks who like to switch up the look and feel of their home often but want to do so responsibly, weekly market florals or locally foraged greenery can change your home’s color scheme instantly, and can also provide either a wild or polished look as desired. And for anyone on a tighter budget, try propagating! With a few reused jars, a pair of clippers, and a bit of guidance from interior plant stylists and experts like Hilton Carter, you can create a lush and green interior. (As always, keep the safety of pets and kids in mind when it comes to selecting your plant varieties.) We place our potted plants near our windows so they can live their best life indoors, whereas we arrange our clipped branches in more shaded corners to help them last longer.

This post was kindly sponsored by Marvin. All opinions and visuals are my own. We appreciate sponsors who believe in and support our small business.


Creating Your Own Small Entryway Solutions
This latest Create the Look post is is geared towards creating a utilitarian, customized, aesthetically-minded entryway in a small space with the help of vintage and salvaged materials.

But before we jump into it, please note: I don’t want everything I publish to be shoppable. I don’t wan’t to constantly encourage people to buy more, when I know that most of us can (and should — for environmental reasons,) live with less. What I do want is for folks to be comfortable, confident and content in their small homes or apartments.
In our 900 sqft cottage, the front door opens directly into the dining room. Despite the multitasking nature of this area, there’s more than enough space for us to hide our door-side essentials in plain sight. (See my “Rightsizing” Newsletter for detailed photos and explanations.)
Here are pre-loved or small-batch items from independent storefronts that might help you bring a touch of extra storage and functionality to your compact entryway, too.

Please note that we sometimes use affiliate links for the vintage and handmade goods we’ve curated, which helps keep the twinkle lights glowing for our small business.
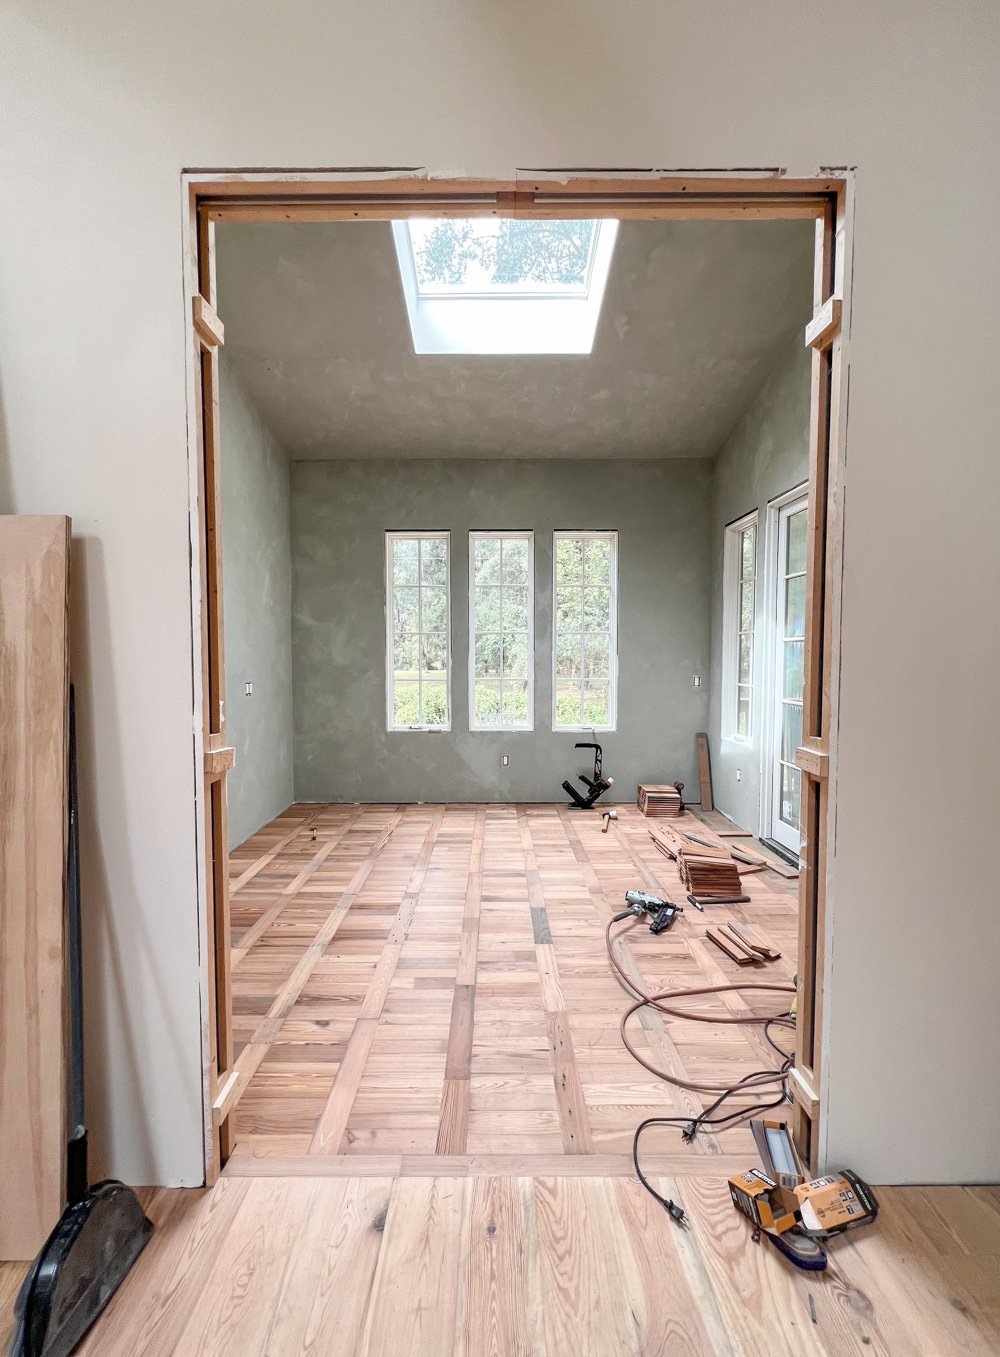
Using Recovered & Reclaimed Wood Remnants for a Unique Flooring Pattern
They say that one person’s trash is another person’s treasure. Well, we’re the second-hand treasure seekers over here!

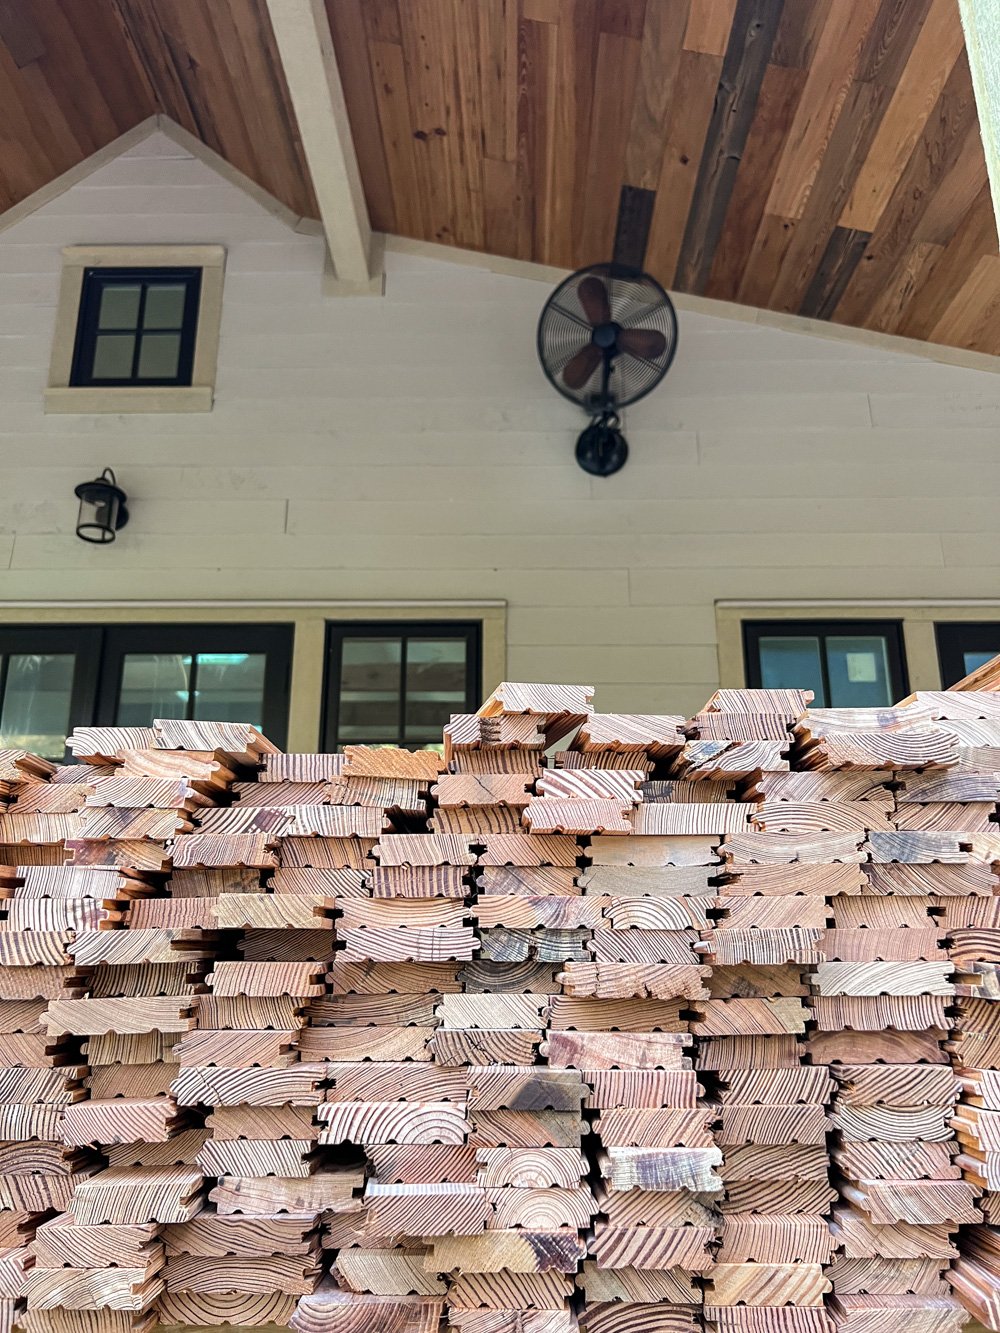
We’ve used reclaimed materials as well as surplus supplies from larger local builds on parts of our new, small cottage. Now we have three palettes of diverse leftovers of recovered wood from Goodwin to add to the mix!


We decided to experiment with these leftovers, attempting to create bedroom floors with a pattern I’ve had in mind for well over a year. It’s a pattern I’ve seen before in Europe, so the design details feels like another little nod to our French Farmhouse in a roundabout way.

It’s not only the pattern that drew me to the idea of this flooring. It’s the reusing of hundreds of remnant scraps, which came from boards that were both river-recovered and building reclaimed.

Not only are there different types of character pine in this floor, but there’s also very noticeable variation in the wood’s size, surface condition, age, and color.

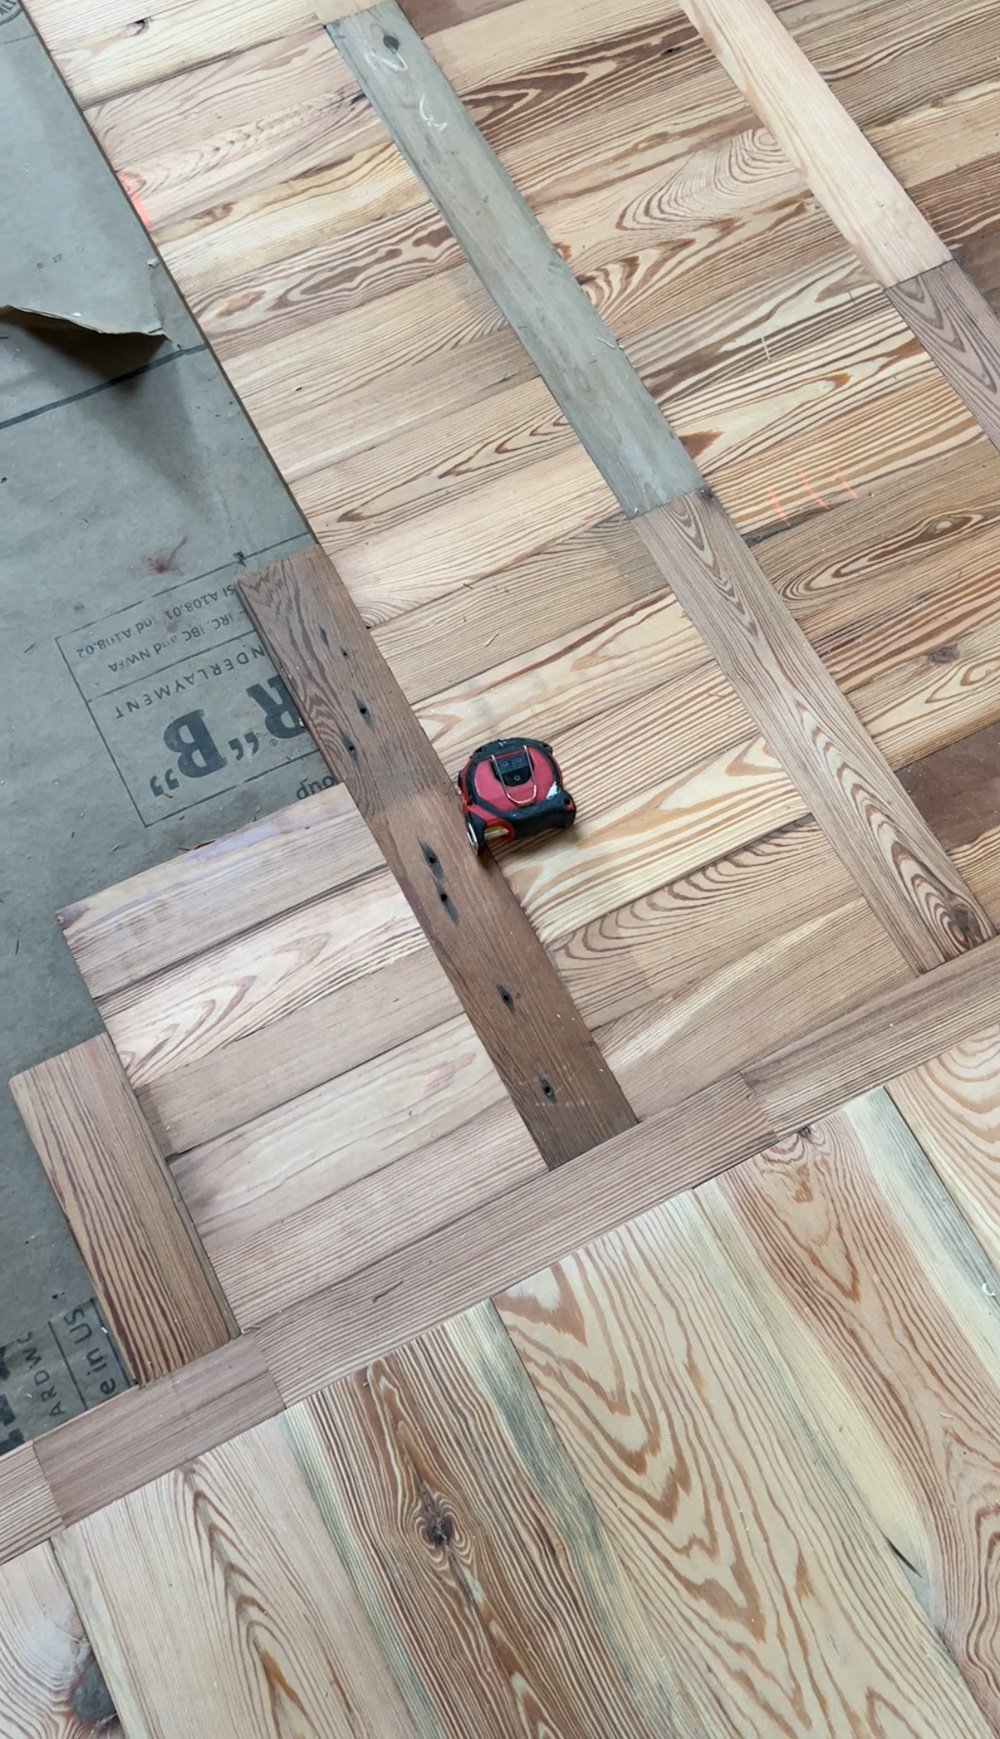


The variation is all welcome here, as the mix of widths and face markings only makes everything all the more special in our minds.
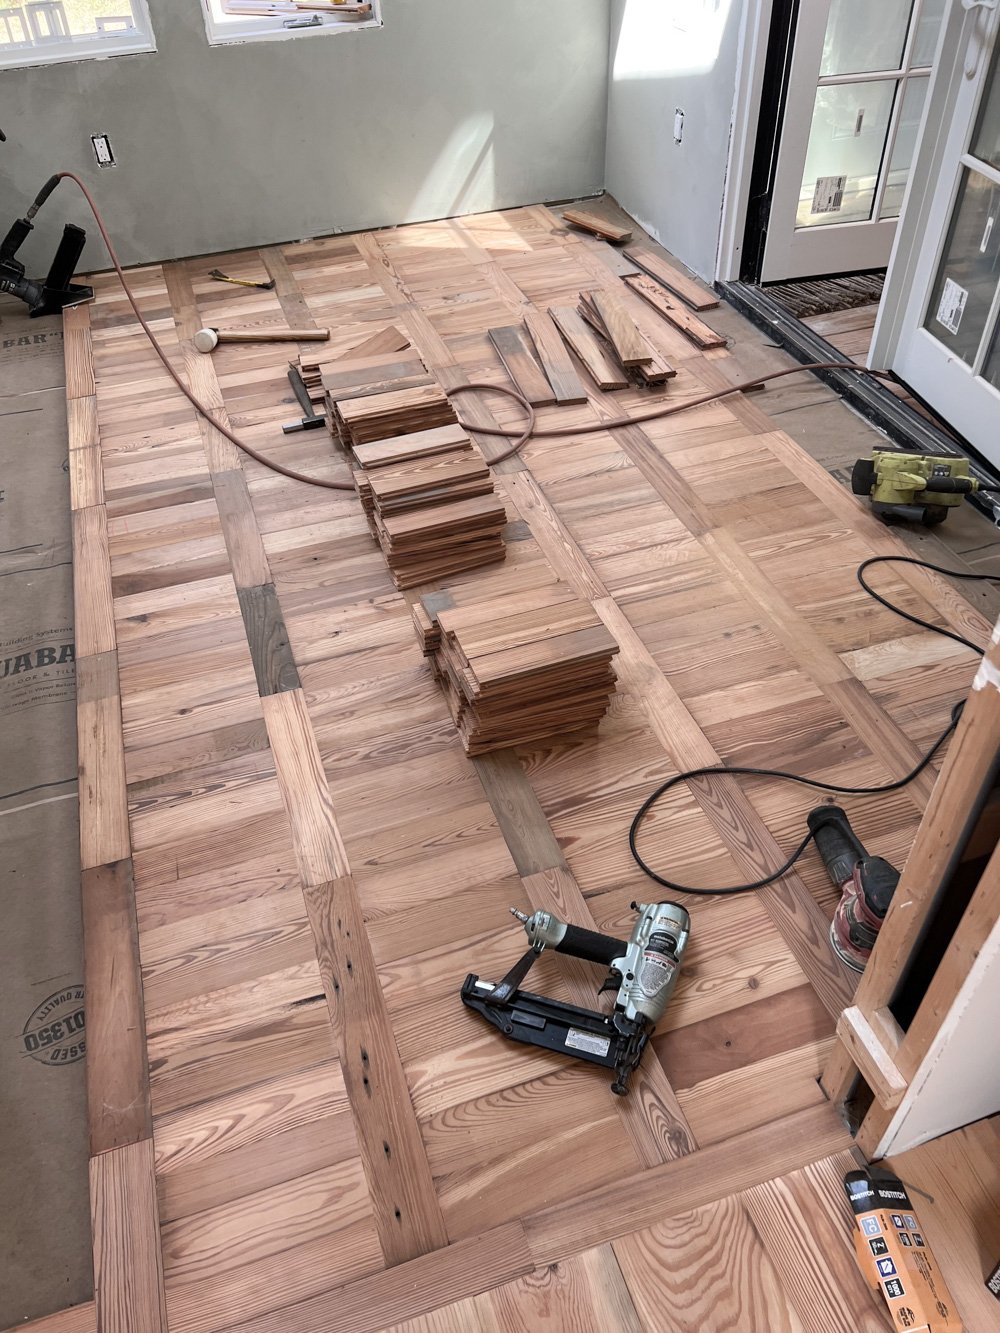
In certain light, the floor reads a more muted-brown. In other light, it has a red tint to it. We will be staining it with a healthy, whey-based layer in order to mute and even the tones without taking away from the general tonal variations and markings.
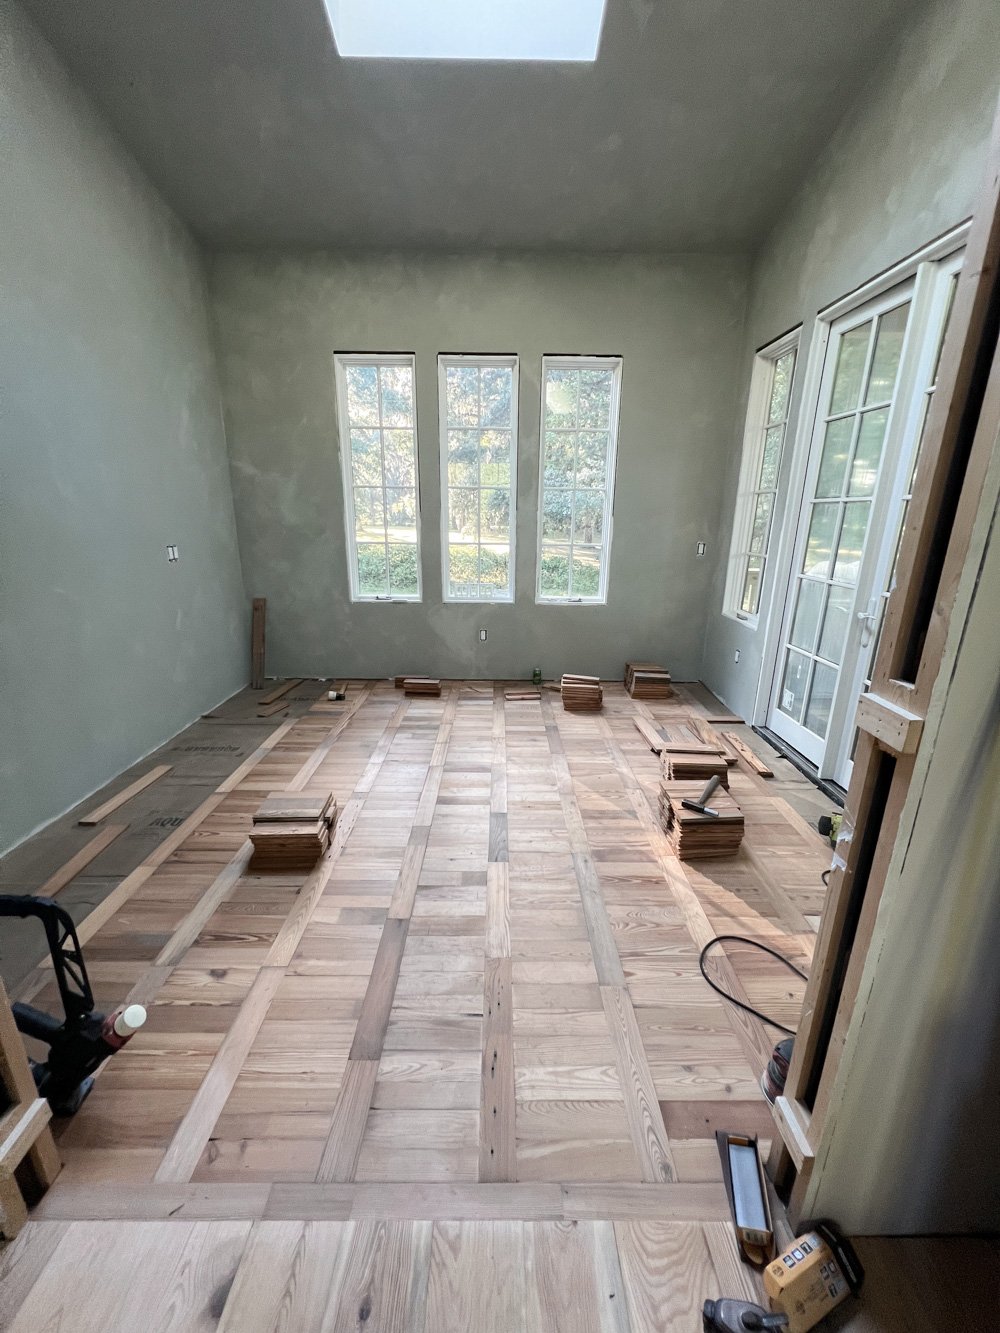
When paired with the lime painted walls, this room feels lovingly handmade and full of character. It’s exactly as I imagined.

Floral Crown Hat Band
Having grown up in Florida, and spent the majority of my adult life in California, I’m unfortunately no stranger to sunburns.

Earlier this month I had some skin spots checked by a dermatologist,. To my surprise, despite hundreds of freckles, my age (40), and numerous “wisdom spots,” the doctor informed me that I shouldn’t require another exam for two years unless something out of the ordinary pops up.


On her way out the door, she nodded towards my West Perro desert sun hat propped up on a chair, and commented that I likely have the hat to thank for my good fortune. It’s for that exact reason that I’m constantly wearing my hat. Other than one ball cap from The RightWay Foundation, it’s the only one I own. I curb temptation to buy additional styles I don’t need by updating the brim on a regular basis.

During election years, I wrap a Late Sunday Afternoon ascot around the hat and load it with political pins. Other times it’s dressed minimally with a simple horsehair braid. Lately, West and I have taken to accessorizing our hats with flowers and feathers discovered while on our daily walks.

To keep these treasures threaded securely to the hat, I ordered an adjustable, handmade band off Etsy that’s made for just such ornamentation.

Not only is decorating the band an outdoor activity that I can enjoy with my four year old, but it’s also an excuse for us to us to slow down and tune in to the tiny details around us.
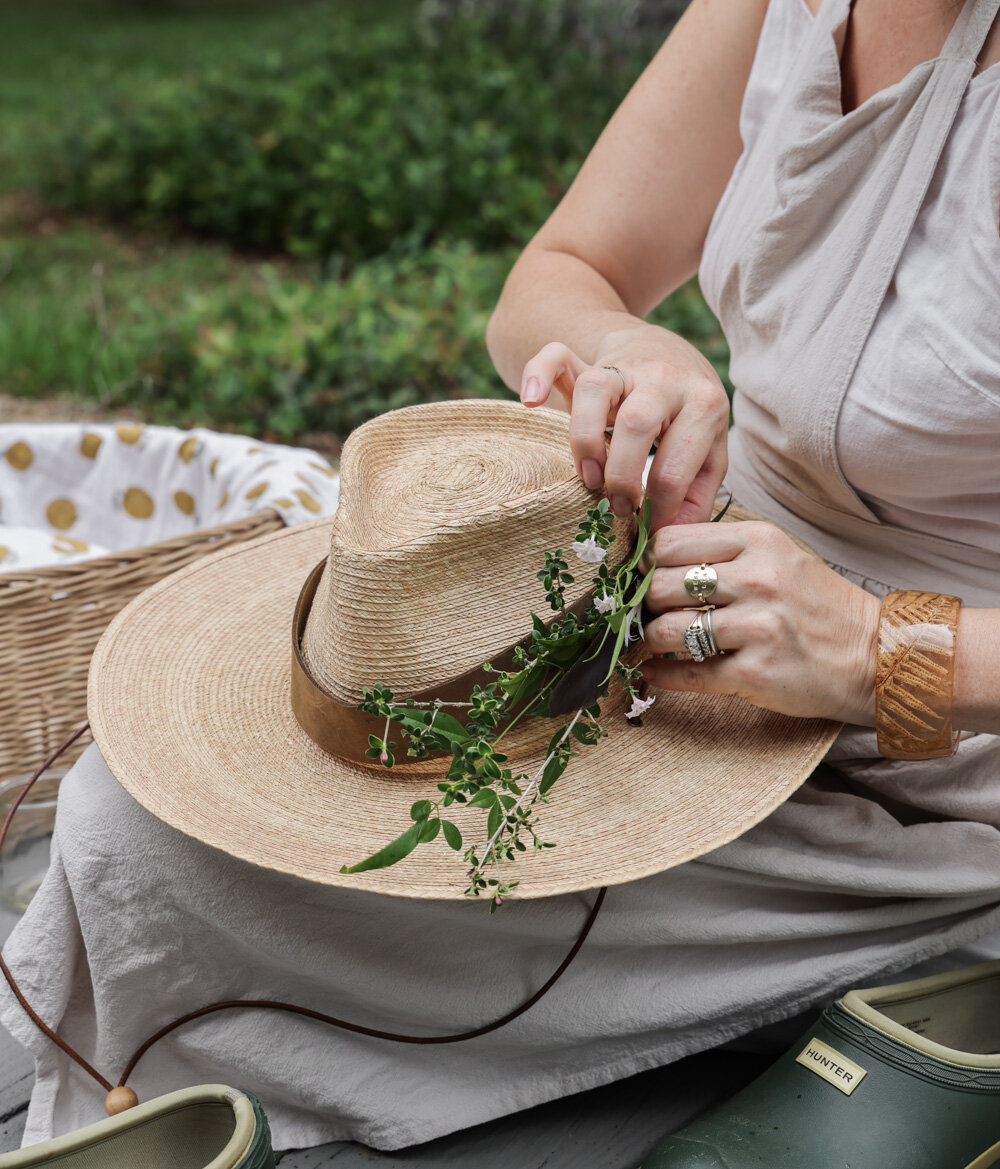
And, as with home decor, I delight in the opportunity to create endless , zero waste designs with the help of a few simple, practical belongings.

Before + After: Wallpaper Hack - How We Hid a Textured Wall
As short-term borrowers of our current, temporary living space (which is partially furnished and accessorized), we’re endeavoring to strike a balance between making it comfortable for our lifestyle, while also trying not to disrupt the space irreversibly. (Read more about my feelings on this balancing act via my previous post, and discover where we are and why we’re here via this entry from January.)
In our space, there’s a little nook in the multitasking nursery + playroom + bedroom, which I knew I wanted to turn into something special for our second baby, who arrives this spring. Other than the crib, this spot will be our newest family member’s only dedicated zone.

While envisioning the room makeover from across the country prior to our move, I’d pictured using a bright, playful, peel + stick wallpaper that would wrap around the full cubby, adding visual interest and depth to the otherwise static space.


… Then I remembered that the entire room (which was built in the late 80s/early 90s) has textured walls. Naturally, wallpaper won’t successfully adhere fully to textured surfaces. And even if it did, the details of the wall would show through.
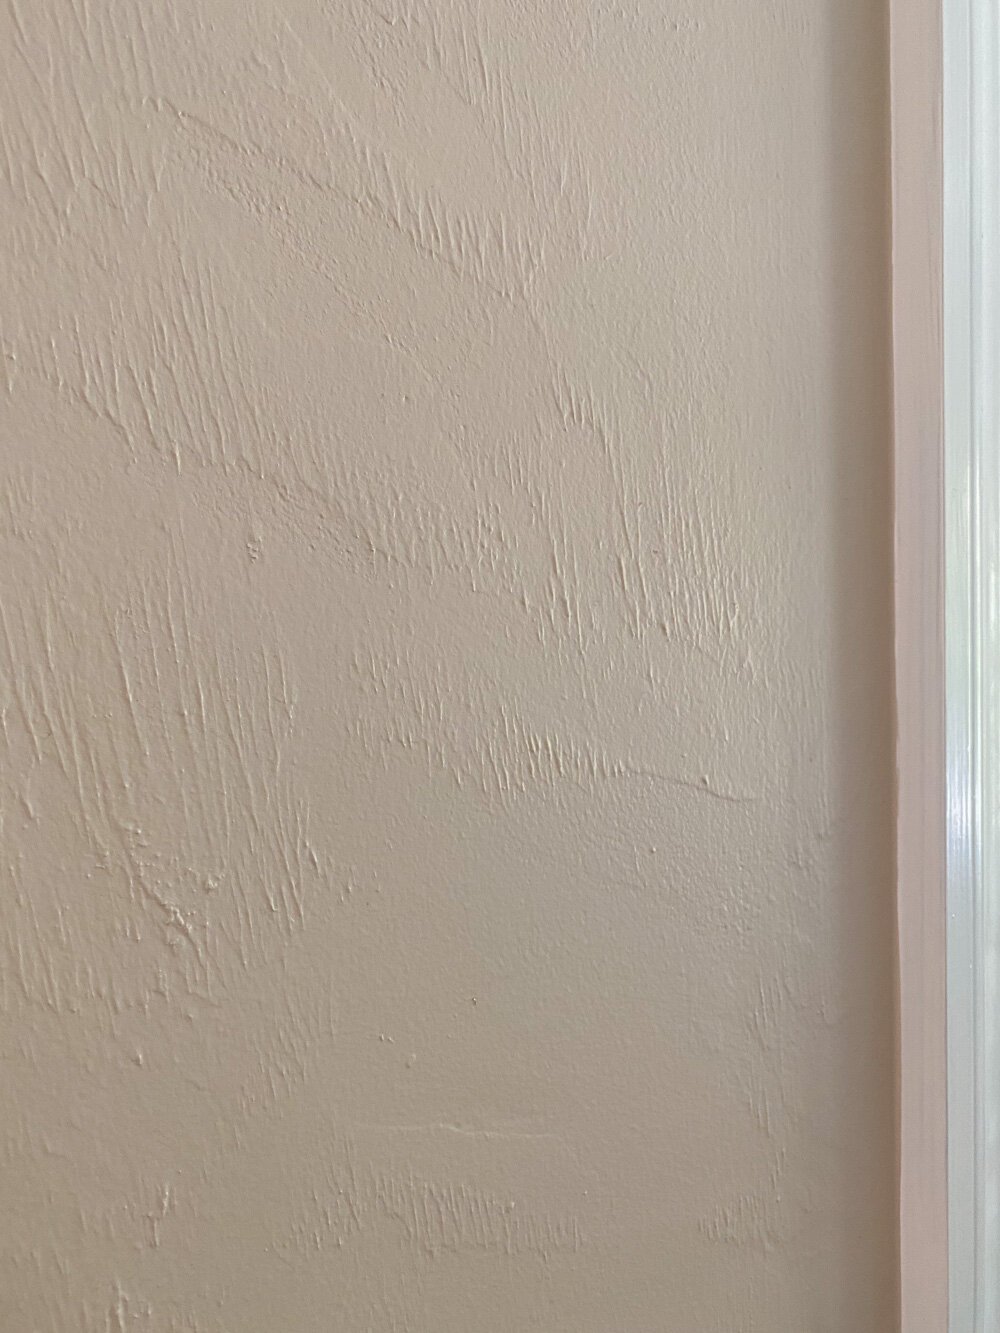
Fully resurfacing or masking the walls (like with beadboard) isn’t an option. We’re not here long enough to make the cost and footprint worth it, plus a change of that magnitude feels like a disrespectful level of change to introduce to a borrowed suite. We did, however, update the walls to Pure White, replacing the brown-beige color that was here upon our arrival. Still, the room needed something more to make it feel special, and I wasn’t willing to give up the vision for the nook.

I decided to attempt an inexpensive little hack in order to incorporate the peel + stick paper and hide the textured wall of the cut-out. We went to The Home Depot and picked out a single, thin panel of plywood that is lightweight enough to easily hang from a wall, but sturdy enough to resist major warping from humidity.

While there, we worked with an employee to cut the panel into slices sized uniquely for popping into the three divided sections of the nook. For the larger, lower slice, we used one uniform panel. For the two remaining areas, we puzzled together the plywood with neutral-toned tape (so it wouldn’t show through the wallpaper,) in order to keep the panels somewhat flexible for sliding in and out of the tightly built-in shelving. We gave up on the idea of the full wrap for the sake of our sanity, hoping that if we could pull the hack off for the back wall it would be enough to scratch the itch.

We covered the panels with a peel + stick wall mural. I chose the mural version instead of the wallpaper, as I preferred a wider spacing / larger print of the artwork for this particular project, rather than a tightly repeating pattern. I selected an orange grove design as a nod to Florida, ushering in the rich greens and playful but watered-down terracottas I’d planned to use within the room.

Thankfully, the peel + stick mural was forgiving, as Adam and I had to reset it a few times to get the layer as smooth as possible over the untreated plywood. The application took about an hour, as I’m in my 8th month of this pregnancy and my range of motion is getting more limited by the day.

To our delight, the panels popped perfectly into the cubby, and a simple screw driven into either side of each panel is enough to hold them in place.

I can’t change the carpet or the dresser, but thanks to the mural I’m no longer bothered by those features. The simple decluttering of the shelves and the addition of the bright paint and orange grove artwork were enough to make the visual and emotional impact I’d hoped.

Our 4 year old likes it, as do we. I hope his little sibling does, too. We’ll find out soon!
Sources:
Jute Baskets: Will & Atlas
Abacus: Etsy
Clothing: Primary Dot Com (Use code WHIT25 for 25% off)
Wall Mural / Paper: Society 6
Duck Baskets: Vintage via Etsy
Changing Pad: Gathre

Repairing and Repurposing Clothing and Accessories
Post Summary: How repairing shoes and attending Moving Thread sewing classes forever changed my feelings on buying new in an era of climate crisis.
During last year’s winter, we discovered some water damage in the wall of our built-in bed. It wasn’t until months later— when fall rolled around— that we reached for our cold/wet weather boots and realized that half of our shoes had also been harmed by exposure to the moisture.

In evaluating the damage, we had a choice to make: either get rid of all 8 pairs and purchase just 2 or 3 new pairs in their place, or invest in repairing the sets.
As we’d recently learned that about 80+% of donations end up in landfills, we decided to spend on professional restoration. After all, one of my goals for 2020 is to repair and repurpose as many belongings as possible instead of acquire anything new, which is why I began taking sewing lessons— but more on that later in this post.

The repairs weren’t cheap, but they cost far less than replacing each pair, and probably the same price as buying 2-3 new styles. Plus we knew where our money was going; to skilled and friendly crafters who’ve been restoring goods here in West LA for nearly 4 decades.

In chatting with the team at Buster’s on Main Street in Santa Monica, I learned that not only do they repair boots, but they also work on all sorts of leather goods, handbags, luggage, zippers, dyeing and more.

I was eager to share that information, as I’ve seen mountains of bags, coats and suitcases pressed up against the glass in the nearest Goodwill, destined for who-knows-where, and I imagine that shoe repair shops in other communities are likely multi-service like Buster’s is.


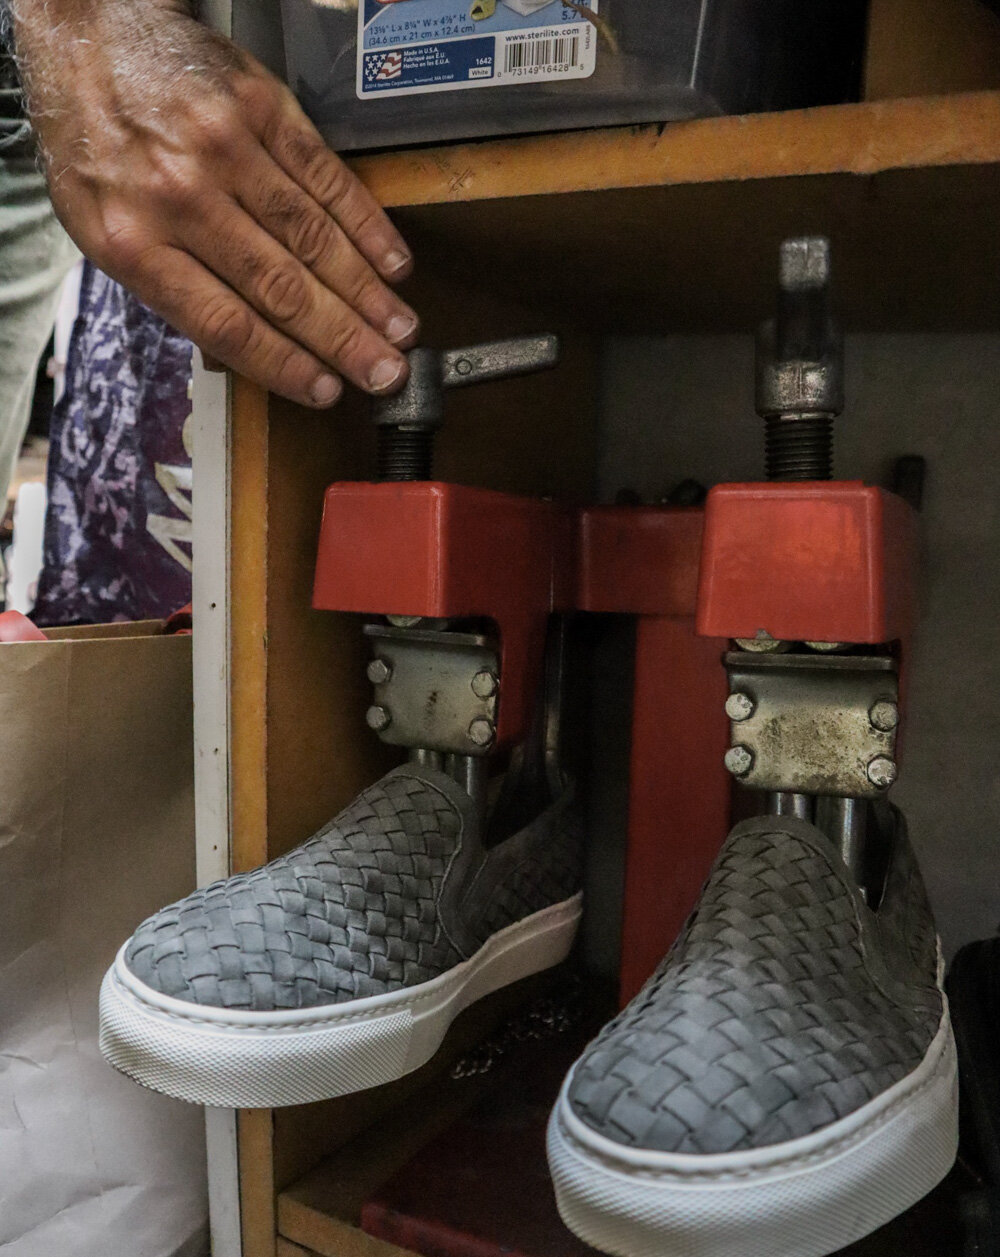


A month or so later when I pedaled the cargo bike over to collect our like-new boots, it was so satisfying to see them all ready to live our a second life, WITHOUT requiring manufacturing, shipping, and packaging like new shoes would have.
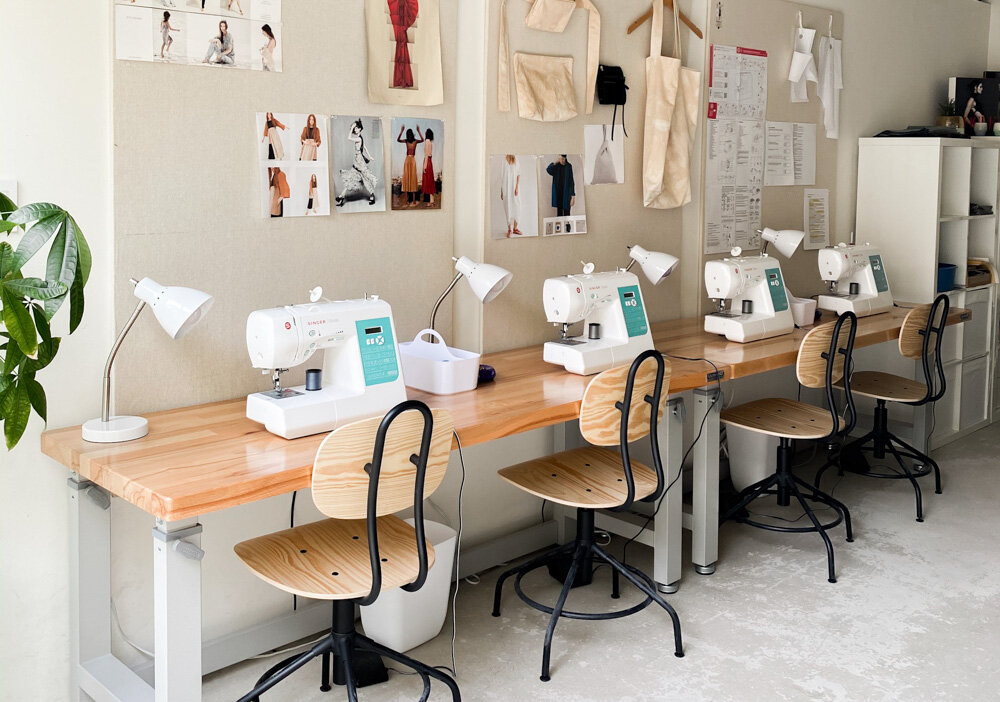
Inspired by this, I signed up for introductory sewing classes at Moving Thread. The classes have a maximum of 4 participants each, and are conducted within a beautiful home-studio space in Venice. Lead by Lissa, an expert who has been sewing and designing garments for over 25 years, Moving Thread offers intro and beginner workshops during which students can learn to make their own bags, and ultimately repair or alter an existing article of clothing.
One of the things that struck me about Lissa’s mission was this statement from her website:
“Today, we could all have less. The fashion industry is one of the most polluting industries in the world and a massive contributing factor to global warming. A lot of change needs to be made to undo what we’ve already done but there are some small steps we, as individuals, can take. By repairing or making our own clothes and refusing to buy from companies that don’t do their part to improve our environmental standards is just one bit closer towards a cleaner Earth.”
I signed up immediately.

Moving Thread was one of the highlights of my holiday break. I’m eager to attend a few more classes, and then thrift a sewing machine of my own so we can begin to alter and repair our own clothes and repurpose linens around the cottage.

(On a fun side note, Lissa has a lovely outdoor shower, as well as a cargo bike similar to ours. I feel as though we were destined to meet and become close. She even attended my low waste holiday decor workshop at Big Red Sun, which was such a sweet surprise.)

So, while we’re still not one of those single-mason-jar-of-household-waste-per-year families, I’m determined to get there before it’s too late.

Tiny Toolboxes
When I left for college, I inherited several tools from my parents. I felt sentimental about the pieces that they generously gave me, and I used those hand-me-down supplies to assemble furniture and make minor repairs in nine of the ten places I’ve lived since leaving home at 18. The last major project in which I used the tools was West’s nursery nook.

Over the years, the tool collection evolved and grew. I added more and more little things to it— particularly when I was set styling over recent years. Eventually I found myself with a multi-level, wheeled cart that I dragged around our cottage with me, despite the fact that I usually only used a handful of items within it when at home.
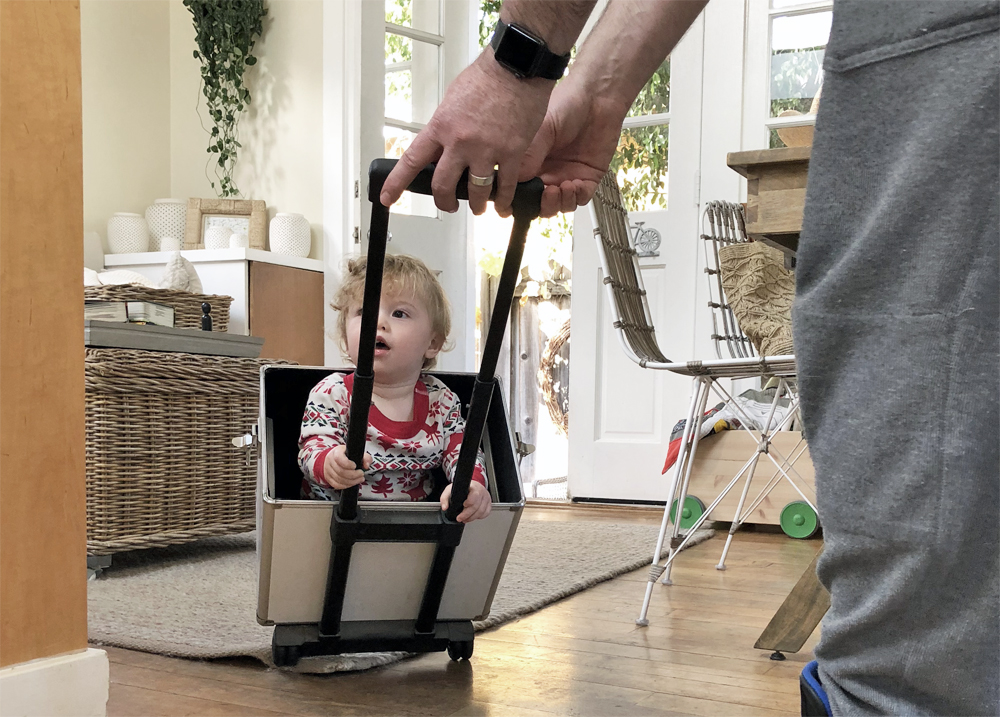
As we began working on the front tiny cottage, I realized— I only need a small, specific grouping of tools and hardware. Everything else is always brought and handled by the professionals with whom we work. So why was I struggling to store a 3’-tall toolbox in our tiny house when I didn’t have to? True small space dwellers know— there is absolutely no room for something like that in a compact home. The poor thing was was a mess inside, and it was routinely left outside for days on end, crammed onto one stoop or the other, and shoved into the back of our 2’ shed. (It was so oversized that West would even climb into the bottom 1/3 of it so we could roll him around the house. It was adorable, but ridiculous.)
I got to thinking about the individual items within my collection. The ones I used regularly could be condensed into a multi-tool, and most of the other products I could do without entirely. (And, surprisingly, I was missing a tool or two that would’ve been extremely helpful to have here on a regular basis.)

I realized that a toolbox makeover was in order. I had to separate the sentiment behind select items and part ways with them. Plus, I needed to come up with out-of-the-ordinary ways to store the necessities. I played around with a few ideas, testing out what ACTUALLY worked (not just for photos), and what was easily accessible, without standing out in our tiny house or consuming space needed for other uses. I combined few methods of storage, and thus far, this mix has been practical and hassle-free:

1. Small Tool Roll (Rather than Box)
A tool roll has proven much easier to store than a box of any size. It’s portable, it can easily be kept out of West’s reach, and it’s neat and organized even when left out in the open. I use these waxed canvas pockets to store the handle of our new Husky 16-in-1 interchangeable screwdriver set from The Home Depot, our new Husky pick + probe set, our hammer, touch-up paintbrushes, and a miscellaneous multi-tool that I use on our bikes. (The Pick & Probe set was one of the items I realized I needed but was missing. Our cottages are from the 1920s and have a lot of imperfections, and West somehow finds them all, and then gets all sorts of stuff trapped in the smallest slivers of space. The picks help Adam and me reach and clear those spots.)
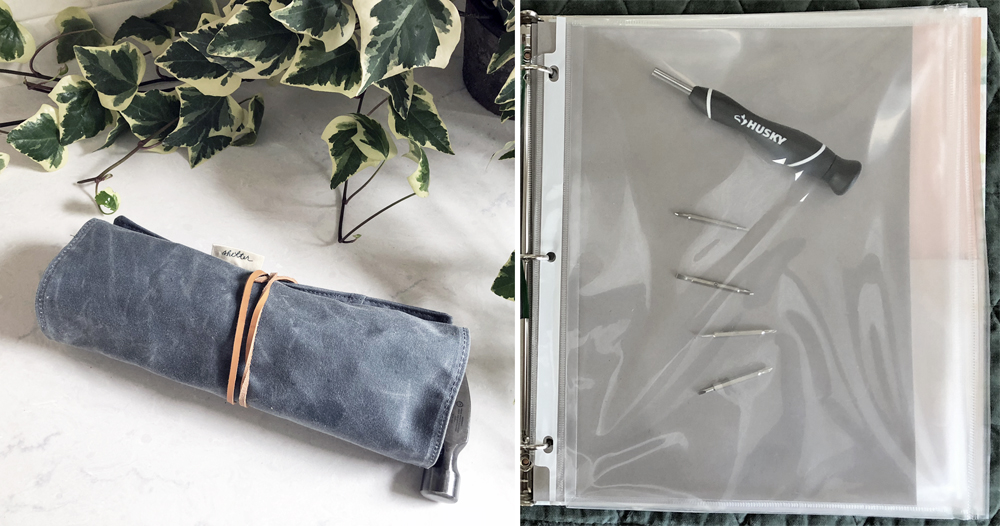
2. Hardware Notebook
It’s easier to make room on our bookshelf than anywhere else in our home, because books can live countless lives by being re-gifted onward to friends and family for their enjoyment. I couldn’t find a hardware organizer that worked well on our built-in bookshelf, so I upcycled a 3-ring binder for the job. I used a combination of basic plastic bags and binder pouches to hold a mix of hardware, along with the various heads for our screwdriver and drill.

3. Large Tool Hanging Bag
After giving away anything I no longer needed, then outfitting the tool roll and notebook, I was left with a few compact yet larger items that were scattered around the house: a 30’ tape measure our Ryobi multi-tool base (which I use to build our suspended shelves and to cut/sand wood), our Hex Key sets, and extra water-resistant gloves. It got obnoxious to have all these items separated, so I gathered them together and dropped them into a washable garden bag that I can hang on the wall. Not only is the bag easy to tote around, but it hangs mere inches away from the notebook, and can also contain the tool roll.

No longer having to track down and lug our nomadic, oversized toolbox has saved time me and frustration. I now have everything organized side-by-side in a way that really works for our funny little space. As we finally wrap up months of repairs to the front cottage this week, I realize that I now have delightful new memories associated with our updated tools.

My advice to anyone in a small space who's looking to get a fresh start on their tool/hardware/craft collection is to carefully select multi-tools, and to think beyond the usual toolbox when it comes to how to store them. Find means of organization that work well for the spaces you have available, keeping size, shape, accessibility, and aesthetic in mind.
Select tools from this post were gifted to me by The Home Depot. All words/opinions are my own.

Tiny Garden Tips
Do you have a tiny yard? Or perhaps just a stoop or fire escape? Don't overlook the possibilities-- even small outdoor spaces can be beautiful and functional! Below are a few helpful mini-garden tips that routinely come in handy here at the Cottage.
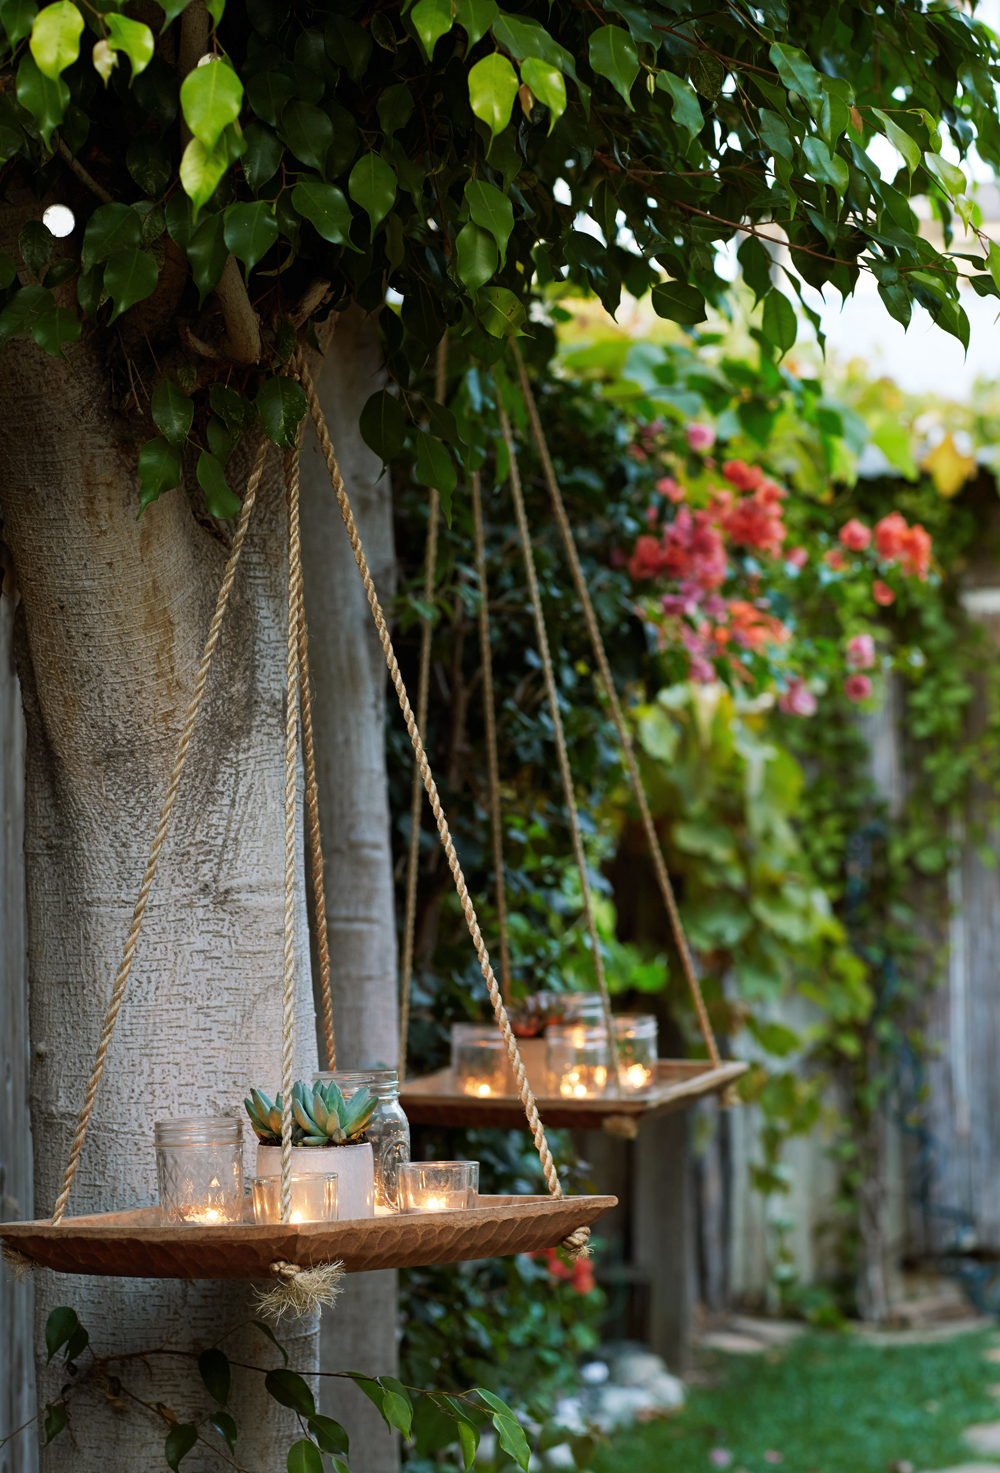
Photo of the Cottage garden by James Tse for THE NEST / THE KNOT Magazines.
1. GO VERTICAL - This is the best piece of advice I can offer folks living in small spaces. Be creative, while always remembering to please be safe and smart when getting crafty with your vertical decor. Hanging trays, suspended starter beds, and "gutter gardens" are a great way to begin growing your greenery, and they function particularly well in window frames, and on external walls.
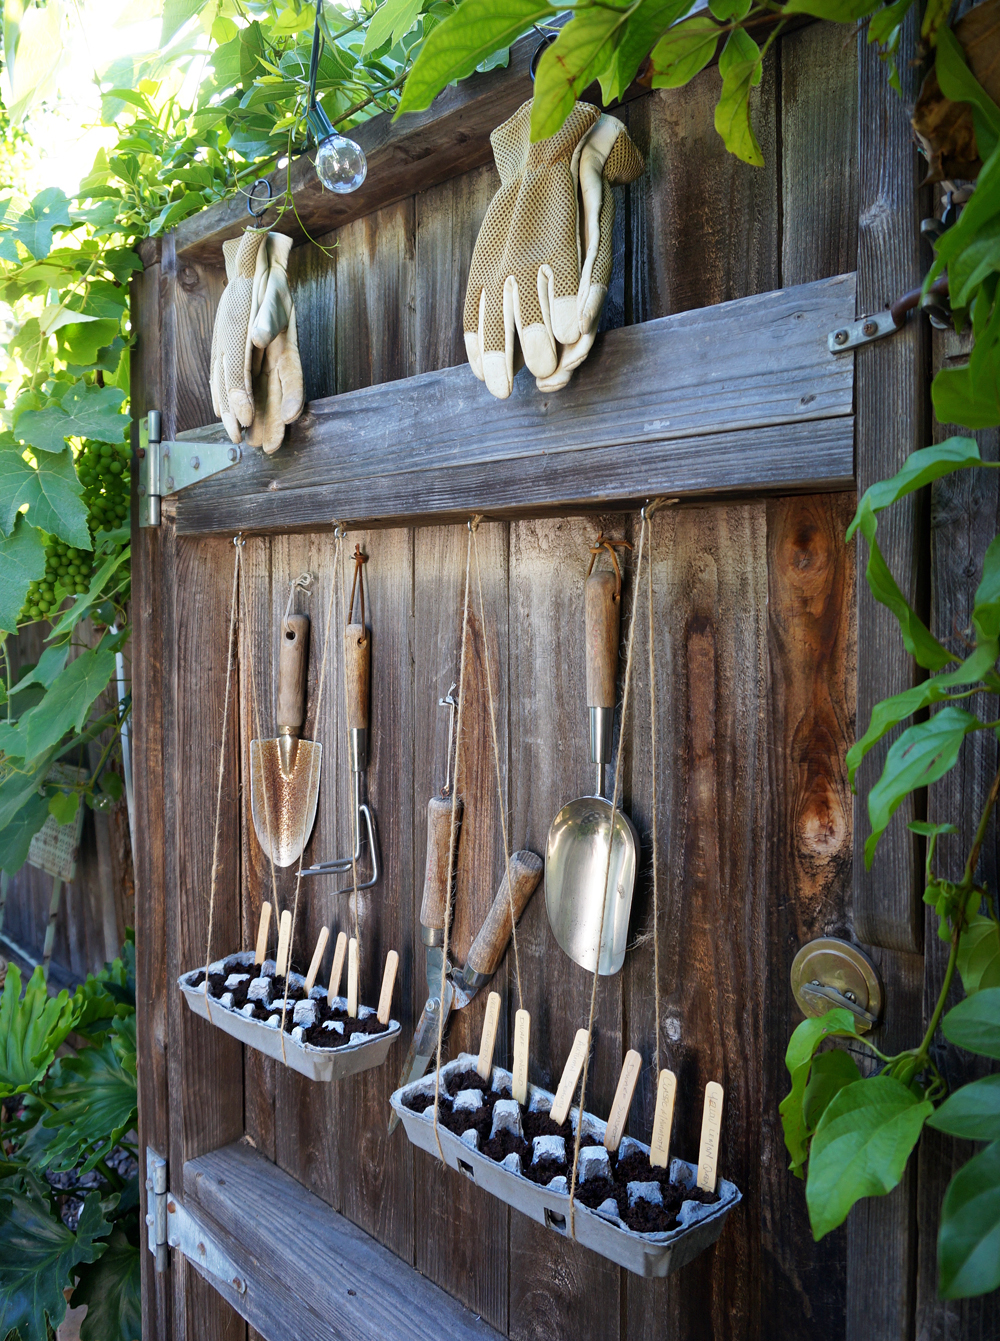
For our home wedding last month, we gifted a mix of Grow Kits from Terrain to all of our guests. We loved the tagline from the kits: "Grow Happiness in Small Spaces." (How perfect is THAT?) The kits are all made in the USA, and are simple, pretty and eco-friendly. We kept two for ourselves ("Grow Herbs" & "Grow Sunflowers") so we could continue to expand our garden. Rather than keeping the egg crates inside the house, we strung them from our back gate, along with our gardening tools.


2. SEMI-CIRCULAR DESIGNS - Another handy concept for small outdoor spaces are half-circle tables and accents, like this planter along our fence:
We have two of these planters, which we move around the property depending on the occasion and season:
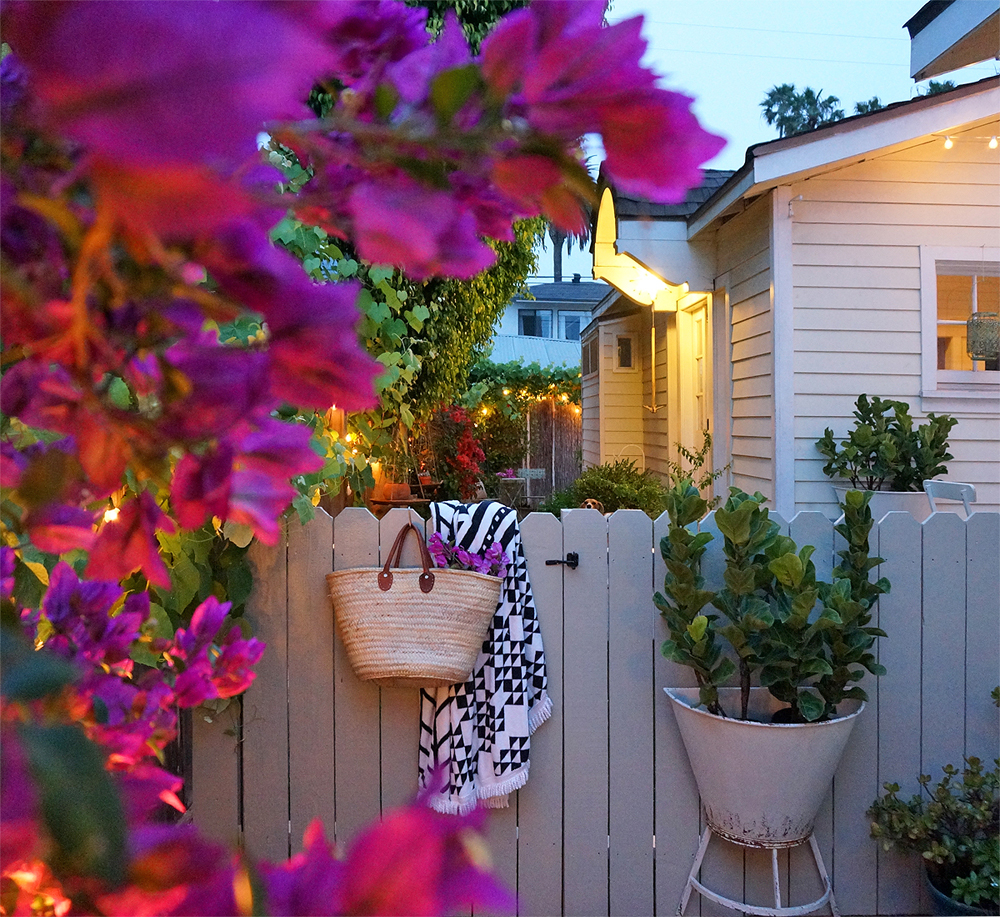
3. LATTICE GARDEN - One of our favorite outdoor areas here at home is the porch, where we have an 8'-wide lattice garden. Balcony planters and pots hung with "S" hooks enable us to switch up the plants and their placement regularly. The vertical, potted garden offers some additional privacy from the neighboring house, while also beautifying our lounge area:
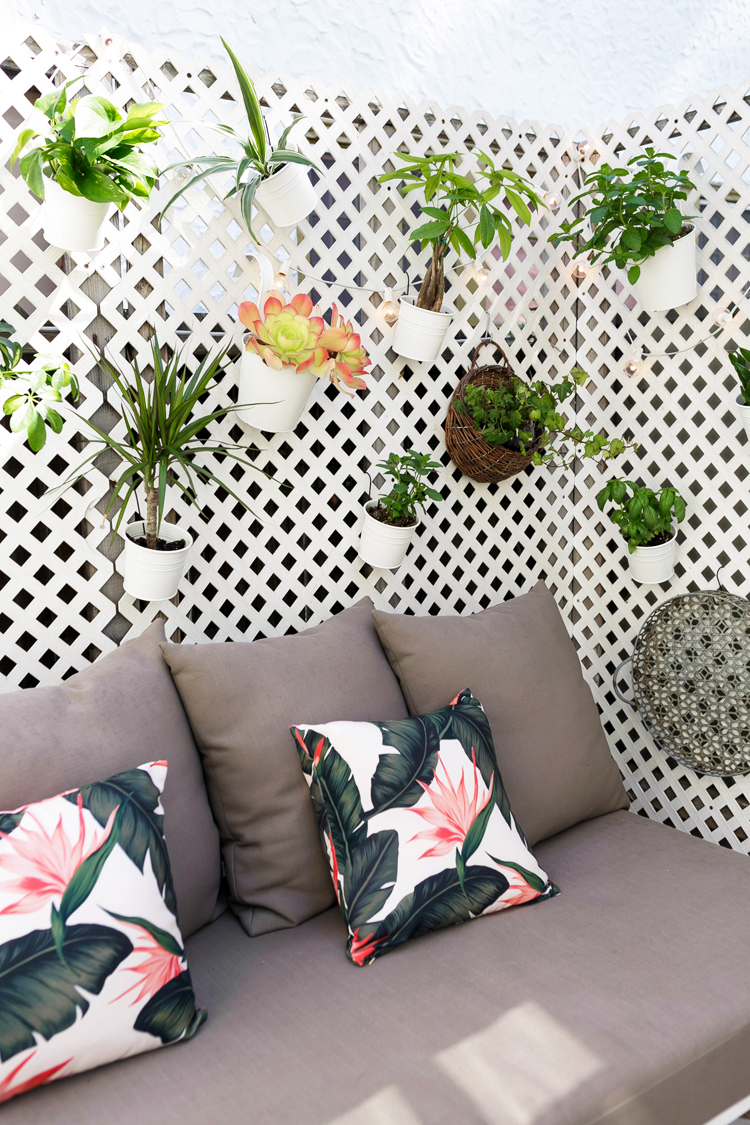
Photo of the Cottage porch by Monica Wang

Photo of the Cottage garden by James Tse for THE NEST / THE KNOT Magazines.
4. MULTI-TIERED CARTS - No room to go up? Try layering plants on a compact, vertical, multi-tiered rolling / bar cart:
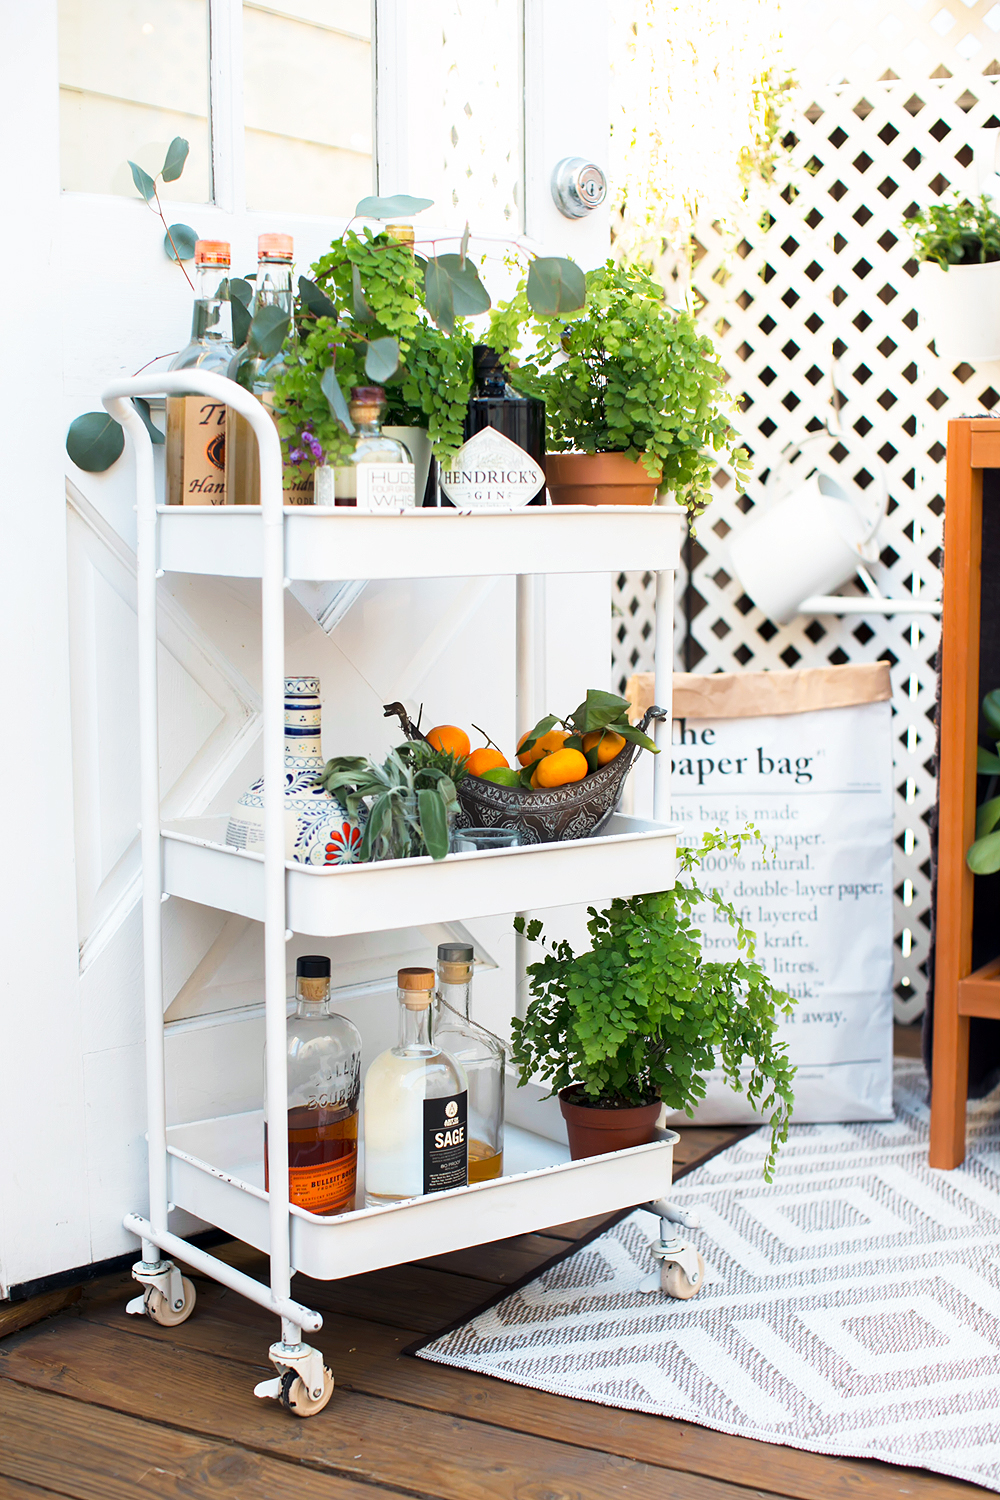
Photo of the Cottage porch by Monica Wang
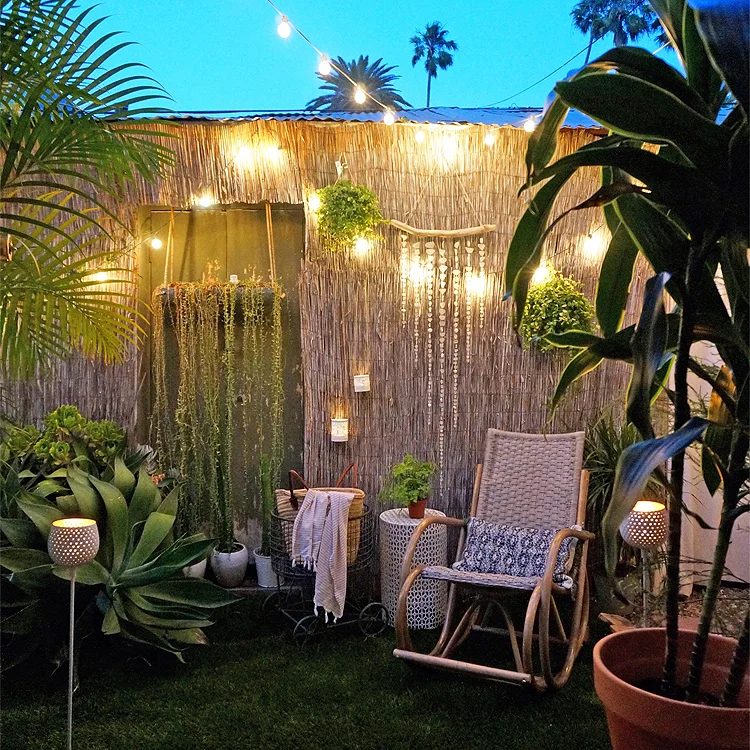
And don't forget: plants, cafe lights, outdoor textiles, and patio rugs can transform even the smallest, shabbiest spot into a lush getaway in your own backyard!


Here are a few more ideas we love for displaying your clippings and small plants: A garden chandelier (read more), yard stakes, wall vases and miscellaneous hanging planters:


Garden Mimosas
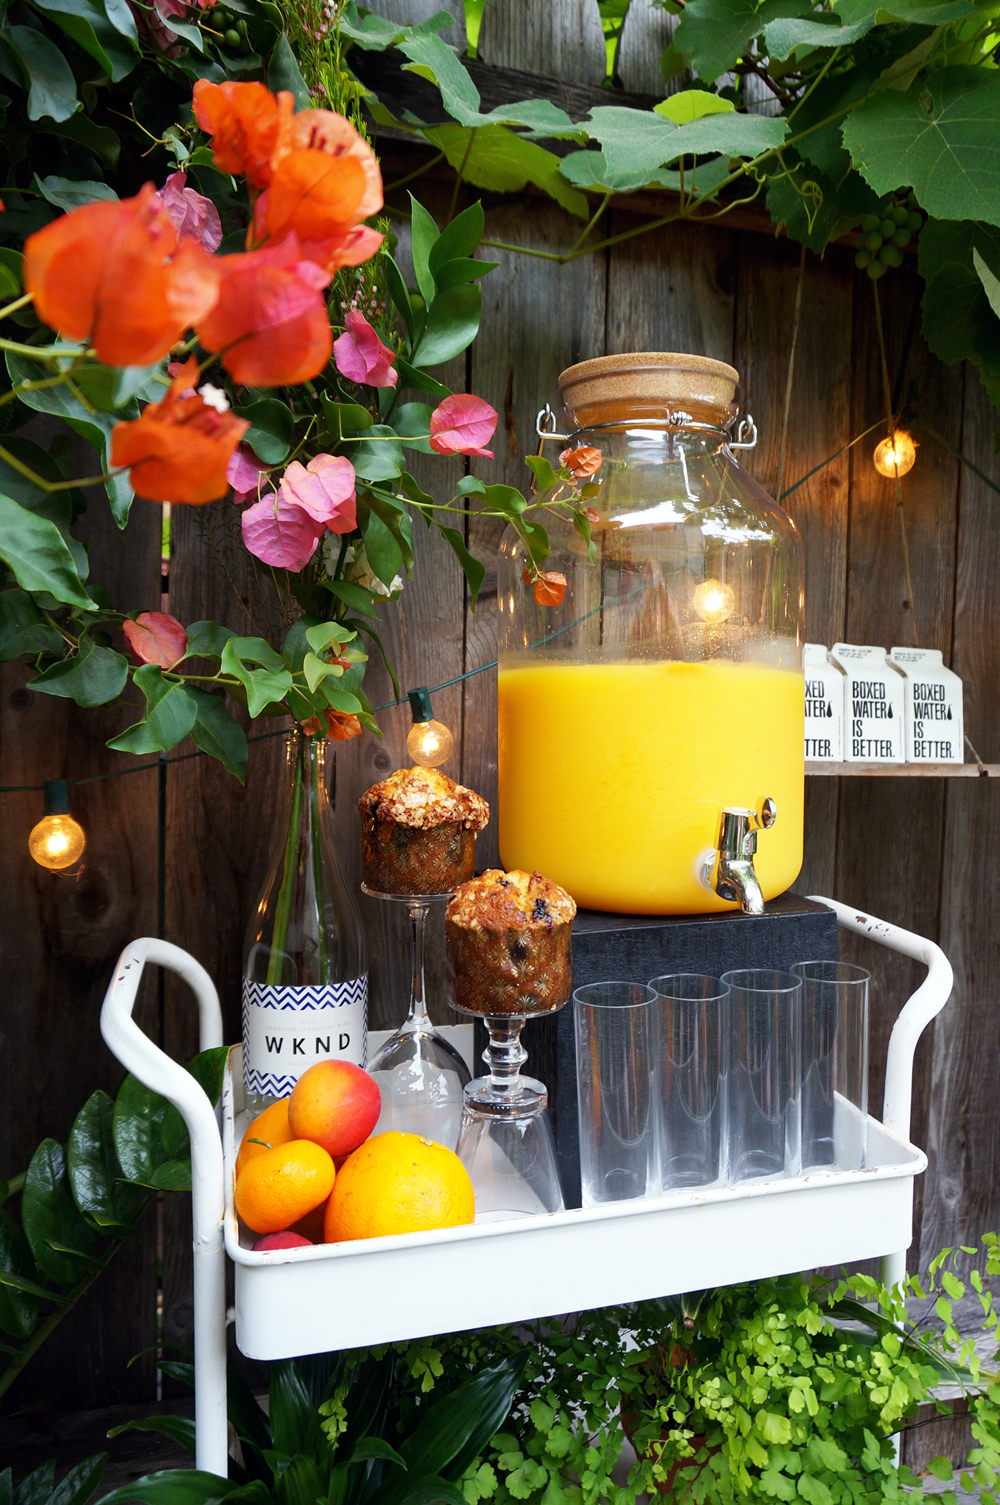
When entertaining larger groups in small spaces, I find it helps to have mini stations (for food, beverages, a bag/coat drop, etc.) instead of one main area dedicated to this-or-that. Compact entertaining spots positioned wisely around your tiny home and/or garden will naturally break up large clumps of people, and allow folks to move around with greater ease. We did this for our wedding brunch with lil' mimosa stations:
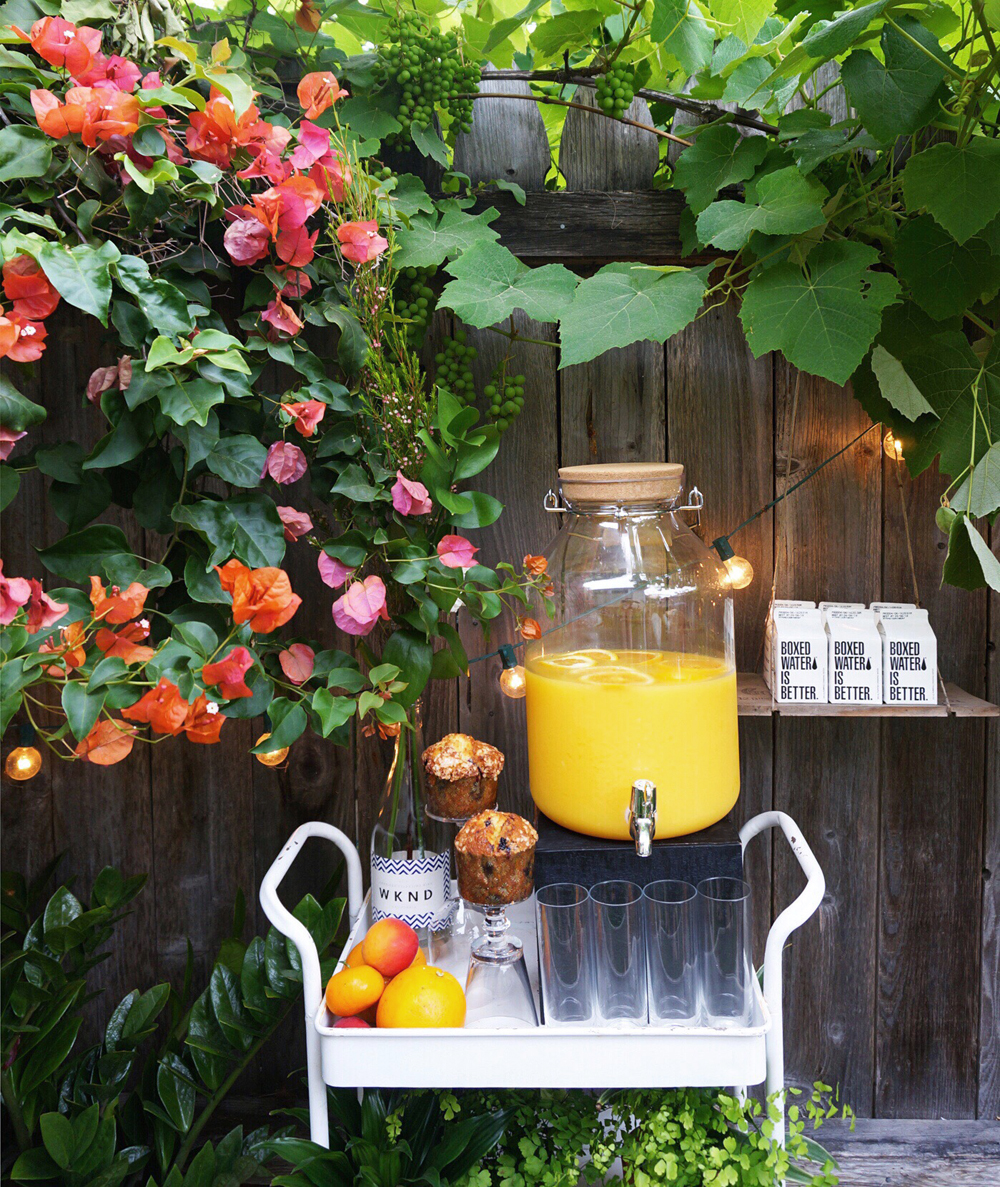
Garden Beverage Station: Sparkling wine for classic mimosas by WINC, H20 by Boxed Water.
I placed a 3-tier bar cart in the shade of our bougainvillea and grapevine to hold our CB2 champagne flutes, baked goods, fresh market produce, plants, and the beverage dispenser with sparkling wine mimosas from Winc. I upcycled an old wine crate top to make a space-saving hanging shelf where we offered Boxed Water that guests could take with them when strolling the canals throughout the brunch. (As I'm midway through my pregnancy, I had to refrain from enjoying the drink stations. While it's obviously well-worth it, I gotta say that I've never been so sad to say no to a mimosa-- especially after hoofing it through a DIY home-wedding!)
GARDEN BEVERAGE STATION: SPARKLING WINE FOR CLASSIC MIMOSAS BY WINC, H20 BY BOXED WATER.
Gifts for Out of Town Guests
With the wedding around the corner, we've started prepping and delivering lil' gifts to our out of town guests at their hotels, Airbnbs, and One Fine Stay homes. As always, our main aim is to delight our friends and family with goodies that won't clutter up their homes (and, in this case, don't hinder their ability to travel light).

These are the main items I chose. (For various boxes, we added bubbles for kids, and ties by Combatant Gentlemen for select guests.)


Ikea Decorative box with lid ($1.99)
“Venice” History Book from Arcadia Pubishing & The History Press
Freshly Baked Goods from Gjusta and/or Superba Food & Bread
Fresh Market and/or Garden Florals in Reusable/Recyclable Glass Spice Jars

We also made little favor bundles for all parties attending our wedding reception, including the following:
- Venice Greeting Cards by Brittney Banks
- Grow Kits from Shop Terrain (I love the tagline: "Grow Happiness in Small Spaces")
- Chocolate Bars from Nohmad Snack Co.
The Cottage Bath
Lately, we've received numerous requests for photos of the Cottage bath. While the room is actually larger than you might think, it's designed in a way that makes it tough to photograph, meaning we have very few images available:
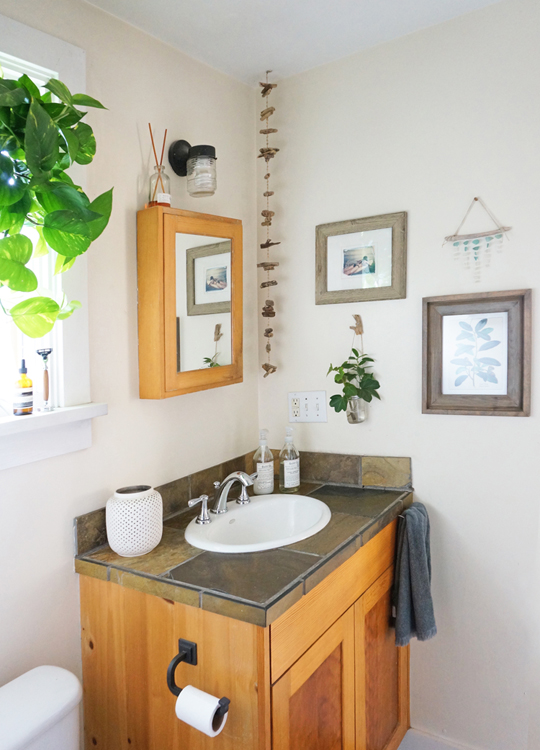
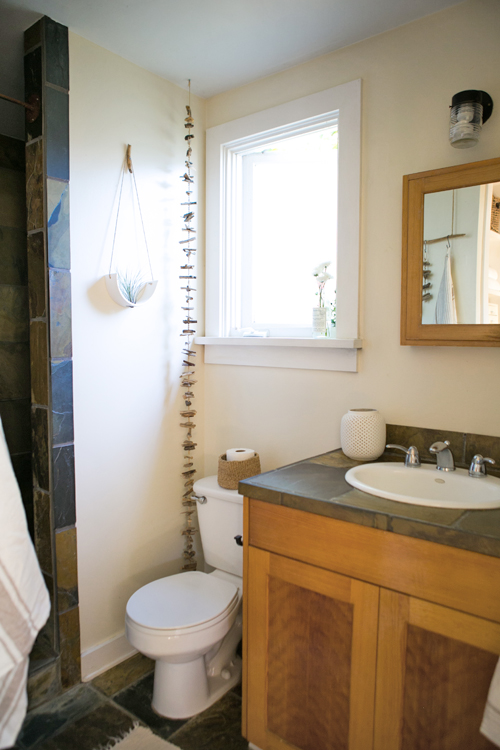


I'm often asked how we keep the bathroom organized and uncluttered, given its small size. Here are some of my top tips:
Only buy what you REALLY need:
I know this sounds basic, and it is. But controlling what you bring into your home is the best way to avoid accumulating clutter and wasting your money. We have ONE shampoo dispenser. ONE pet wash. ONE body wash. Etc. You don't have to come up with creative storage solutions when you don't have too much to store in the first place!
Upcycle:
I keep my makeup in an old metal hardware drawer set that I found on ETSY (reference: photo #7). I spray-painted the box, applied liners to the base of each drawer, and used the original metal hardware organizers within the drawers to keep my palettes and tools separated and easy to find.
Functional decor:
If you have limited cabinet space, try organizing your must-have items (such as spare toilet paper, extra cotton, etc.) in containers that fit with your style-- that way you can keep them out on display as functional decor. For example, we stash our extra bath goods in a white metal mop bucket from West Elm.
Save counter space:
Limited surface space? Try organizing your jewelry in slim hardware drawers. They come in varying sizes and depths, and are easy to stash in cabinets and next to sink U-bends. I purchased one like this years ago, which I keep in the vanity in front of our spare towels and travel pouches. It not only saves us counter space, but it also saves us time. This organizer helps me expedite my out-the-door routine on a daily basis, as I rarely have to untangle chains, and I don't have to sift through pouches to find the item(s) I'm looking for.
Let Go:
Don't let expired bottles, nearly-empty beauty products, and samples you've never used clutter up your limited space. Routinely clean out your medicine cabinet and drawers. Donate extra products to your local community housing corp or homeless shelter.
DIY:
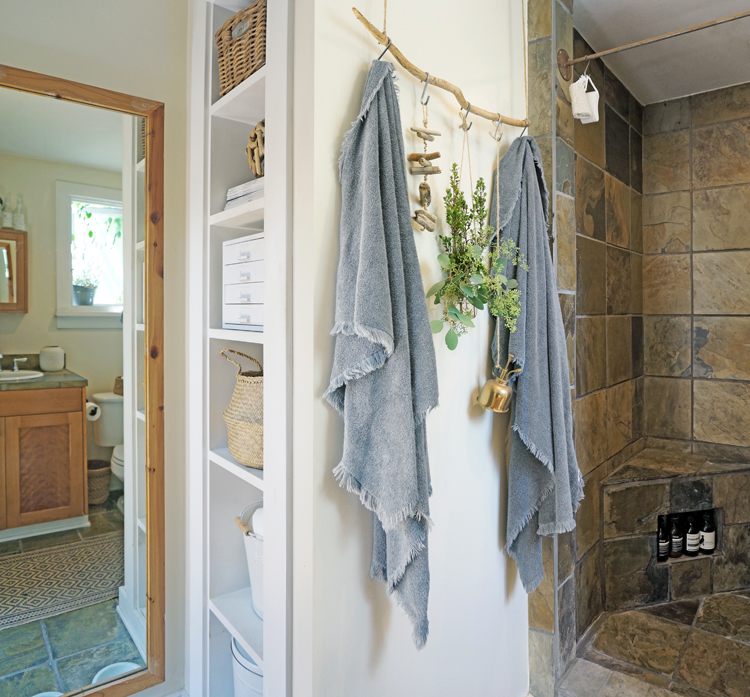
Save money and get creative! Try making your own racks and/or curtain rods. Instead of buying a standard metal towel rack, I opted to craft one of my own. All it required was jute twine, S hooks (to hang towels and accessories), screw eyes (to secure the unit into the ceiling), and a wooden branch I found at my sister's wedding in Idaho. My good friend Lindsay over at Casa Joshua Tree did the same thing while renovating her house in the desert, and look at how great it turned out:

Our bathroom is a little too long for a standard bathmat to cover the necessary floor space, but it's definitely too small for two throws or a larger area rug. I searched Etsy and easily found alternatives to typical bathmats that have all worked beautifully over the years.
Lastly, for some strange reason, there is a recent story circulating that claims the Cottage is a converted garage or guest unit. That is inaccurate. While our home has been updated over the decades, it has always been its own free-standing house, consisting of a main room (including a kitchen), a bedroom, and a bathroom. So no-- we did not have to add the bathroom to our home. The Cottage was one of four identical, neighboring houses built in the 1920s. Three of those four are still standing today.
Photos by Whitney Leigh Morris & Monica Wang Photo.
Temporary Dishwasher Cover
So many people have asked about the fun lil' dishwasher cover featured in one of our recent Cottage images:
The artwork pictured is a piece of wallpaper that was designed by my friend (and total genius) Justina Blakeney for Hygge and West. Instead of fully adhering the paper to the front of the dishwasher, I simply used four magnets to hold it in place.
Try extra strong magnets. Or, if you'd prefer to use adhesive, try something "damage free," such as contact strips.
Wrapping paper is a wonderful way to expand your options, and switch up your look at very little cost.
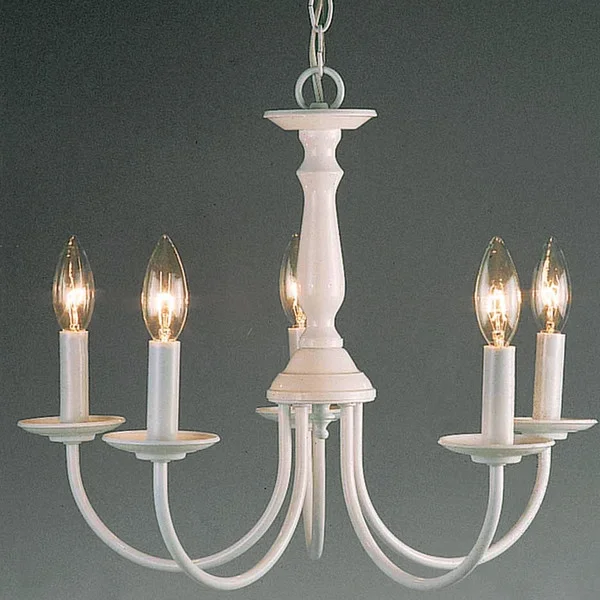
Cottage Bedroom Garden Chandelier
January is such a weird month in the Cottage. The greenery outside is gone and all the winter holiday decor is packed away. The house just feels kind of bland and lifeless. Usually we see the overflowing grape leaves through the windows over our built-in bed, but in January and February we're stuck looking at the barren vines and the line of homes nearby. I decided to make a small greenery chandelier for the bedroom to cheer up the space a bit.
I do tons of handmade projects here, but I'm not a particularly patient person, so I tend to lean towards DIY-lite. This chandelier was quick and simple:
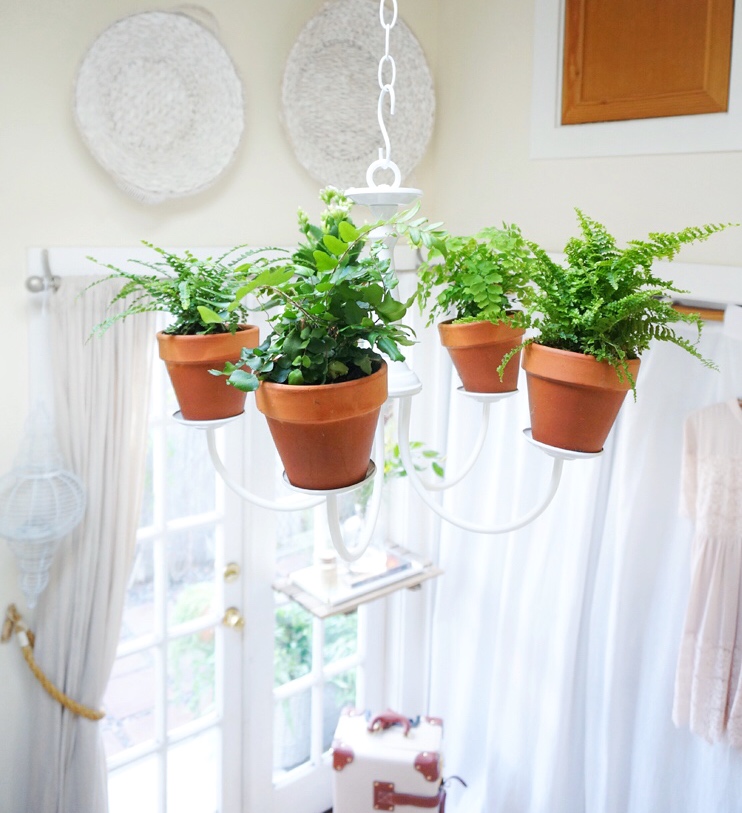
I got the smallest chandelier I could find and made sure that the lightbulb holders were still large enough for a standard small pot. I clipped all the electrical components off the fixture with garden clippers, leaving me with the perfect platform on which to put the pots.
I debated between white or clay pots. I ultimately chose terracotta, which corresponds with the color of the built-ins. We suspended the fixture from the interior wall of the skylight, and voila! We love it.

I was tempted to get succulents (I mean, look at those colors!). But in a tiny space like ours, I generally opt for simpler palettes to help the room feel uncluttered. But to each his/her own! There are endless beautiful options...